

Automatic Gain Control
Introduction
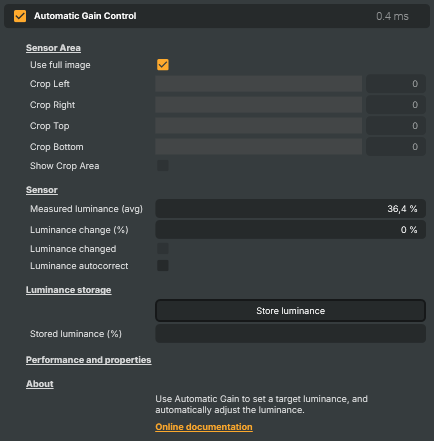
The Automatic Gain Control operator watches the brightness of a chosen area of the picture, compares it against a stored reference, and — if you ask it to — nudges the image back toward that reference. It is a one-knob fix for exposure that drifts: cameras whose auto-iris hunts in mixed lighting, keys that lose their punch as the sun moves across a studio window, ambient feeds that gradually darken across an afternoon, signage that must hold a consistent on-screen brightness regardless of the input.
The workflow is always the same three steps. Position the sensor area so it covers the part of the frame whose brightness you actually care about. Store a reference luminance when the scene looks correctly exposed. Then either leave the operator in report-only mode — surfacing the live measurement and a "changed" flag for scripts and connectors to react to — or switch on Luminance autocorrect and let it hold the image steady on its own.
How it works
Every frame, the operator averages the brightness of every pixel inside the sensor rectangle. That single number is exposed three ways:
- Measured luminance (avg) — the live reading, as a percentage. 100 % is pure white, 0 % pure black.
- Luminance change (%) — the current measurement minus the stored reference. Negative means the scene is darker than when you stored the reference; positive means brighter.
- Luminance changed — a boolean that flips true the moment the live measurement diverges from the stored value. Drive it from a Connector to light up a UI indicator, or read it from a script to log alerts when a feed dips or spikes.
When Luminance autocorrect is on, the operator uses the same change value to apply a brightness offset to the picture, pulling the output back toward the stored reference. Turn it off when the Show Crop Area overlay is showing — autocorrect is suppressed in that mode so you can configure the sensor without the picture jumping around underneath you.
Sensor area
Two ways to tell the operator where to look:
- Use full image — average over every pixel in the frame. The right choice when overall scene brightness is what you want to stabilise.
- Crop Left / Right / Top / Bottom — restrict the sensor to a rectangle. Use this when only one region should drive the gain. Common examples: a presenter's face but not the LED wall behind them; the sky in a wide outdoor shot; a product on a turntable but not the studio floor. The crop sliders are locked while Use full image is on, and unlocked the moment you switch it off.
Show Crop Area overlays the configured rectangle on the output so you can confirm the sensor is where you think it is. Turn it on while positioning, then off before going live — autocorrect won't run while the overlay is visible.
Storing a reference
The reference luminance is the target the operator pulls toward. Store luminance captures the current measurement and freezes it as that target. Run it when the scene is correctly exposed and lit the way you want it; the value persists with the project. Re-store after changing the sensor area, since a new region will almost certainly read a different average.
Stored luminance (%) is the captured value, displayed for reference. Until something has been stored the operator runs in pure measurement mode — no autocorrect, no "changed" flag.
Two modes of use
Report-only. Leave Luminance autocorrect off. The operator becomes a passive exposure meter: it never touches the picture, just surfaces Measured luminance, Luminance change, and Luminance changed. Script against those values to log drift, switch to a backup source when a feed darkens, page an operator when an outdoor camera loses sun, or feed the readings to a dashboard.
Autocorrect. Turn Luminance autocorrect on. The operator continuously applies a brightness offset to keep the sensor area at the stored reference. Best used when the upstream source drifts slowly — a long-running outdoor feed, a venue whose lighting changes through the show, a camera whose auto-iris hunts on a busy scene. Less appropriate when the brightness changes are intentional (a deliberate fade, a planned cut to a dark interior), because the operator will try to undo them.
Common use cases
- Long-running outdoor cameras — store a reference at the start of the broadcast, switch on autocorrect, and the picture stays at the same apparent exposure even as the sun moves across the sky.
- Keeping a key consistent — point the sensor at the presenter's face, store the reference during rehearsal, and the foreground luminance holds steady even when studio lights are tweaked between segments.
- Stabilising a hunting auto-iris — a camera that bounces a stop or two as people move through the frame can be calmed by autocorrect pulling the output back to a stored mid-grey.
- Signage / ambient feeds — hold a target on-screen brightness on a wall-mounted display so the picture doesn't fade with the source's quirks.
- Feed-drop alerts — leave autocorrect off and watch the Luminance changed boolean from a script; a sustained negative Luminance change is an early sign that a feed has gone dark or dropped to black.
- Exposure-matched cuts — store the same reference on multiple sources to keep cut-to-cut brightness consistent between cameras that don't quite agree on what "neutral" looks like.
Diagnostic readouts
The Performance and properties section surfaces two debug values useful when checking that the sensor is doing what you expect: Pixel Count is the number of pixels included in the most recent measurement (changes whenever you resize the crop or the input resolution shifts), and Luminance Sum is the raw sum of those pixels' brightness before averaging. They are mostly relevant when calibrating or troubleshooting unusual readings.
Automatic Gain Control - Settings
Sensor Area
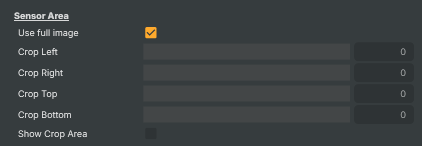
Sensor Area — defines the rectangular region of the frame whose brightness will be measured.
| Property | Description |
|---|---|
Use full image |
When on, brightness is measured across the entire image; when off, the crop region defines the sensor area. On is the right choice when overall scene brightness matters. Off is better when only a specific area should drive the gain — e.g. the presenter's face but not the screen behind them. Turning this on locks the crop sliders. |
Crop Left |
Pixels to skip from the left edge before sampling. [min=0, max=4096, default=0]. 0 starts the sensor area at the very left edge. Increase to exclude an area on the left (e.g. a fixed graphic). Only active when UseFullScreen is off. |
Crop Right |
Pixels to skip from the right edge before sampling. [min=0, max=4096, default=0]. 0 ends the sensor area at the very right edge. Increase to exclude an area on the right. Only active when UseFullScreen is off. |
Crop Top |
Pixels to skip from the top edge before sampling. [min=0, max=4096, default=0]. 0 starts the sensor area at the very top edge. Increase to exclude an area at the top (e.g. a banner or scoreboard). Only active when UseFullScreen is off. |
Crop Bottom |
Pixels to skip from the bottom edge before sampling. [min=0, max=4096, default=0]. 0 ends the sensor area at the very bottom edge. Increase to exclude an area at the bottom (e.g. a lower-third or ticker). Only active when UseFullScreen is off. |
Show Crop Area |
When on, overlays the configured sensor rectangle on the output for visual setup; off for normal operation. Use this while positioning the crop sliders to confirm the sensor area is on the right part of the image. Turn it off before going on-air — autocorrect is disabled while the overlay is visible. |
Sensor
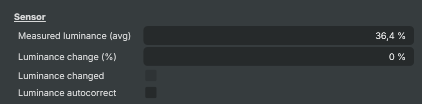
Sensor — live readouts of measured brightness and the autocorrect toggle.
| Property | Description |
|---|---|
Measured luminance (avg) |
Current average brightness inside the sensor area, formatted as a percentage (read-only). |
Luminance change (%) |
Difference between the current measured luminance and the stored reference, as a percentage (read-only). 0 means the brightness is at or near the stored reference. Negative values mean the scene is darker than the reference; positive values mean it is brighter. |
Luminance changed |
True when the measured luminance differs from the stored reference (read-only). Useful as a trigger for scripts that should react to exposure drifts — e.g. logging an alert or activating a backup feed. Becomes false again when the values match. |
Luminance autocorrect |
When on, automatically nudges image brightness to match the stored reference luminance. Off by default — turn on once a stored reference is set and the sensor area is positioned. Has no effect while ShowCropArea is on. Useful for keeping a feed visually consistent when the source slowly drifts in exposure. |
Luminance storage
Luminance storage — capture and display the reference brightness used by autocorrect.

| Property | Description |
|---|---|
Store luminance |
Capture the current measured luminance and store it as the reference for autocorrect. Run when the scene looks correctly exposed; the stored value becomes the target that autocorrect will pull the image back towards. Re-run after changing the sensor area. |
Stored luminance (%) |
The reference luminance value captured by Store luminance, formatted as a percentage (read-only). |
Inherits from: AbstractOperator, AbstractAudioMetering.
See also: Automatic Gain Control in Script Engine Objects.
Related components
Composer's Color Correction family contains nine operators that work on the colour of the image. Each takes a different approach — picking the right combination is part of the grading workflow, and the operators are designed to be stacked. The other Color Correction operators are:
- Color Adjust — general-purpose colour correction with gain/gamma/lift, HSV adjustments, per-channel RGBA, and clipping in one operator. The fastest way to match cameras, tame highlights, or lift crushed blacks.
- Color Curves — master and per-channel (R/G/B/A) curve editor with an automatic grey-card camera-calibration workflow. The right choice when you need precise control over a specific tonal range.
- Color Shift — three-zone colour balance (shadows / midtones / highlights) along Cyan/Red, Magenta/Green, Yellow/Blue. Build cinematic teal-and-orange looks or fix mixed-lighting casts that hit shadows and highlights differently.
- Grading LUT — applies a pre-baked Hald CLUT image to drop a finished colour grade onto a feed in a single step. The fastest way to deploy a house style across many compositions.
- HSV Correct — per-hue curves for hue, saturation and luminance. Boost just the blues in a sky, lift skin tones without touching the background, desaturate one specific colour family.
- Hue Shift — selects a hue band by centre, tolerance and softness, then shifts its hue, saturation or luminance independently. The tool for recolouring a specific object without affecting the rest of the image.
- Vibrance — boosts the colourfulness of muted tones while protecting already-saturated colours and skin tones. Make landscapes pop without making faces look orange.
- White Balance — corrects colour temperature (cool/warm) and tint (green/magenta) with presets for daylight, tungsten, fluorescent, and shade lighting.