

Grading LUT
Introduction
The Grading LUT operator applies a pre-baked colour grade to a layer. Point it at a 4096×4096, 24-bit RGB PNG look-up table — a single image that contains the full mapping from every input colour to every output colour — and every pixel passing through the operator is remapped accordingly. A LUT is the simplest way to drop a complete, finished colour treatment onto a feed: the creative work happens once, in your colourist's tool of choice, and Composer just plays it back at full broadcast frame rates on the GPU.
Use it to lock a whole project to a shared house style, paste a film-emulation look across multiple cameras for cut-to-cut consistency, audition a third-party LUT pack supplied by a colourist, or A/B between graded and ungraded versions of a feed without touching individual colour-correction controls.
How it works
A LUT (look-up table) is just a giant pre-computed table that says "input colour X becomes output colour Y." Composer expects this table stored as a Hald CLUT — a layout that packs the entire colour mapping into a regular PNG image so it can be stored, edited, and shared like any other file.
The trick is dimensions. Every 8-bit RGB colour can take one of 256 values per channel, which means there are 256 × 256 × 256 = 16,777,216 possible input colours. A 4096×4096 image contains exactly that many pixels (4096 × 4096 = 16,777,216). So a Hald CLUT puts one pixel per possible input colour, in a defined order: the pixel's position in the image encodes the input colour the operator might see, and the RGB value stored at that pixel is the output colour to produce in its place. The PNG must be 24-bit (8 bits per channel, no alpha) for the maths to line up.
An identity Hald CLUT is one where each pixel's stored RGB value equals the colour its position represents — so every colour maps to itself, and applying the LUT does nothing. That's the starting point for building your own grade: take the identity image, apply colour adjustments to it in your grading tool of choice, and the resulting image is a complete LUT that bakes in every adjustment you made. Most grading tools (DaVinci Resolve, Photoshop, dedicated LUT generators) can export to this format directly, and most "LUT packs" sold or shared online ship a Hald variant alongside the more familiar .cube files. A step-by-step Photoshop walk-through using the bundled identity template is at the bottom of this page.
Every frame, the operator looks up each pixel's input colour in that table and replaces it with the corresponding output colour. Because the lookup is a flat memory read on the GPU, the cost is the same regardless of how dramatic the grade is — a subtle Rec.709 tweak and a heavy bleach-bypass film emulation take exactly the same time to render.
Configuration
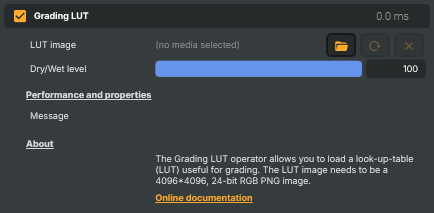
- LUT image — path to the 4096×4096 24-bit RGB PNG. Relative paths are resolved against the project's media folder, so you can ship the LUT inside the project bundle and the operator will find it on any machine. If the file is missing, the wrong size, or not a 24-bit RGB PNG, the operator falls back to passing the image through unchanged and surfaces the reason in the Message field.
- Dry/Wet level — the blend, in percent, between the unmodified source (0 = dry) and the fully graded output (100 = wet). Default is 100. Drop it to 50 to halve the strength of an aggressive grade. Animate it from 0 to 100 to fade a look in over the course of a transition, or hold it at intermediate values to soften a LUT that's a bit too forceful for the material.
Loading status
The Message field in Performance and properties is the place to look when something doesn't behave:
Loaded LUT successfully: …— file was found, decoded, and uploaded to the GPU. The grade is live.Could not locate LUT image: …— the path doesn't resolve. Check that the file exists, that the relative path is correct against the project's media folder, and that the project bundle includes the LUT if it's being moved between machines.Could not open still image file: … image was wrong format— the file was found but isn't a 4096×4096, 24-bit RGB PNG. Re-export from your grading tool with those exact settings. 8-bit-per-channel RGB; no alpha; no 16-bit; no JPEG.
While a LUT is reloading, the operator stays on the previously loaded one — no flicker to bypass mid-show.
Common use cases
- House style across a project — point every camera layer at the same LUT so the whole show looks like it was shot through one camera, regardless of which cameras actually filmed it.
- Film-emulation looks — drop in a Kodak/Fuji/Arri emulation LUT to give a clean digital feed a filmic feel, then dial in with Dry/Wet until it sits right without crushing the picture.
- Third-party LUT packs — quickly audition a colourist's LUT pack by swapping the LUT image path; keep the wet level at 100 to see each look as the colourist intended.
- Graded vs ungraded A/B — animate Dry/Wet from 100 to 0 and back to flip between the graded version and the source. Useful when reviewing with a director, or when an operator needs to verify what's on the LUT vs what's coming in.
- Soft creative passes — set Dry/Wet to a low value (10–30) and use a strong LUT as a gentle tint rather than a full grade — a quick way to give a feed mood without designing a colour-correction stack from scratch.
- Transition into a graded look — keyframe Dry/Wet from 0 to 100 over a few seconds at the top of a show so the picture eases into its on-air look rather than slamming straight to graded.
Notes on positioning the operator
A LUT is a finishing touch and should sit late in the operator chain — after any per-feed colour correction, keying, and image fixes. The job of a LUT is to apply a final, top-coat creative look; everything underneath should already be in a clean, neutral state. If a LUT is fighting with an earlier colour-correction operator, the symptom is usually crushed blacks or clipped whites that no amount of dry/wet adjustment can recover — move the LUT later in the chain (or move the corrections earlier) and the picture will hold together again.
Grading LUT - Settings

| Property | Description |
|---|---|
LUT image |
Path to the LUT image file. The file must be a 4096×4096, 24-bit RGB PNG. Set to a valid file path/URL to apply the grade. Files are searched relative to the project's media folder if a relative path is given. Loading failures are reported in the status AssetLoadingMessage. |
Dry/Wet level |
Blend amount between the original image (dry) and the LUT-graded image (wet), in percent. [min=0, max=100, default=100]. 0 shows the unmodified source. 100 shows the fully graded image. Use intermediate values to soften the strength of an aggressive grade, or animate this value to fade a LUT in and out smoothly during a transition. |
Performance and properties
Performance and properties — status messages about LUT loading.

| Property | Description |
|---|---|
Message |
Latest LUT loading status message with timestamp (read-only). Reports successful loads, missing files, format mismatches, and other errors. |
Inherits from: AbstractOperator, AbstractAudioMetering.
See also: Grading LUT in Script Engine Objects.
Tutorials
A ready-made example project demonstrates the Grading LUT operator in context:
- LUT Demo — uses the Grading LUT operator to apply a look-and-feel to a piece of source content. A good first stop if you want to see the operator working on real video before building your own grade.
Tutorials are downloaded on demand from RealSprint via Tutorials → Download tutorials… in Composer Desktop; the full catalogue with thumbnails and minimum-version requirements lives on the Tutorials page.
One LUT instead of a stack of operators
A LUT can carry the work of several colour operators in a single file. The picture you'd otherwise build by stacking Color Curves, Vibrance, hue/saturation tweaks, and per-channel adjustments can be flattened into one Hald CLUT image, exported once, and dropped on every layer that needs the look. The advantages are:
- A consistent aesthetic across the project. One file is the single source of truth for the grade; if every layer references the same LUT, every layer looks the same.
- A faster grading workflow. The creative work happens once, in a grading tool you already know, instead of having to recreate (and keep in sync) a stack of operator settings on every layer.
- A reusable starting point for a personal style. Once you've baked a look you like into a LUT, it becomes a building block you can reuse on the next project, the next show, or share with another operator.
Creating your own LUT in Photoshop
Composer ships a Hald CLUT template you can grade in Photoshop and then export back out. The template installs to the Composer Media\Images folder alongside the other sample media — on a default Windows install that's:
C:\Program Files\RealSprint AB\Vindral Composer\Media\Images\
Two files are placed there:
Lut 4096_4096 Sample.psd— the Photoshop template. Open this one when building a new LUT.Lut 4096_4096 Sample 24-bit.png— the same identity LUT already exported in the format Composer expects. Load it straight into the operator to confirm everything is wired correctly (the picture will pass through unchanged), or use it as a starting point in any non-Photoshop colour tool.
The workflow is:
- Open a reference image in Photoshop — a still frame from the source you're trying to grade, or a representative shot from your project.
- Apply adjustment layers until the reference looks the way you want it on-air. Curves, Color Balance, Vibrance, Hue/Saturation, and Selective Color all work; any adjustment that maps colour to colour will bake correctly. Avoid anything spatial (blur, sharpen, vignette, masks) — a LUT is a pure per-pixel mapping and can't carry location-dependent effects.
- Open
Lut 4096_4096 Sample.psdand copy the same adjustment layers onto it, in the same order, with the same settings. The template is the identity LUT — applying your adjustments to it bakes the entire grade into a single image. - Flatten and export as a 4096×4096, 24-bit RGB PNG. No alpha, no 16-bit, no JPEG — those will be rejected at load time with a wrong format message.
- Point the Grading LUT operator at the new PNG and use Dry/Wet level to dial the intensity if the baked grade lands stronger than you wanted on the live source.
The same approach works in DaVinci Resolve, Affinity Photo, or any other tool that can apply a colour transform to an arbitrary image — the only requirements are that the output is the exact pixel dimensions and bit depth above, and that the grade is built up from purely colour-to-colour operations.
Related components
Composer's Color Correction family contains nine operators that work on the colour of the image. Each takes a different approach — picking the right combination is part of the grading workflow, and the operators are designed to be stacked. The other Color Correction operators are:
- Automatic Gain Control — measures average brightness in a sensor area and optionally nudges the picture back to a stored reference luminance. Good for stabilising drifting exposure on long-running feeds.
- Color Adjust — general-purpose colour correction with gain/gamma/lift, HSV adjustments, per-channel RGBA, and clipping in one operator. The fastest way to match cameras, tame highlights, or lift crushed blacks.
- Color Curves — master and per-channel (R/G/B/A) curve editor with an automatic grey-card camera-calibration workflow. The right choice when you need precise control over a specific tonal range.
- Color Shift — three-zone colour balance (shadows / midtones / highlights) along Cyan/Red, Magenta/Green, Yellow/Blue. Build cinematic teal-and-orange looks or fix mixed-lighting casts that hit shadows and highlights differently.
- HSV Correct — per-hue curves for hue, saturation and luminance. Boost just the blues in a sky, lift skin tones without touching the background, desaturate one specific colour family.
- Hue Shift — selects a hue band by centre, tolerance and softness, then shifts its hue, saturation or luminance independently. The tool for recolouring a specific object without affecting the rest of the image.
- Vibrance — boosts the colourfulness of muted tones while protecting already-saturated colours and skin tones. Make landscapes pop without making faces look orange.
- White Balance — corrects colour temperature (cool/warm) and tint (green/magenta) with presets for daylight, tungsten, fluorescent, and shade lighting.