

HSV Correct
Introduction
The HSV Correct operator lets you remap hue, saturation and luminance independently across the whole colour wheel by drawing a curve against hue. Instead of selecting one colour band and transforming it, you sculpt a per-hue response: boost the blues while leaving the reds alone, lift the brightness of skin tones without touching the background, or drain saturation from one specific colour family while pushing another.
It's the operator to reach for when a single pass needs several independent, colour-specific adjustments at once. Where Hue Shift works on one band at a time, HSV Correct gives you a continuous curve across every hue, so multiple corrections coexist in the same operator.
The curves editor
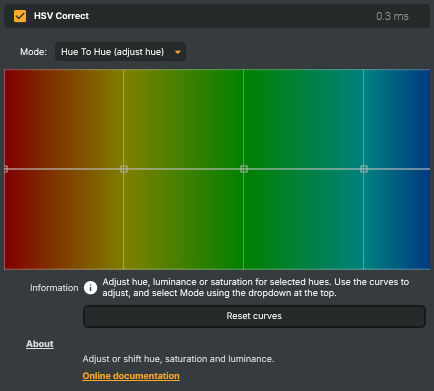
The heart of the operator is the curve editor in the centre of the panel. It maps hue along the horizontal axis — running around the full colour wheel from red, through yellow, green, cyan, blue and magenta, back to red — against an adjustment amount on the vertical axis, ranging from -100 at the bottom to +100 at the top. A flat line through the middle (0) means "no change" — that's the default for all three curves.
To make an adjustment, drag points on the curve up or down at the hue you want to affect. Lift the curve over the blues and the blues are pushed up; pull it down over the reds and the reds are pulled back. Because it's a curve rather than a slider, the effect eases smoothly between hues, so neighbouring colours blend naturally instead of showing a hard boundary.
The Mode selector
A single curve editor is shared between three separate adjustments, and the Mode dropdown at the top of the panel chooses which one you're currently drawing on:
- Hue To Hue (adjust hue) — the curve rotates the selected hues around the colour wheel. Raising the curve over a hue shifts those colours towards the next family; lowering it shifts them the other way. Use it to nudge or swap colours — warm up greens, push blues towards cyan.
- Hue To Saturation (adjust saturation) — the curve changes how saturated each hue is. Lift it to intensify a colour family, drop it to drain colour from one. Set a hue to the bottom of the range to fully desaturate just that colour while everything else stays untouched.
- Hue To Luminance (adjust luminance) — the curve changes the brightness of each hue. Lift the blues to brighten a sky, darken the reds for a moodier look — all keyed to colour rather than to overall exposure.
Switching Mode only changes which curve is shown and editable — it is not a one-of-three choice. All three curves are always live and applied together, so a finished correction might rotate the greens, lift saturation on the blues, and darken the reds simultaneously. Switch between the three modes to set each part of the look; the panel only ever displays one curve at a time to keep the editor readable.
The on-screen Information note repeats this reminder: draw on the curve, and pick what the curve controls using the Mode dropdown at the top.
How to set it up
- Pick what you want to change — colour, saturation or brightness — and select the matching Mode.
- Find the hue to target on the horizontal axis (red on the left, working around through green and blue to red again on the right).
- Drag the curve up or down at that hue until the colour responds the way you want. Neighbouring points ease the change in smoothly.
- Switch Mode and repeat for any other adjustments — they all stack into the same operator pass.
- Use Reset curves to flatten all three curves back to
0and start over.
Common use cases
- Boosting one colour family — in Hue To Saturation mode, lift the curve over the blues or greens to make skies and foliage pop without over-saturating skin tones.
- Recolouring across the wheel — in Hue To Hue mode, rotate selected hues to shift a whole palette while keeping the transition between colours smooth.
- Protecting or lifting skin tones — in Hue To Luminance mode, raise the orange/red region a touch to brighten faces without lifting the rest of the frame.
- Selective desaturation — drop the saturation curve to the floor over a single distracting colour to mute it while leaving every other colour intact.
- Stacked corrections — combine all three modes in one operator for a complete per-hue grade, or stack HSV Correct with Hue Shift when a single band needs extra-precise treatment.
HSV Correct - Settings
| Property | Description |
|---|---|
Reset curves |
Reset all settings to their defaults (Hue, Saturation and Luminance curves all flat at 0). |
Inherits from: AbstractOperator, AbstractAudioMetering.
See also: HSV Correct in Script Engine Objects.
Related components
Composer's Color Correction family contains nine operators that work on the colour of the image. Each takes a different approach — picking the right combination is part of the grading workflow, and the operators are designed to be stacked. The other Color Correction operators are:
- Automatic Gain Control — measures average brightness in a sensor area and optionally nudges the picture back to a stored reference luminance. Good for stabilising drifting exposure on long-running feeds.
- Color Adjust — general-purpose colour correction with gain/gamma/lift, HSV adjustments, per-channel RGBA, and clipping in one operator. The fastest way to match cameras, tame highlights, or lift crushed blacks.
- Color Curves — master and per-channel (R/G/B/A) curve editor with an automatic grey-card camera-calibration workflow. The right choice when you need precise control over a specific tonal range.
- Color Shift — three-zone colour balance (shadows / midtones / highlights) along Cyan/Red, Magenta/Green, Yellow/Blue. Build cinematic teal-and-orange looks or fix mixed-lighting casts that hit shadows and highlights differently.
- Grading LUT — applies a pre-baked Hald CLUT image to drop a finished colour grade onto a feed in a single step. The fastest way to deploy a house style across many compositions.
- Hue Shift — selects a hue band by centre, tolerance and softness, then shifts its hue, saturation or luminance independently. The tool for recolouring a specific object without affecting the rest of the image.
- Vibrance — boosts the colourfulness of muted tones while protecting already-saturated colours and skin tones. Make landscapes pop without making faces look orange.
- White Balance — corrects colour temperature (cool/warm) and tint (green/magenta) with presets for daylight, tungsten, fluorescent, and shade lighting.