

Connectors
The Connectors feature is one of Composer's most powerful tools. It lets you create custom sequences of actions based on Commands that can be triggered from external systems through Composer's built-in HTTP API. That means another system — a game server, community platform, or backend service — can control what happens inside Composer.
Connectors can change or animate any property and trigger commands such as play, stop, or connect on any object within Composer. This includes inputs, scenes, layers, operators, and targets — essentially anything you can control manually in Composer can also be controlled by a Connector.
Example use cases:
- Change the active scene or switch cameras.
- Start or stop an animation or media clip.
- Show or hide visual layers.
- Change audio sources or trigger sound effects.
- And much more.
Tip
Think of a Connector as a macro or preset — it runs one or more predefined actions automatically so you don't have to do them manually every time.
Integration overview
Composer offers several ways to integrate with external systems — the HTTP API, Connectors, Batch Processor, and the Script Engine. Each tool has its own strengths; combining them is often the right answer.
Difference between the regular API and Connectors
A regular API call performs a single, predefined Composer function — such as retrieving information or starting playback. A Connector executes a custom sequence of actions that you define, in the order and with the behaviour you specify.
Each Connector can contain one or more API Commands, where each command performs a specific action (for example, setting a property or triggering an event). When a Connector is triggered, all its API Commands are executed (unless disabled).
You can also configure how Composer handles multiple Connector triggers — for example, whether it should show a warning or prevent a new Connector from running while another is active. Those options live in the Web API tab in Settings.
Activate Web API
Before using Connectors externally, make sure Composer is configured to receive API requests:
- From the main menu, choose Edit → Settings → Web API.
- Enable Enable Web API.
- Select a port number; the default is
44433.
Once enabled, Composer starts listening for incoming HTTP requests from other systems. For more configuration details, see the Web API tab in Settings.
Note — Core licence limitations
A Vindral Composer Core (free) licence imposes two restrictions that affect Connectors:
- A project can contain at most 2 Connectors. Trying to add a third — from the UI, the HTTP API, or by loading a project file — is refused with a clear message.
- The HTTP API is disabled on Core, so Connectors cannot be triggered over HTTP. The Script Engine remains fully available, but its
Project.TriggerConnectorByName()helper routes through that same local HTTP endpoint — so it cannot fire a Connector on Core either, and returnsfalse. To run a Connector on Core, use its Test Connector (Invoke) button in the Connectors panel, or upgrade the licence.See Activating a license for the full Core-licence restrictions table and upgrade options.
Calling a Connector — quick overview
There are two simple ways to call a Connector — by its Name or by its Value:
http://YOURIP:PORT/api/connector/trigger?name=MyConnectorName
http://YOURIP:PORT/api/connector/trigger?value=MyConnectorValue
Note
Calling a Connector that does not exist yields an error in the log.
For richer examples, see Example Connector setup below.
Managing Connectors
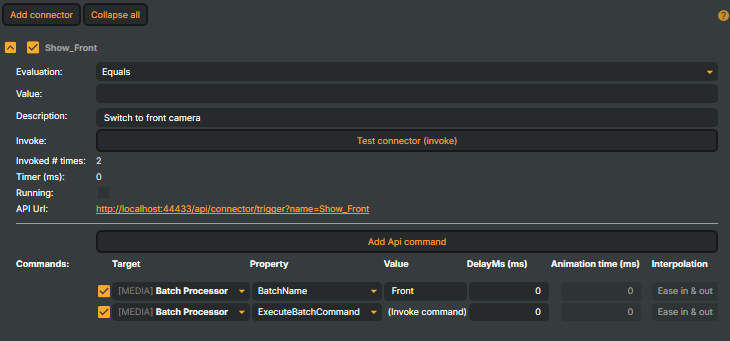
You can add, organise, or remove Connectors directly from the Connectors tab.
- Add a new Connector — click
Add Connectorto create a new entry. - Collapse all Connectors — click the collapse button next to the Connector name to minimise the selected Connector.
- Delete a Connector — select the Connector and press
Delete, or right-click and chooseDeletefrom the context menu. - Clone a Connector — right-click and choose
Cloneto create an exact copy, including all API Commands and settings. - Reorder Connectors — drag and drop Connectors to change their order in the list.
Connector options
Each Connector includes several key properties that define how it behaves and how it can be triggered.
Name— the name of the Connector (e.g.MyConnectorName). Double-click the name field to rename.Evaluation— defines how the Connector's Value is compared when triggered. Options:Contains,ContainsNot,Equals(default),EqualsNot.Note
Evaluation only applies to Connectors triggered by Value. Connectors triggered by Name are always treated as
Equals.Value— the key value used to trigger this Connector when calling it by Value via the API.Description— optional free-text notes about this Connector. A multi-line field for documenting what the Connector does, who triggers it, or any other context useful to the next person opening the project. Has no effect on Connector behaviour — it's purely a project-author note.Invoke— the Test Connector (Invoke) button manually triggers all API Commands assigned to the Connector. Useful for testing and verifying behaviour from inside Composer.Invoked # times— how many times the Connector has been triggered.Timer (ms)— the total execution time, in milliseconds, for the Connector to complete all assigned commands.Running— whether the Connector is currently active (executing commands).API Url— the API endpoint used to execute this Connector. Clicking the URL opens the default web browser and invokes the Connector.Add API Command— opens the API Command window to add a new command to this Connector.
See Command options below for the per-command properties.
Adding commands (actions) to a Connector
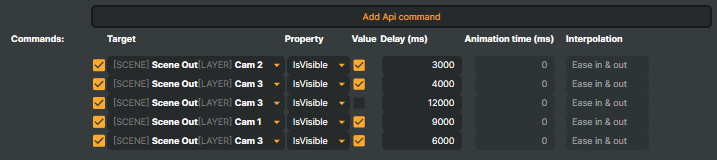
- Add a Command — click
Add API Commandto open the API Command window (see below). - Remove a Command — right-click an existing command and select
Remove API Command. - Duplicate a Command — right-click an existing command and select
Duplicate API Command. - Reorder Commands — drag and drop commands to change their execution order.
Tip
Hold
Altwhile dragging a command to copy it to another Connector instead of moving it.
API Command window — selecting a target component
When adding a new API Command to a Connector, the API Command window helps you locate and select the correct component from the project. It provides browsing tools that scale to large or complex projects.
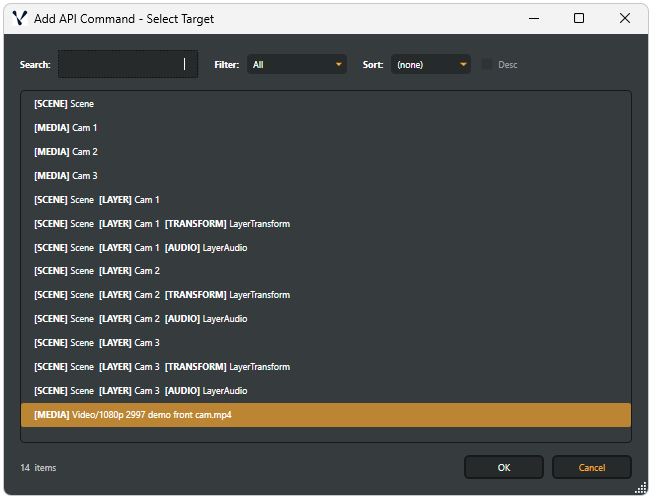
Search
The Search field finds components by name. It works across every component type — inputs, targets, operators, scenes — and is case-insensitive, updating the result list as you type. Fastest way to locate a specific component if you already know its name.
Filter
The Filter option limits which types of components are shown:
All— every component in the project (default).InputsLayersTransformAudioOperatorsTargetsScenes
Use filters to reduce visual clutter and focus on relevant component types.
Sort
The Sort option controls how the displayed components are ordered:
None— uses the default project order.Name— sorts components alphabetically.Type— groups components by their type.
Sorting is especially useful in projects with many similarly-named components.
Confirming selection
Select the desired component from the list, click OK, and the selected component is added as a new API Command in the Connector. From there, configure the Command's Property, Value, Delay, Animation Time, and other options.
Command options
A Connector is made up of one or more API Commands, where each command defines a specific action — such as setting a property value or executing a function. When a Connector is started (also called triggered or invoked), all enabled API Commands within it are executed in sequence. Disabled commands are skipped.

Each API Command exposes:
Commands— toggles the Command on or off. Disabled commands are ignored when the Connector is triggered.Target— the object in Composer that the Command affects.Property— which property of the target will be modified.Value— the new value to apply to the selected property.Delay— delay (in milliseconds) before the Command is executed.Animation Time— for properties that support animation, the animation duration in milliseconds.Interpolation— how the animated transition progresses over time.
An empty Connector (no API Commands) does not affect Composer.
Context menus
Composer provides context menus for both Connector Commands and Connectors to streamline workflow.
Connector Command context menu
Right-click any API Command (inside a Connector) for the following options:
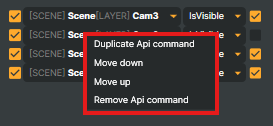
- Duplicate API Command — creates an identical copy of the selected API Command within the same Connector. Useful when you want a new command based on an existing one (changing only the target, property, or value) without configuring all the settings from scratch.
- Move down — moves the selected command down one step.
- Move up — moves the selected command up one step.
- Remove API Command — deletes the selected API Command from the Connector.
Connector context menu
Right-click a Connector in the Connectors list for:
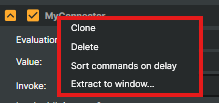
Clone — creates a complete duplicate of the selected Connector, including every API Command and setting. Useful when you have configured a complex Connector and want a similar one without rebuilding it manually.
Delete — removes the selected Connector entirely from the project. A confirmation prompt prevents accidental deletion.
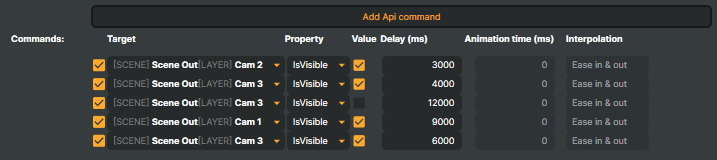
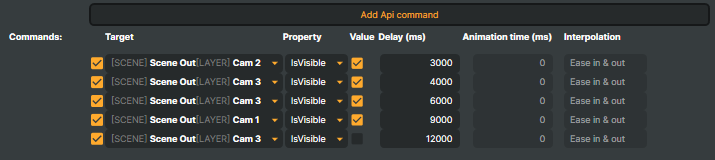
Sort Commands on Delay — sorts all API Commands within the Connector in ascending order based on their
Delayvalues, keeping the command list organised so the execution order visually matches the timing sequence.Example before sorting:
Example after sorting:
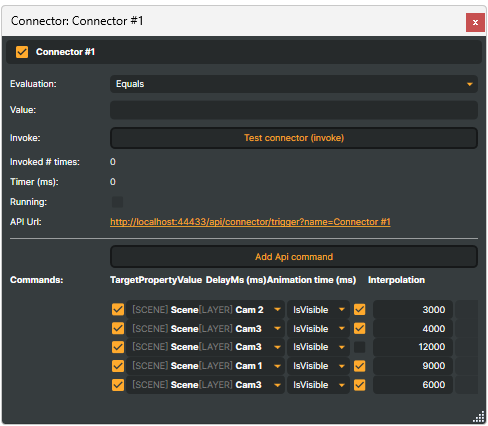
Extract To Window — moves the selected Connector into its own separate, floating window outside the main Composer interface.
Tip
Extracting the window is useful when you want persistent access to a Connector's settings or controls while working elsewhere in Composer — editing scenes, layers, operators, or targets. The extracted window remains visible and usable independently of the main UI, improving workflow efficiency on multi-monitor setups. The Connector continues to function normally and remains part of the project; only its UI is detached from the main window.
Removing a Connector
Two ways to remove a Connector:
- Click the Connector you want to remove and press
Deleteon your keyboard. - Right-click and choose
Deletefrom the context menu.
A confirmation message appears:
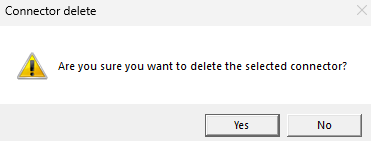
Click Yes to confirm.
Example Connector setup
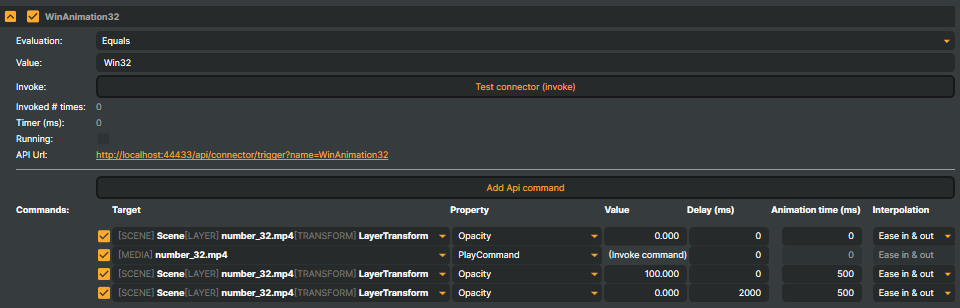
In the example above, using Name, the Connector listens for API calls with name=WinAnimation32:
http://YOURIP:PORT/api/connector/trigger?name=WinAnimation32
Using Value, the Connector listens for API calls with value=win32 (with Evaluation set to Equals):
http://YOURIP:PORT/api/connector/trigger?value=win32
Reminder
Evaluation only applies to Connectors triggered by Value. Connectors triggered by Name are always treated as
Equals.
When this Connector is triggered, the following four commands execute in sequence:
- Set the opacity of the scene layer
number_32.mp4to 0. This ensures the layer is fully transparent before starting the animation sequence. - Start playback of the media file
number_32.mp4. - Animate the opacity from
0to100over a duration of500 ms, using the Ease In & Out interpolation method. - After a 2000 ms delay, animate the opacity from
100back to0over500 ms, again using Ease In & Out interpolation.
Parameterized Connectors
Connectors can also use parameters — additional values passed through the API call to customise the Connector's behaviour. Parameters are especially useful for actions that require dynamic data — for example, sending cue points that include an eventId or other metadata.
These parameter values can be defined directly in the API call and then referenced inside the Connector's commands. This lets the same Connector perform different actions depending on the parameter values provided.
Parameter reference
To reference a parameter value inside an API Command, prefix the parameter name with @@. For instance, @@MyParameter inserts the value provided for MyParameter in the API call.
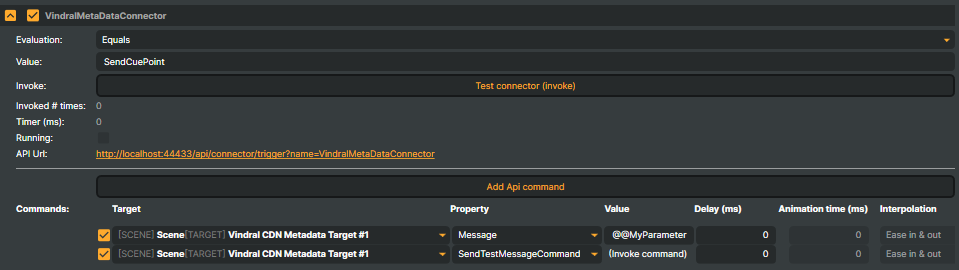
Example 1 — calling a Connector by Name, including a user-defined parameter (MyParameter):
http://[YOURIP:PORT]/api/connector/trigger?name=VindralMetaDataConnector&MyParameter=32
Example 2 — calling a Connector by Value, also using the same user-defined parameter:
http://[YOURIP:PORT]/api/connector/trigger?value=SendCuePoint&MyParameter=32
These examples pass the MyParameter value (32) as a message to the Vindral CDN Metadata Target, setting a cue point in the outgoing video stream.
Calling multiple Connectors in a single API call
You can trigger multiple Connectors at once with a single API call. List the Connector Names separated by + (URL-encoded as %2B):
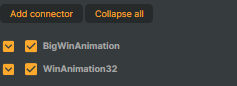
http://[YOURIP:PORT]/api/connector/trigger?name=BigWinAnimation%2BWinAnimation32
It's also possible to trigger multiple Connectors based on their Value property using the Evaluation options — Contains, ContainsNot, or EqualsNot. When a Connector's Value matches the evaluation condition, it triggers together with any other matching Connectors.
For example, the request below will trigger both Connectors with the values BigWin and Win32, since both contain the substring "Win" and the Evaluation is set to Contains.
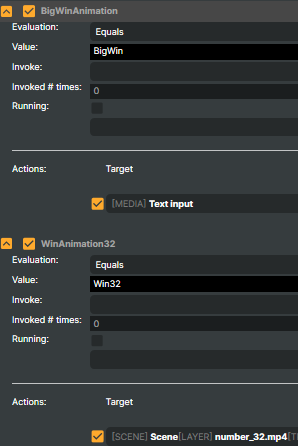
http://[YOURIP:PORT]/api/connector/trigger?value=Win
Execute Batches using Connectors
Connectors can also trigger Batches, giving you powerful control over your scenes — instantly showing, hiding, or soloing entire groups of layers that share the same batch name (overlays, cameras, graphics).
To use this feature, add a Batch Processor input to your project. The Batch Processor input acts as a bridge between Connectors and the Batch system, letting Connectors execute batch commands just like any other input or operator.
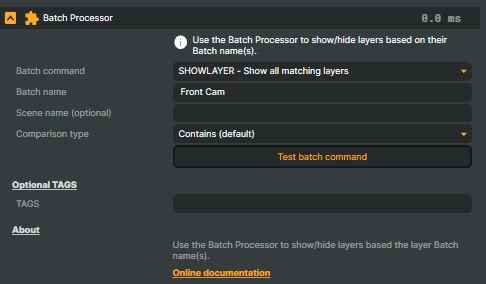
- Add a
Batch Processorinput to your project. - Tag your scene layers with batch names.
- Configure your Connector with Batch Processor commands.
Tip
For detailed setup steps and examples of using Connectors with Batches, see
Batch Processorin the Inputs manual.
Triggering a Connector from the Script Engine
A project script can fire a Connector by name with Project.TriggerConnectorByName() — the in-Composer equivalent of an external GET /api/connector/trigger?name=…:
Project.TriggerConnectorByName("MyConnectorName");
It returns true when the Connector exists and was queued, or false if the Connector can't be found or the Web API is disabled. Internally it issues a fire-and-forget HTTP request to the local connector trigger endpoint, which has two consequences:
- The Web API must be enabled — the call routes through the same HTTP endpoint external callers use.
- It is therefore not available on a Core licence, where the HTTP API is disabled (see the Core-licence note above). Use the Test Connector (Invoke) button to run a Connector on Core.
For the full picture — including the response contract a triggered Connector's script can return — see Connectors and the response contract in the Script Engine manual.
Using Script Engine with Connectors
This is the reverse of the section above: rather than a script triggering a Connector, here a Connector runs a script. Connectors can trigger custom JavaScript functions through Composer's built-in Script Engine. This makes it possible to execute dynamic logic — sending data, responding to state changes, performing conditional actions — whenever a Connector is invoked.
Function naming convention
When a Connector is triggered by Name, Composer automatically looks for a JavaScript function whose name is prefixed with OnConnector followed directly by the Connector's name.
Example 1 — if the Connector name is MyTestConnector, the corresponding function must be named OnConnectorMyTestConnector:
http://[YOURIP:PORT]/api/connector/trigger?name=MyTestConnector
function OnConnectorMyTestConnector()
{
    // Write message to the Composer log
    Logger.Debug("Hello World!");
}
Important
The function name must match exactly — it is case-sensitive and requires no spaces or separators between
OnConnectorand the Connector name.
Passing parameters to JavaScript
A Connector JavaScript function may optionally define one parameter. If a parameter is defined, all query parameters from the API call are passed to the function as a single argument. The argument is not automatically parsed — it's up to the script to interpret or extract the parameter values.
Example 2 — basic query parameters:
http://[YOURIP:PORT]/api/connector/trigger?name=MyTestConnector&winner=Alex&score=92&round=3
function OnConnectorMyTestConnector(parameters)
{
    Logger.Debug("Connector triggered. Raw parameters: " + parameters);

    // Remove leading '?' if present
    if (parameters.startsWith("?"))
        parameters = parameters.substring(1);

    // Parse query string manually
    var params = {};
    var pairs = parameters.split("&");

    for (var i = 0; i < pairs.length; i++) {
        var parts = pairs[i].split("=");
        var key = decodeURIComponent(parts[0]);
        var value = decodeURIComponent(parts[1] || "");
        params[key] = value;
    }

    // Access individual parameters
    Logger.Debug("Winner: " + params.winner + " | Score: " + params.score + " | Round: " + params.round);
}
Note
Composer only executes script functions when a Connector is triggered using the name selector. Using the value selector is not supported.
Example 3 — JSON payload. Sometimes you want to send more complex data (e.g. multiple related values) to a Connector in a single parameter. Encode a JSON object as a query-string value, then decode and parse it inside the JavaScript function:
my_payload={"winner": "Alex", "score": 92, "round": 3}
API request:
http://[YOURIP:PORT]/api/connector/trigger?name=MyTestConnector&my_payload=%7B%22winner%22%3A%22Alex%22%2C%22score%22%3A92%2C%22round%22%3A3%7D
Note
When sending JSON, make sure the payload is URL-encoded — otherwise special characters like
{,}, or"may cause parsing errors.
Script:
function OnConnectorMyTestConnector(parameters)
{
    Logger.Debug("Connector triggered. Raw parameters: " + parameters);

    // Remove leading '?' if present
    if (parameters.startsWith("?"))
        parameters = parameters.substring(1);

    // Parse query string manually
    var params = {};
    var pairs = parameters.split("&");

    for (var i = 0; i < pairs.length; i++) {
        var parts = pairs[i].split("=");
        var key = decodeURIComponent(parts[0]);
        var value = decodeURIComponent(parts[1] || "");
        params[key] = value;
    }

    // Parse payload into a JSON object
    const json = JSON.parse(params.my_payload);

    // Access individual parameters
    Logger.Debug("Winner: " + json.winner + " | Score: " + json.score + " | Round: " + json.round);
}