

Color Curves
Introduction
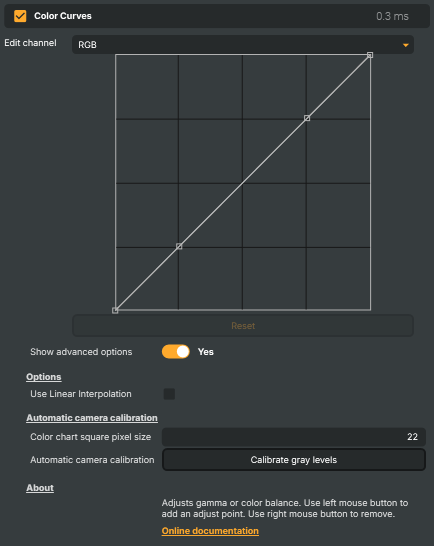
The Color Curves operator remaps the brightness of an incoming feed through one or more user-drawn curves. Each curve is a graph from input level (horizontal axis) to output level (vertical axis): lift the middle of the curve to brighten the mid-tones, pull it down to darken them, or shape its ends to crush blacks and roll off highlights. The result is the precision-tool answer to colour correction — a single instance can flatten gamma, lift crushed shadows, neutralise a per-channel tint, match cameras that don't quite agree on neutral, or build an S-curve for cinematic contrast, all without touching a generic slider.
Use it as the camera-calibration step that flattens a slightly tinted live source towards a neutral reference, as the creative grade that shapes the final on-air look, to recover detail at the extremes of the tonal range, or — through the alpha curve — to reshape a key signal.
How it works
Five independent curves live inside one operator: a master RGB curve that affects red, green and blue together, three per-channel curves (red, green, blue) that act on a single channel, and an alpha curve that reshapes the layer's transparency. They combine in series — the master sets overall contrast, and per-channel curves push casts on top of that — so it's normal to draw on the master plus one or two channels in the same instance.
Each curve is interpolated through its control points. Smooth (Lagrange) interpolation, the default, draws a curved line through every point and produces natural-looking grades. Linear interpolation draws straight line segments between points and is the right choice when you need hard transitions at specific tonal levels — strict posterised looks, or precise matching of a measured calibration sample. The choice is global, set by Use Linear Interpolation under Options.
The remap runs as a GPU look-up — each input level is mapped through the curve once per frame, then applied per pixel — so the cost is constant regardless of how aggressive or how subtle the curve shape is.
Automatic calibration
Show advanced options reveals an Automatic camera calibration section. With a six-square grey-scale reference chart in the frame and the six yellow preview markers positioned over its grey patches, pressing Calibrate gray levels samples each square and builds a master plus per-channel correction curve that flattens the camera response towards neutral grey. Color chart square pixel size controls how many pixels each marker averages — larger values are more stable when the chart fills the frame, smaller values are needed when the chart is small or the sample regions are tight.
The full step-by-step procedure, with images and the expected grey-level reference values, is described below in Camera calibration.
Common use cases
- Camera calibration against a grey-scale chart — flatten a tinted source towards neutral with the automatic calibration tool, then leave the resulting curves in place for the rest of the show.
- Cinematic contrast — drop a gentle S-curve on the master RGB curve to crush blacks slightly and roll off highlights, giving a flat live feed more on-air punch.
- Removing per-channel casts — lift the blue curve's shadows to take the chill out of an underlit scene, or pull the red curve's mid-tones down to neutralise a warm bias.
- Camera matching — when two cameras don't quite agree on neutral, draw curves on the second camera until its grey card reads the same as the first.
- Recovering crushed shadows or blown highlights — bend the bottom of the master curve up to lift detail out of black, or pull the top down to bring back an overexposed sky, before any keyer or compositing operator further down the chain has to deal with it.
- Alpha shaping — use the alpha curve to soften a hard-edge key signal, or to push a noisy alpha back to pure transparent or pure opaque at the extremes.
Notes on positioning the operator
Color Curves is typically one of the first operators on an incoming live feed, before any keyer, blur, or compositing step. Those downstream operators have a much easier job when the picture coming into them is already in a clean, neutral state.
It is common to use two instances in series: one near the top of the chain for camera calibration (flatten the source) and a second one further down for look and feel (apply the creative grade on top). Keeping the two roles in separate operators means a camera swap or a relighting between segments only forces a recalibration of the first instance — the creative grade in the second instance stays untouched.
Color Curves - Settings
| Property | Description |
|---|---|
Show advanced options |
Reveals the automatic camera calibration controls when on. Off by default to keep the UI uncluttered for everyday curve work. Turn on when using a grey-scale reference chart to build a correction curve automatically. |
Options
Options — global behaviour switches for how curves are interpolated.
| Property | Description |
|---|---|
Use Linear Interpolation |
When on, draws straight lines between curve points; when off, draws smooth (Lagrange) curves. Off (smooth) is the typical default for natural-looking grades. Turn on when you want hard transitions at specific tonal levels — e.g. a strict posterised look, or precise matching of a measured calibration sample. |
Automatic camera calibration
Automatic camera calibration — sample squares on a grey-scale reference chart and build a correction curve.
| Property | Description |
|---|---|
Color chart square pixel size |
(advanced) Edge length, in pixels, of each square sampled from the reference chart. [min=2, max=32, default=22]. Larger values average over more pixels, giving more stable readings — best when the chart fills a large portion of the frame. Smaller values are needed when the chart is small or the sample regions are tight; expect noisier results. |
Automatic camera calibration |
(advanced) Sample the configured grey-scale chart squares and build a correction curve automatically. Run this once a reference chart is visible in the source frame and the sample positions are aligned. Generates a master curve plus per-channel red/green/blue curves that flatten the camera response towards a neutral reference. |
Inherits from: AbstractOperator, AbstractAudioMetering.
See also: Color Curves in Script Engine Objects.
Camera calibration
Almost no camera is perfect, and almost no light setup or environment is colour-neutral. The camera output ends up slightly tinted — too red, too blue, too purple — but the eye adapts and white-balances the view automatically, so the cast is hard to spot by looking. A camera has no equivalent reflex, so the cast goes straight to air unless something corrects for it.
Camera setup, white balance and light setup are out of scope for this guide; what follows is the part Color Curves can automate.
What you'll need
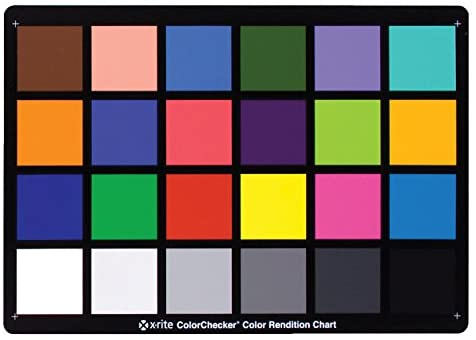
A Color Checker Board (also called a Colour Calibration Chart). The important parts for this workflow are the six grey squares running from white to black — they're what the operator samples to verify both luminance (gamma and exposure) and that the greys are neutral (not tinted).
Calibration workflow
- Match the camera's white balance to the colour temperature of the lights.
- Remove any gamma curve applied by the camera.
- Remove any colour profile added by the camera.
- Position the calibration camera at the spot in the studio where colour accuracy matters most — typically where the presenter or guests stand, since skin tones are the most unforgiving subject.
- Hold the chart horizontal and confirm it's in sharp focus.
- Add a Color Curves operator to the layer and configure it:
- Select the operator by clicking its title.
- Turn on Show advanced options to reveal the calibration controls.
- Turn on the crop area tool in the preview toolbar — six yellow square markers appear over the preview window.
- Drag the six markers onto the six grey squares on the chart, one marker per square. Keep each marker centred inside its grey patch. The marker labelled with the highest value goes on the white square, the marker with the lowest value goes on the black square, and the rest distribute between them in order.
- Press Calibrate gray levels.
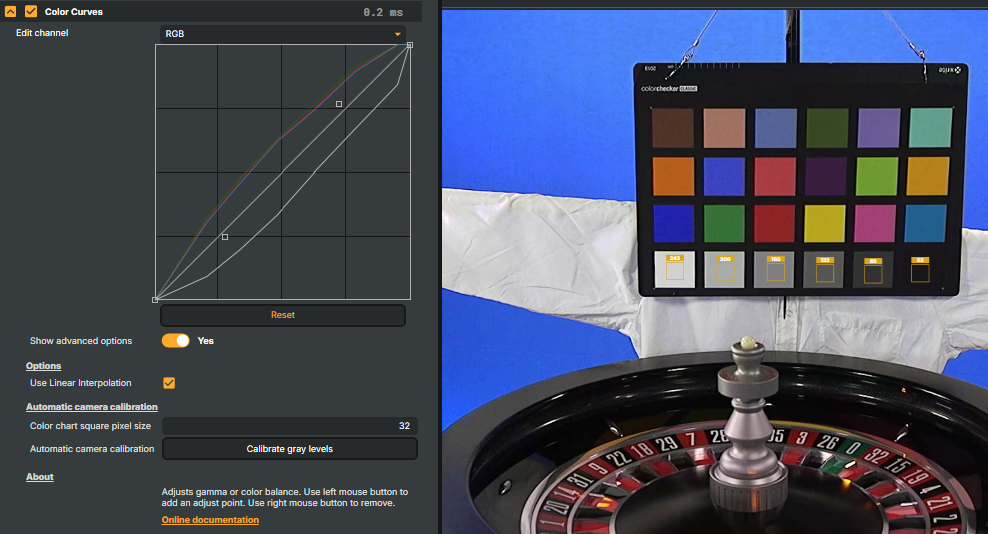
After the calibration runs, the operator builds a master curve plus per-channel red, green and blue curves that neutralise the greys and correct the exposure on the rest of the picture.
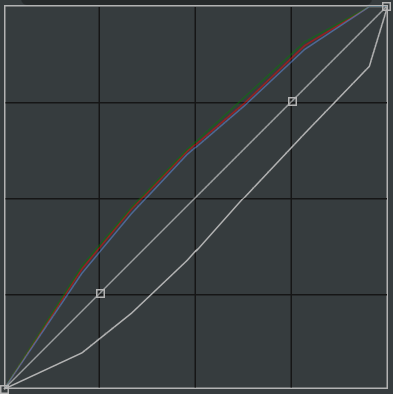
Even when the chart itself lands at the right exposure after calibration, other parts of the frame may still be over- or under-exposed. If that's the case, the lights — not the operator — are usually what needs revisiting.
Reference grey levels
The expected white levels of the six grey patches on the chart (on a 0–255 scale) are:
243, 200, 160, 122, 85, 52
Useful as a sanity check when verifying that a calibration brought the patches close to where they should be, or when picking marker positions on an unfamiliar chart.
Editing curves by hand
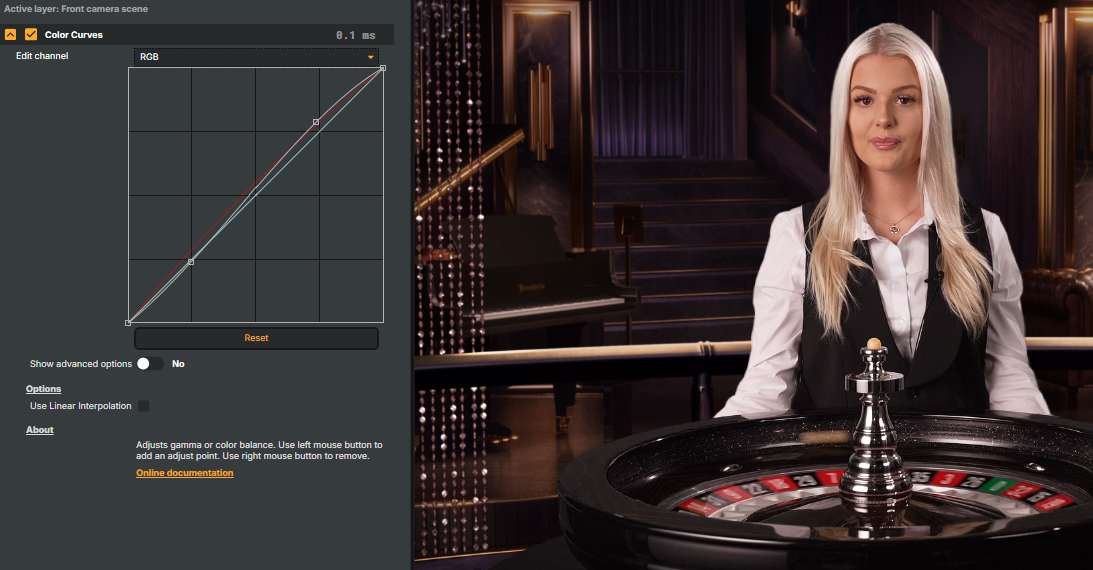
Interacting with a curve in the editor:
- Move a point — left-click and drag.
- Add a point — left-click on the curve where no point exists.
- Remove a point — right-click on the point.
- Reset a curve — press the Reset button on that curve.
- Copy the full set of curves from one Color Curves instance to another — right-click on the operator title.
The example below adds contrast on the master RGB curve and a touch of warmth on the Red channel — a common combination when shaping a creative look on top of an already-calibrated source:
Related components
Composer's Color Correction family contains nine operators that work on the colour of the image. Each takes a different approach — picking the right combination is part of the grading workflow, and the operators are designed to be stacked. The other Color Correction operators are:
- Automatic Gain Control — measures average brightness in a sensor area and optionally nudges the picture back to a stored reference luminance. Good for stabilising drifting exposure on long-running feeds.
- Color Adjust — general-purpose colour correction with gain/gamma/lift, HSV adjustments, per-channel RGBA, and clipping in one operator. The fastest way to match cameras, tame highlights, or lift crushed blacks.
- Color Shift — three-zone colour balance (shadows / midtones / highlights) along Cyan/Red, Magenta/Green, Yellow/Blue. Build cinematic teal-and-orange looks or fix mixed-lighting casts that hit shadows and highlights differently.
- Grading LUT — applies a pre-baked Hald CLUT image to drop a finished colour grade onto a feed in a single step. The fastest way to deploy a house style across many compositions.
- HSV Correct — per-hue curves for hue, saturation and luminance. Boost just the blues in a sky, lift skin tones without touching the background, desaturate one specific colour family.
- Hue Shift — selects a hue band by centre, tolerance and softness, then shifts its hue, saturation or luminance independently. The tool for recolouring a specific object without affecting the rest of the image.
- Vibrance — boosts the colourfulness of muted tones while protecting already-saturated colours and skin tones. Make landscapes pop without making faces look orange.
- White Balance — corrects colour temperature (cool/warm) and tint (green/magenta) with presets for daylight, tungsten, fluorescent, and shade lighting.