

IBK 3D Keyer

The IBK 3D Keyer is an image-based chroma keyer, designed for situations where a conventional single-colour keyer falls short. Real-world green and blue screens are never perfectly evenly lit — there are folds, hot spots, soft shadows, and lighting drift across the surface. Traditional keyers compensate by widening their tolerance around the chosen screen colour, but that costs detail: fine hair, sheer fabrics, and contact shadows are the first things to go.
The IBK 3D Keyer takes a different approach. Instead of looking for a single screen colour, it compares the live video to a clean plate — a reference image of the same shot with the foreground subject removed. Every pixel of the screen contributes its own "this is what the screen looks like at this exact spot" reference, so unevenness in the backdrop is built into the keyer's expectations rather than fought against. The result is a highly detailed matte that holds onto wisps of hair, semi-transparent garments, and natural shadow falloff — the kind of fine detail conventional keyers tend to smear away.
It also unlocks more flexibility on stage: shadows cast by the actual stage lighting can be preserved and carried through the composite instead of being killed off as part of the screen.
The clean plate
A clean plate is the shot with everything except the subject — typically just the lit backdrop, captured after the lighting and camera are locked off. You can record it by stepping the talent out of frame and grabbing a still, or rebuild it in an image editor by painting the foreground out of a production frame while preserving the underlying backdrop colour values.

What matters is that the clean plate keeps matching the live shot. If the lighting changes, the camera moves, or anything else physically shifts on stage, the clean plate has to be re-captured. A stale clean plate degrades the key fast — at that point the IBK 3D Keyer can perform worse than the simpler HSV-based alternatives, since it is now comparing today's shot against yesterday's reference.
Not suitable for unattended 24/7 operation — use the HSV Keyer instead
For the same reason, the IBK 3D Keyer is not designed for unattended long-running deployments (continuous 24/7/365 productions, headless installations, automated playout, etc.). The matte's accuracy is tied to the clean plate matching reality, and over hours or days lighting drifts, the camera bumps, the screen scuffs, or the temperature in the room changes the look of the backdrop just enough to invalidate the reference. Without an operator on hand to spot the drift and re-shoot the plate, the matte degrades.
For 24/7/365 deployments the HSV Keyer is the right choice. It works from a chosen screen colour rather than a reference image, so it has nothing that can go stale — set it once and it carries on indefinitely. Reach for the IBK 3D Keyer only when a human is present during the production and can verify the key during rehearsal and refresh the plate whenever the rig is touched.
Creating the alpha channel
The keyer builds the alpha channel by comparing every pixel of the live foreground against the corresponding pixel of the clean plate. That comparison is performed in a chosen colour-space model, and the model — the Processor — drives the maths used and therefore the look of the final key.
The default processor, IBK 3D, is tuned for green-screen workflows. It is similar in flavour to a hue/saturation/value approach but with extensions specific to image-based keying, and it produces a usable key on most well-lit green-screen setups with minimal tuning.
Two further control groups refine the result:
- Balance — adjusts the gain on each of the three colour-space channels independently, so you can compensate for small differences between the clean plate and the live foreground (e.g. a slight white-balance drift between when the plate was captured and the live shot).
- Amplifier — Alpha Gain, Alpha Gamma, and Alpha Pedestal shape the resulting alpha channel as a final pass before the matte is passed to compositing — useful for tightening edges or rescuing faint detail that the comparison stage left a touch too transparent.
Tip
Light the screen as evenly as you reasonably can, lock the camera off before shooting the clean plate, and re-shoot the plate any time the rig is touched. The IBK 3D Keyer rewards good production hygiene with a noticeably cleaner matte than the older keyers can deliver.
Step-by-step setup
The IBK 3D Keyer has more controls than a simple hue keyer, but the order in which you tune them matters. The following workflow gets you from a freshly-added operator to a clean key with the fewest detours. Steps 4 and 5 are the iterative core — expect to revisit them several times as you fine-tune.
If your set has solid props that should never key out, or stretches of backdrop that the comparison can't quite resolve, add a garbage matte image or layer first. Cleaning those areas up front saves a lot of fiddling with the per-channel controls later.
Pick a key channel — Green or Blue. The choice drives the spill-suppression maths, so set it up front to match the screen on stage.
Pick a clean plate — either an image file or a layer in the scene that holds the plate. Make sure it matches the current camera framing and lighting.
Pick a Processor — IBK 3D is the default and is the right starting point for almost every green-screen shot. HSV (or another available model) is worth trying if your set has unusual lighting or screen tints that IBK 3D doesn't handle cleanly.
Tune the Balance. Switch the keyer's output to the IntermediateMax channel and adjust the per-channel Balance controls until you get a solid screen area while keeping the soft edges of the foreground intact. To inspect the contribution of each channel, switch the output to Intermediate — that renders an RGB image of the per-channel difference between the clean plate and the live foreground.
- Don't over-drive the balance — too much gain creates hard, unnatural edges.
- For most green-screen shots, only Channel B needs adjustment. A value in the 1.1–1.3 range is usually enough; the exact figure depends on your stage lighting and the foreground colours.
Below: the IntermediateMax view (left) compared with the resulting Alpha (right).
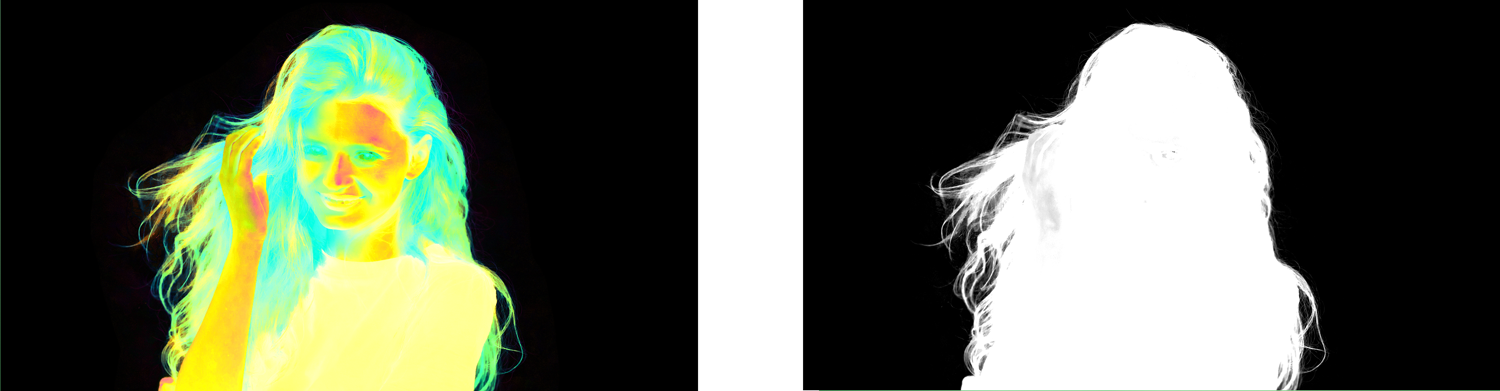
Shape the alpha with the Amplifier. Use Alpha Gain, Alpha Gamma, and Alpha Pedestal to refine the matte. Switch the keyer output to Alpha while you tune so you can see exactly what the matte is doing, then switch back to Final to confirm the composite. Push these gently — heavy amplifier settings produce hard edges very quickly. Iterate between steps 4 and 5 until the matte is stable.
Optionally clean up noise. Clipping (black) in the amplifier removes low-level noise from the matte. Apply it sparingly — too aggressive a clip will harden soft edges that you worked hard to preserve.
Tune Spill Suppression. Switch the output to Suppressed and adjust the Spill Suppression Type until no green (or blue) cast remains on the foreground edges. The Amount can usually stay at its default of
100; lower it only if suppression is killing too much of the foreground.Compensate for off-pure screens. If the screen colour isn't a pure green or pure blue (a more cyan-leaning green, a teal blue), use Screen Color Compensation and Compensation Boost to bring spill suppression back into line.
Restore the spill-suppressed edges. Removing spill always alters the luminance, saturation, and hue of the affected pixels. Spill Restoration brings the look back, with three modes:
- None — no restoration. Edges read slightly darker than the rest of the foreground because some luminance was lost with the spill.
- Luminance — restores the lost luminance. Adjust Gain until the edges blend naturally with the rest of the figure.
- Tint — choose a hue and saturation manually, or enable Pick hue from background layer so the edges pick up the colour they would naturally reflect from the new background.
No single configuration is universally best — try Luminance first, then experiment with Tint. Tint with "Pick hue from background layer" is the option that lands closest to natural in most live composites.
Example
A finished key with the IBK 3D Keyer:

The corresponding alpha channel:
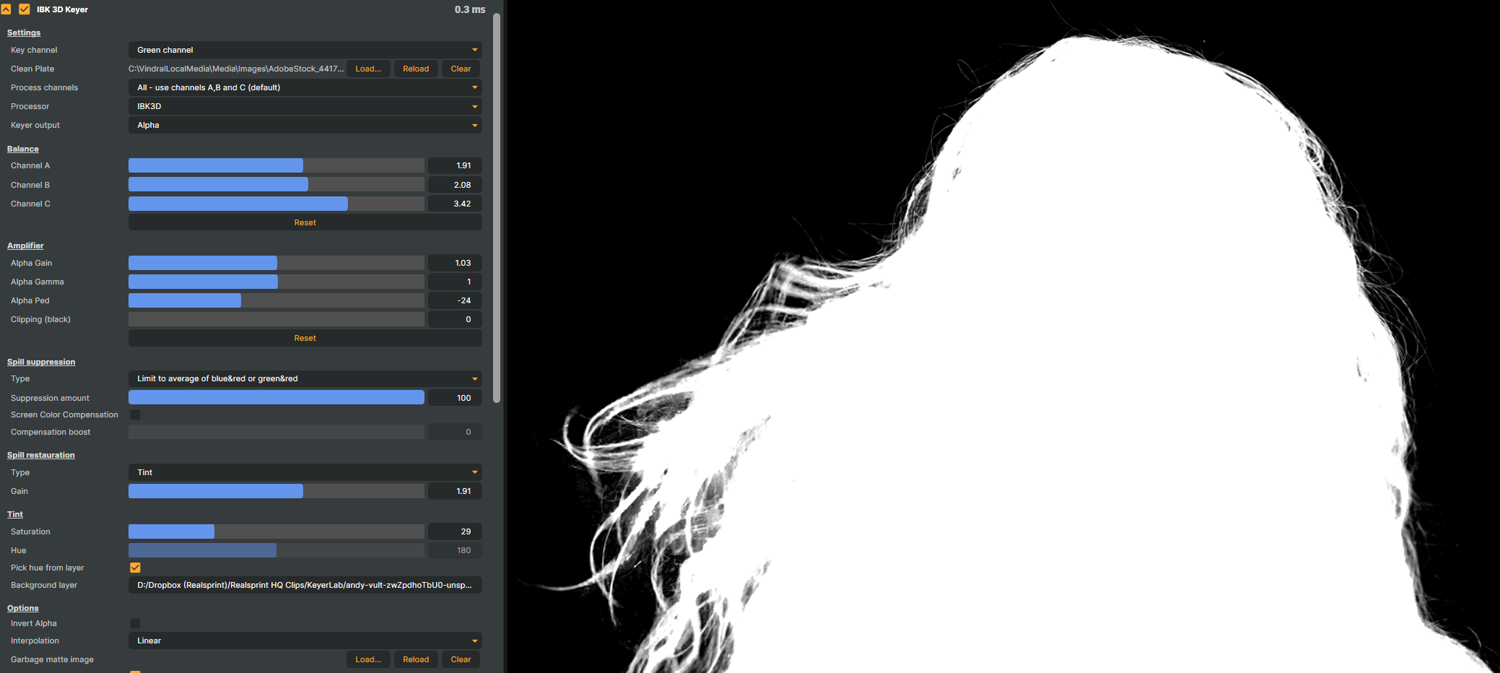
IBK 3D Keyer - Settings
Settings
Settings — core key configuration including clean plate and screen colour.
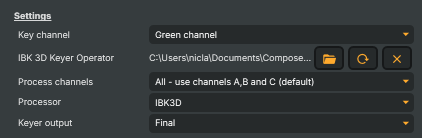
| Property | Description |
|---|---|
Key channel |
Which colour the screen is (Green, Blue, or None). Determines how spill is detected and suppressed. Pick the colour matching your physical screen so the keyer cleans the right channel from foreground edges. |
IBK 3D Keyer Operator |
Path to the clean plate image — a still photo of the empty screen with the same lighting as the live shot. The clean plate is the heart of this keyer; the better it matches lighting and lens, the cleaner the key. |
Process channels |
Which colour-space channels (A, B, C or combinations) are used when comparing the input to the clean plate. Limit channels to focus on the most useful ones for your screen — can help with fluorescent or LED-lit screens. |
Processor |
Colour space model used to compare the foreground against the clean plate. Different models work better with different screen types — try alternatives if you cannot eliminate fringing. |
Keyer output |
What the operator outputs (Final, Foreground, Alpha, Spill, Garbage, etc.). Switch to Alpha or Intermediate while tuning to see exactly what the matte looks like; switch back to Final for the result. |
Balance
Balance — per-channel gain to fine-tune how the comparison weights each colour space axis.
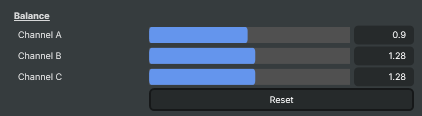
| Property | Description |
|---|---|
Channel A |
Weighting for the first channel of the chosen colour space. [min=-4, max=6, default=1]. Adjust if the screen has uneven response across colour space axes; usually leave at default unless tuning advanced cases. |
Channel B |
Weighting for the second channel of the chosen colour space. [min=-4, max=6, default=1]. Used together with ChannelAGain and ChannelCGain to bias the keyer toward channels that best separate background from foreground. |
Channel C |
Weighting for the third channel of the chosen colour space. [min=-4, max=6, default=1]. Used together with ChannelAGain and ChannelBGain to bias the keyer toward channels that best separate background from foreground. |
Reset |
Reset all balance gains back to 1.0 (ChannelAGain, ChannelBGain, ChannelCGain). |
Amplifier
Amplifier — shape the matte by adjusting alpha gain, gamma, ped (offset) and black clip.
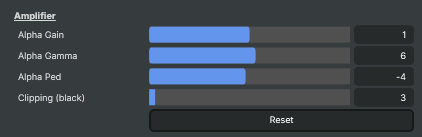
| Property | Description |
|---|---|
Alpha Gain |
Multiplies the matte values to make foreground more or less opaque. [min=-4, max=6, default=1]. Raise to recover edges that have gone too transparent; lower if foreground is showing background bleed-through. |
Alpha Gamma |
Reshapes the alpha curve, biasing the matte toward fully transparent or fully opaque. [min=-100, max=100, default=1]. Use small adjustments to tighten soft hair edges or to soften an overly hard matte. |
Alpha Ped |
Adds a fixed offset (pedestal) to the matte. [min=-100, max=100, default=1]. Positive values lift transparent regions toward opaque (good for retaining detail); negative values clip toward fully transparent. |
Clipping (black) |
Forces matte values below this level to fully transparent. [min=0, max=100, default=0]. Raise to clean up dirty backgrounds where the screen is not pure; watch for losing translucent details like glass or smoke. |
Reset |
Reset all amplifier settings to their defaults (AlphaGain, AlphaGamma, AlphaPed, BlackClip). |
Spill suppression
Spill suppression — neutralises residual screen colour on foreground edges.
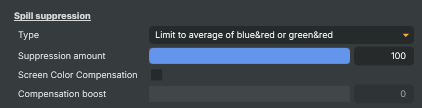
| Property | Description |
|---|---|
Type |
Algorithm used to neutralise residual screen colour on the foreground (Average, Maximum, etc.). Try different algorithms if the default leaves grey edges or shifts skin tones too far. |
Suppression amount |
Strength of the spill suppression. [min=0, max=100, default=100]. Lower if skin starts looking magenta/yellow; raise if green/blue tint is still visible at edges. |
Screen Color Compensation |
Compensates for the screen colour bleeding into foreground brightness. Enable when a green/blue cast remains on the subject after spill suppression — particularly for fast-moving subjects. |
Compensation boost |
Extra strength applied when ScreenColorCompensation is on. [min=0, max=100, default=0]. Raise gradually if foreground still feels colour-cast after enabling compensation. |
Spill balance
Spill balance — fine-tune how spill colour is replaced when removed from edges.
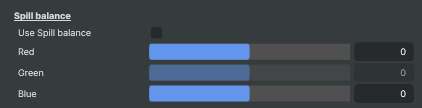
| Property | Description |
|---|---|
Use Spill balance |
Enables manual control over the colour written into spill areas via SpillRedBalance, SpillGreenBalance, SpillBlueBalance. Use to push edge colour toward a specific tone (e.g. neutral grey or warm skin) instead of the default neutralised result. |
Red |
Red component of the spill replacement colour. [min=-255, max=255, default=0]. Combine with SpillGreenBalance and SpillBlueBalance to choose the tint that replaces removed spill. |
Green |
Green component of the spill replacement colour. [min=-255, max=255, default=0]. Locked when KeyChannel is Green (it would re-introduce screen colour). |
Blue |
Blue component of the spill replacement colour. [min=-255, max=255, default=0]. Locked when KeyChannel is Blue (it would re-introduce screen colour). |
Spill restauration
Spill restoration — re-introduces detail in suppressed edges so they match the new background.

| Property | Description |
|---|---|
Type |
How spill colour is restored once removed (None, Luminance, Tint). Luminance reuses brightness from the foreground; Tint pushes toward a chosen colour. None leaves edges fully suppressed. |
Gain |
Strength of the spill restoration. [min=-4, max=6, default=1]. Higher values bring back more original edge brightness/colour; lower keeps edges flatter. |
Tint
Tint — when SpillRestaurationMode is Tint, controls the colour used to fill restored spill regions.
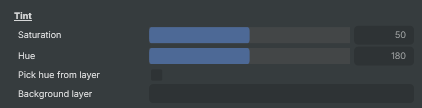
| Property | Description |
|---|---|
Saturation |
Saturation of the restoration tint colour. [min=0, max=100, default=50]. Lower for subtle, near-grey edges; raise for stronger coloured edges that match a vivid background. |
Hue |
Hue of the restoration tint colour. [min=0, max=360, default=180]. Choose the dominant colour of the new background so spilled edges blend in naturally. |
Pick hue from layer |
Sample the tint hue automatically from a chosen background layer instead of using a fixed hue. Best when the background is animated or changes colour over time — the edges always match what is behind them. |
Background layer |
The layer used as the hue source when SpillRestaurationTintPickHueFromLayer is enabled. |
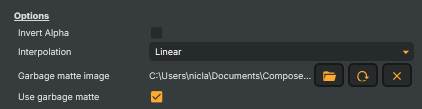
Options
Options — interpolation, alpha invert, and garbage matte controls.
| Property | Description |
|---|---|
Invert Alpha |
Inverts the alpha channel so foreground and background swap. Useful for creating hold-out mattes or reusing the same key as a mask for another effect. |
Interpolation |
Interpolation curve for soft matte edges (Linear, Cardinal, etc.). Smoother curves give more natural transitions for hair and motion blur; sharper curves keep edges crisp. |
Garbage matte image |
Garbage matte image — a black/white image used to force regions of the frame fully transparent or fully opaque. Useful for excluding lighting rigs, microphone booms, or set edges that the keyer would otherwise have to deal with. |
Use garbage matte |
Enables the loaded GarbageMatteSourceUrl image; turn off to ignore the matte without removing the file path. |
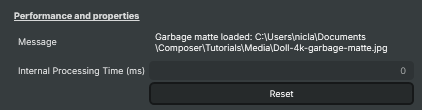
Performance and properties
Performance and properties — runtime status messages and timing.
| Property | Description |
|---|---|
Message |
Status message about clean plate / garbage matte loading and runtime warnings. |
Internal Processing Time (ms) |
Time taken to process one frame, in milliseconds. Read-only diagnostic value. |
Reset |
Reset all settings to their defaults (clean plate cleared, balance/amplifier/spill back to neutral). |
Inherits from: AbstractOperator, AbstractAudioMetering.
See also: IBK 3D Keyer in Script Engine Objects.
Tutorials
A ready-made example project demonstrates the IBK 3D Keyer in context:
- IBK3D keyer - doll 4k — IBK Keyer in UHD 4K, with a clean plate and a garbage matte already in place. A good first stop for seeing how the clean plate and garbage matte slot together on a real shot before setting up your own.
Tutorials are downloaded on demand from RealSprint via Tutorials → Download tutorials… in Composer Desktop; the full catalogue with thumbnails and minimum-version requirements lives on the Tutorials page.
Related components
The IBK 3D Keyer is rarely used on its own — chroma keying is a small pipeline of operators, and the IBK 3D Keyer is the one in the middle that produces the matte. The components below sit on either side of it.
Alternative keyers — reach for one of these instead of the IBK 3D Keyer when its requirements don't fit your shot:
- HSV Keyer — the right choice for unattended 24/7/365 productions and any setup where no operator is on hand to spot drift and re-shoot the clean plate. Works from a single screen colour rather than a reference image, so there is nothing that can go stale. Trades some of the IBK 3D Keyer's edge detail for a setup that holds indefinitely without supervision.
- Difference Matte — also clean-plate-based, but builds the matte from a simpler frame-vs-plate difference rather than the IBK 3D Keyer's per-channel image-based approach. Useful when you want a keyer that doesn't depend on a green or blue screen at all — for example, keying a moving subject against any locked-off backdrop.
Compositing companions — drop these in after the IBK 3D Keyer to finish the composite:
- Spill Suppression — a dedicated stand-alone spill suppressor. The IBK 3D Keyer already includes a spill-suppression stage, but the dedicated operator gives you a second pass for shots where the built-in suppression isn't enough, or for keyers that don't have their own.
- Light Wrap — wraps a thin halo of the new background colour around the edges of the keyed foreground, so the subject appears to belong to the scene it has been placed into. Almost always worth adding to an IBK 3D Keyer composite; the IBK's detailed edges are what makes Light Wrap pay off, since there's enough real edge to wrap colour around.