

Light Wrap
Introduction
The Light Wrap operator is the finishing touch on a chroma-key composite. After the keyer has isolated the subject and spill has been cleaned from the edges, Light Wrap bleeds a thin halo of the new background's colour and brightness onto the foreground edges — recreating the natural way light wraps around a real subject in a real photograph.
Without it, a keyed composite reads as cut out and pasted. The subject's edges sit too cleanly on top of the new background, and the eye picks up the seam immediately even when the matte itself is technically perfect. Light Wrap closes that seam by giving the foreground edges a colour they would have naturally picked up if the subject had been physically present in the new scene — the cool blue from a virtual newsroom, the warm orange from a sunset background plate, the saturated green from a forest backdrop. The result is a composite that feels photographed rather than assembled.
The real-world phenomenon
In real photography, edges of foreground objects pick up light from everything around them. A presenter standing in a brightly-lit studio has the studio's light hitting their hair, shoulders, and the sides of their face from every angle — and the camera records that as a soft brightness halo around their silhouette. The brighter and more colourful the surroundings, the more pronounced the effect: a candle-lit room paints warm light onto the edges of everyone in it; a snowy outdoor scene wraps cold blue light onto the same person.
When a keyed foreground is dropped onto a new background, none of that wrapping is there — the foreground was lit by the original studio, not by the new scene. Light Wrap reintroduces that missing interaction by sampling the new background and painting a soft halo of its colour and brightness onto the foreground edges.
How it works
Light Wrap needs two things to do its job:
- The keyed foreground — the input passed into the operator. This is normally the output of a keyer (HSV, IBK 3D, or Difference Matte), ideally with spill already suppressed.
- A background layer — chosen via the Background layer property. This is the layer that sits behind the keyed subject in the final composite — the virtual set, the new sky, the background plate. Light Wrap samples this layer's colour and brightness to build the halo. Until a background layer is selected the operator does nothing; a warning shows in the property panel.
Once both inputs are in place, the operator:
- Blurs the background layer to a soft, diffuse version of itself — that's where the wrap colour comes from.
- Detects the foreground's edges using the keyed alpha.
- Bleeds the blurred background colour onto those edges, weighted toward the brightest parts of the new scene (where real-world light would dominate).
- Blends the result back onto the foreground using the chosen blend mode.
Main controls
Four settings cover most shots:
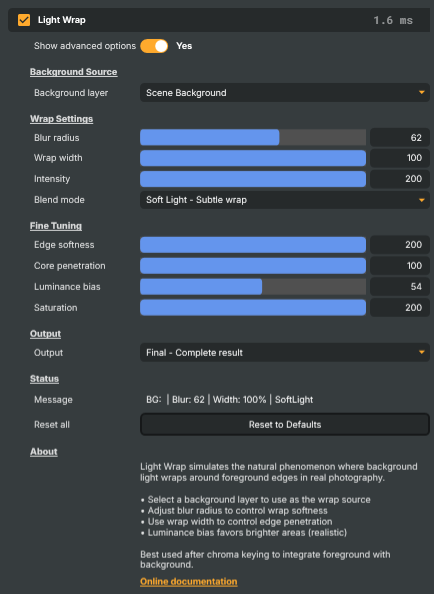
- Blur radius — how soft and spread-out the wrap is. Raise it for diffuse, atmospheric wraps that pick up the overall colour of the scene; lower it for crisper wraps that follow background detail more closely. Default 25 is a good starting point for most live composites.
- Wrap width — how far the wrap reaches inward from the foreground edges. A thin halo at the very edge reads as subtle integration; a wider wrap pushes the new scene's light further onto the subject for a stronger, more committed composite. Default 50.
- Intensity — the overall strength of the effect. Default 100 produces a balanced wrap; raise toward 200 for a strong, visible halo; drop toward 0 for a barely-there subtle touch. Setting it to 0 disables the effect without removing the operator from the chain.
- Blend mode — how the wrap is mixed into the foreground:
- Screen — the default, and the most natural-looking. Brightens edges in a way that matches how light actually behaves in the real world.
- Add — additive blend. Brightest and most pronounced; can blow out highlights if pushed.
- Lighten — picks the maximum of foreground and wrap. Useful when you want the wrap to only lighten, never darken.
- Normal — direct overlay. Less natural, but predictable when you want the wrap colour to dominate.
- Soft Light — the most subtle. Carries colour and contrast without much brightness change.
Fine tuning
The Fine Tuning section is hidden by default — turn on Show advanced options to expose it. The four controls there let you push past the defaults on harder shots:
- Edge softness — shapes the falloff curve at the wrap's edge. Higher values give a more gradual transition; lower values give a crisper, more defined wrap edge.
- Core penetration — by default the wrap stays at the edges only. Raise this to spread the wrap further into the opaque interior of the subject, for the strongest possible integration. Most shots are best at 0; raise sparingly.
- Luminance bias — how strongly the wrap favours the brighter parts of the background. Default 50 is a balanced sample; higher values mimic real-world light, where bright areas of a scene dominate the colour cast they leave on nearby objects.
- Saturation — colour intensity of the wrap. Drop to 0 for a wrap that carries brightness but no colour (useful when the background is heavily tinted but you don't want the foreground to inherit the tint); raise toward 200 for a strongly coloured wrap that visibly tints the foreground edges.
Inspecting the wrap
The Output dropdown lets you switch what the operator sends downstream while tuning:
- Final — the composite result. The mode to leave on for normal use.
- Foreground — just the input image, unmodified. Useful for A/B comparison against Final.
- Background — the selected background layer, unblurred. Sanity check that the right layer is being sampled.
- Blurred BG — the blurred background that the wrap is sampled from. Confirms the Blur radius is producing the colour smear you intended.
- Wrap Mask — the edge mask the operator uses to decide where to apply the wrap. Useful for verifying the matte is clean before tuning the wrap itself.
- Wrap Only — the wrap contribution on its own, on a black background. The clearest view for understanding exactly what colour the wrap is contributing.
Switch back to Final before going live — the other modes are tuning aids, not production outputs.
Common use cases
- Presenter into a virtual set — the day-one use case. Sample the virtual set as the background layer, leave the defaults in place, and the presenter's edges immediately read as part of the room rather than pasted on top of it.
- Gaming streamers — wrap the colour of the gameplay or scene behind the avatar onto the avatar's edges. Especially effective on flame, neon, or otherwise saturated game backgrounds where the missing colour cast is most obvious.
- Weather and news graphics — keyed talent in front of a weather map or graphics rig benefits from a Light Wrap to integrate with the moving visuals behind them.
- In-camera VFX shots — when an LED wall or virtual production environment is the new background, a Light Wrap is the difference between a believable composite and an obvious key.
- Softening hard composite edges — even when a key is technically correct, the edges can read as too sharp. A subtle Light Wrap (low intensity, short wrap width) softens the seam without changing the matte itself.
Where it sits in the chain
Light Wrap is almost always the last operator in the chroma-key chain. The standard order is:
- Keyer (HSV Keyer, IBK 3D Keyer, or Difference Matte) — produces the matte.
- Spill Suppression — removes any residual colour cast from the original screen.
- Light Wrap — adds the new background's colour cast back onto the edges.
- Composite over the background layer.
Running Light Wrap before Spill Suppression is a common mistake — the wrap will pick up and amplify whatever spill is still present, defeating the suppression you're about to apply. Keep the order above and the composite stays believable.
Light Wrap - Settings

| Property | Description |
|---|---|
Show advanced options |
Reveals additional fine-tuning controls (edge softness, core penetration, luminance bias, saturation). Leave off for quick setup; turn on to refine the wrap on detailed shots. |
Background Source
Background Source — the layer used as the source of wrap colour and brightness.

| Property | Description |
|---|---|
Background layer |
The layer to sample for wrap colour. Pick the layer that sits behind the keyed subject in the final composite. Light Wrap will produce no effect until a valid background layer is selected here. |
Wrap Settings
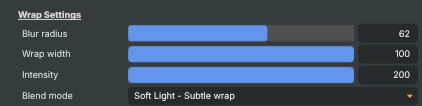
Wrap Settings — primary controls for the wrap's softness, width, intensity and blend.
| Property | Description |
|---|---|
Blur radius |
Softness/spread of the wrap. [min=1, max=100, default=25]. Raise for diffuse, atmospheric wraps (good for blurry backgrounds); lower for crisp wraps that follow background detail closely. |
Wrap width |
How far the wrap reaches inward from the foreground edges. [min=1, max=100, default=50]. Raise to push wrap further onto the subject for stronger integration; lower for a thin halo only at the very edge. |
Intensity |
Overall strength of the wrap effect. [min=0, max=200, default=100]. Raise for stronger, more visible wrap; lower for a subtle effect. Use 0 to disable without removing the operator. |
Blend mode |
Blending mode used when combining the wrap with the foreground (Screen, Add, Lighten, Normal, Soft Light). Screen is the most natural choice; Add is brightest; Soft Light is the most subtle. |
Fine Tuning
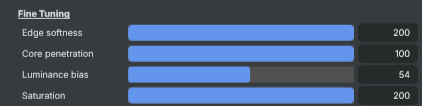
Fine Tuning — advanced controls for edge falloff, penetration, luminance bias and saturation.
| Property | Description |
|---|---|
Edge softness |
(advanced) Falloff curve at the wrap's edge. [min=10, max=200, default=100]. Raise for more gradual transitions; lower for crisper wrap edges. |
Core penetration |
(advanced) How far the wrap bleeds from edges into opaque areas of the foreground. [min=0, max=100, default=0]. Default 0 keeps wrap at the edges only; raise to spread wrap further into the subject for very strong integration. |
Luminance bias |
(advanced) Bias toward sampling brighter parts of the background. [min=0, max=100, default=50]. Higher values mimic real-world light, where bright areas of the scene are what actually wrap onto the subject. |
Saturation |
(advanced) Colour intensity of the wrap. [min=0, max=200, default=100]. Lower for a more neutral wrap that only carries brightness; raise for a more colourful wrap that strongly tints the edges. |
Output
Output — switch to a debug visualisation while tuning.

| Property | Description |
|---|---|
Output |
What the operator outputs (Final, Foreground, Background, Blurred BG, Wrap Mask, Wrap Only). Switch to Wrap Only or Wrap Mask while tuning to inspect exactly where wrap is being applied. |
Status
Status — runtime status messages.

| Property | Description |
|---|---|
Message |
Status message showing the current background layer and key wrap settings. |
Reset all |
Reset all settings to their defaults (blur 25, width 50, intensity 100, Screen blend, Final output). |
Inherits from: AbstractOperator, AbstractAudioMetering.
See also: Light Wrap in Script Engine Objects.
Tutorials
The Light Wrap operator features explicitly in:
- Difference matte — a chroma-key project that combines the Difference Matte keyer with Spill Suppression, Light Wrap, and composite layers. A good reference for where Light Wrap sits at the very end of the compositing chain.
Most production chroma-key tutorials in the catalogue benefit from a Light Wrap stage even when the description doesn't call it out — the operator is the standard finishing touch on any composite, so feel free to add it to the HSV-keyer demos as well to see how it changes the result.
Tutorials are downloaded on demand from RealSprint via Tutorials → Download tutorials… in Composer Desktop; the full catalogue with thumbnails and minimum-version requirements lives on the Tutorials page.
Related components
Light Wrap is the final stage of the chroma-key compositing chain — it runs on the keyed foreground after the matte is clean and any spill is suppressed.
The keyer in front of it — Light Wrap is normally applied after one of the keyers:
- HSV Keyer — the default chroma keyer; the most common partner for Light Wrap in day-to-day broadcast use.
- IBK 3D Keyer — the image-based clean-plate keyer. Light Wrap pays off especially well here, since the IBK 3D Keyer's detailed matte gives Light Wrap plenty of real edge detail to wrap colour around.
- Difference Matte — clean-plate-based keyer for non-chroma scenes.
The spill-cleanup step before it — Light Wrap should run after spill is removed, otherwise the wrap stage will pick up the colour cast you're trying to get rid of:
- Spill Suppression — pairs naturally with Light Wrap. The order in the chain is keyer → Spill Suppression → Light Wrap → composite over background; running them in that order is what gives a believable result.