

Spill Suppression
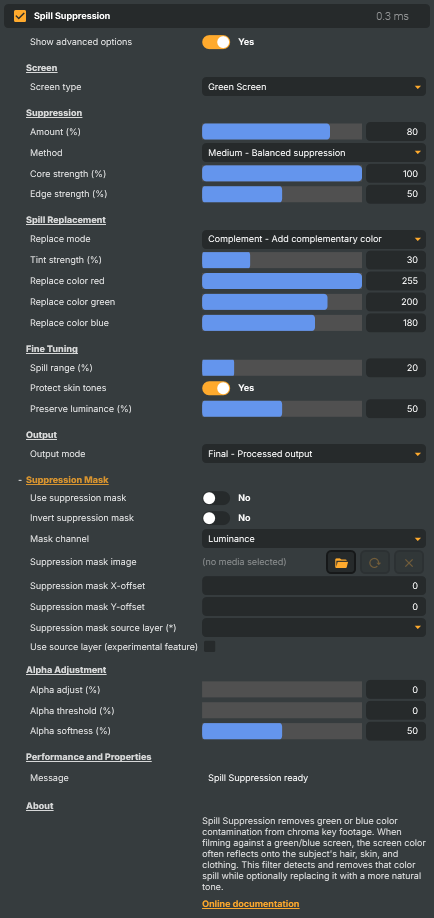
Introduction
The Spill Suppression operator removes the green or blue colour cast that a chroma screen reflects onto the subject. When footage is shot against a green or blue screen, light bouncing off that screen lands on the subject's hair, skin, shoulders, and clothing — leaving a coloured tint that survives the key and makes the foreground look like it doesn't belong in its new background. Spill Suppression detects that tint and pulls it back to a natural level, optionally replacing the lost colour with a more flattering tone.
It is a clean-up step, not a keyer. The matte itself comes from one of the keyers (HSV Keyer, IBK 3D Keyer, or Difference Matte); Spill Suppression runs after the key to fix the colour the keyer left behind. It pairs naturally with Light Wrap as the finishing stage of a composite.
Why spill happens
A chroma screen is a large, brightly lit coloured surface, and it throws colour everywhere. Some of that bounce light lands directly on the subject — most visibly on light hair, white clothing, and the edges of the face nearest the screen. Semi-transparent materials like flyaway hair and sheer fabric pick up even more, because the screen is partly visible through them. The result is a green or blue cast that's strongest at the edges and on bright, reflective surfaces.
That cast is real light in the original shot, so the keyer keeps it — the subject genuinely is slightly green. Once the subject is dropped onto a new background, the tint reads as wrong, because nothing in the new scene would have lit them that way. Spill Suppression is the step that removes it.
How it works
For every pixel, the operator checks whether the screen's colour channel (green or blue) is abnormally high compared to the other two channels. Where it is, that's spill, and the channel is pulled back down toward a natural balance. Removing colour this way can leave the area looking grey or dark, so the operator can also add a replacement tone to compensate.
Two settings shape the whole effect:
- Screen type — Green or Blue, matching the physical screen the footage was shot against. Pick the wrong one and nothing useful happens, because the operator looks for spill on the wrong channel.
- Amount (%) — overall strength of the suppression. The default of 80 suits most footage. Raise it if green/blue is still visible; lower it if skin or hair starts drifting toward magenta or yellow. Setting it to 0 disables the operator entirely.
Spill Suppression - Settings

| Property | Description |
|---|---|
Show advanced options |
Reveals additional fine-tuning controls (spill range, skin protection, alpha adjustment, suppression mask). Leave off for quick clean-up; turn on when you need tight control over how much spill is removed. |
Screen
Screen — colour of the chroma key screen the footage was shot against.

| Property | Description |
|---|---|
Screen type |
Colour of the chroma key screen (Green or Blue). Pick the colour matching your physical screen so spill is detected on the correct channel. |
Suppression
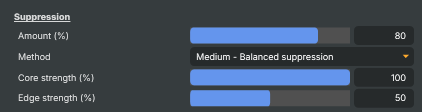
Suppression — primary controls for how strongly spill is removed.
| Property | Description |
|---|---|
Amount (%) |
Overall strength of the spill suppression. [min=0, max=100, default=80]. Lower if skin or hair starts looking magenta/yellow; raise if green/blue tint is still visible. 0 disables suppression entirely. |
Method |
Detection method (Soft, Medium, Hard, etc.) — affects how aggressively spill is identified. Try a softer method if foreground colours are being affected; harder methods are better for stubborn spill. |
Core strength (%) |
Strength applied to areas with obvious spill (clearly green/blue cast). [min=0, max=100, default=100]. Lower if obvious spill areas are getting too washed out. |
Edge strength (%) |
Strength applied to subtle edge spill (faint colour fringing). [min=0, max=100, default=50]. Raise to clean up faint coloured halos at the matte edge; lower if hair detail is being flattened. |
Spill Replacement
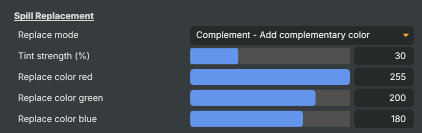
Spill Replacement — choose what colour replaces removed spill (complement, custom tint, etc.).
| Property | Description |
|---|---|
Replace mode |
What replaces the removed spill colour (Complement, Average, Custom tint, etc.). Complement is a good neutral default; Custom lets you push edges toward a specific tone (e.g. warm skin). |
Tint strength (%) |
Strength of the replacement tint. [min=0, max=100, default=30]. Raise for a stronger coloured replacement; lower for a more neutral grey result. |
Replace color red |
Red component of the custom replacement colour. [min=0, max=255, default=255]. Combine with ReplaceGreen and ReplaceBlue to choose the tone written into spill areas when Replace is set to Custom. |
Replace color green |
Green component of the custom replacement colour. [min=0, max=255, default=200]. Pair with ReplaceRed and ReplaceBlue to set the tone for replaced spill. |
Replace color blue |
Blue component of the custom replacement colour. [min=0, max=255, default=180]. Pair with ReplaceRed and ReplaceGreen to set the tone for replaced spill. |
Fine Tuning
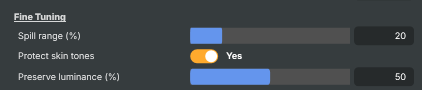
Fine Tuning — advanced sensitivity, skin-tone protection, and luminance preservation.
| Property | Description |
|---|---|
Spill range (%) |
(advanced) How far from pure green/blue still counts as spill. [min=0, max=100, default=20]. Higher = more sensitive (catches faint cast); lower = stricter (only obvious spill is removed). |
Protect skin tones |
(advanced) Reduces suppression on detected skin tones so faces do not shift colour. [default=true]. Leave on for human subjects; turn off for non-skin scenes if it causes false positives. |
Preserve luminance (%) |
(advanced) Maintains the original brightness of pixels after suppression. [min=0, max=100, default=50]. Raise if suppressed regions look unnaturally dark or bright; lower for the raw suppression result. |
Output
Output — switch to a debug visualisation while tuning.

| Property | Description |
|---|---|
Output mode |
What the operator outputs (Final, Original input, Spill visualisation, Alpha, etc.). Switch to Spill while tuning to see exactly which pixels are being treated as spill; switch back to Final for the result. |
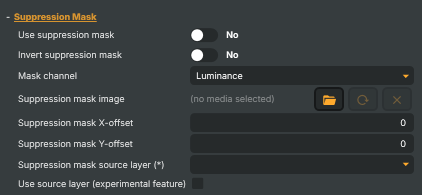
Suppression Mask
Suppression Mask — limit suppression to areas defined by an external mask image or layer.
| Property | Description |
|---|---|
Use suppression mask |
(advanced) Limits where suppression is applied via the mask image (white = full suppression, black = none). Useful for protecting jewellery, props or set elements that share the screen colour but should not be desaturated. |
Invert suppression mask |
(advanced) Inverts the mask interpretation (white = no suppression, black = full suppression). Use when your mask image was painted with the opposite convention. |
Mask channel |
(advanced) Which channel to read from the mask image (Luminance, Green, etc.). Green is compatible with HSV Keyer garbage matte files; Luminance reads overall brightness. |
Suppression mask image |
(advanced) Path to the suppression mask image file. Paint white where you want suppression to apply, black where it should be skipped. |
Suppression mask X-offset |
(advanced) Horizontal offset of the suppression mask image, in pixels. Use to nudge a precomposed mask into alignment if the camera has shifted. |
Suppression mask Y-offset |
(advanced) Vertical offset of the suppression mask image, in pixels. Use to nudge a precomposed mask into alignment if the camera has shifted. |
Suppression mask source layer (*) |
(advanced) Use another layer's rendered output as a live suppression mask (experimental). Useful when the mask should track changes — e.g. an animated mask layer. |
Use source layer (experimental feature) |
(advanced) Enable the experimental layer-based suppression mask (uses SuppressionMaskSourceLayer instead of an image file). |
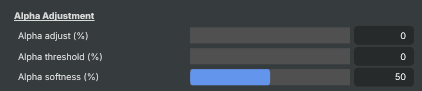
Alpha Adjustment
Alpha Adjustment — optionally reduce alpha in spill regions for cleaner compositing.
| Property | Description |
|---|---|
Alpha adjust (%) |
(advanced) Maximum alpha reduction in spill regions. [min=0, max=100, default=0]. 0 leaves alpha untouched; 100 makes the strongest spill regions fully transparent. Useful for cleaning up halos that the keyer left behind. |
Alpha threshold (%) |
(advanced) Minimum spill strength before alpha is affected. [min=0, max=100, default=0]. 0 means even faint spill reduces alpha; raise to protect light spill regions from becoming transparent. |
Alpha softness (%) |
(advanced) Width of the soft falloff above the alpha threshold. [min=0, max=100, default=50]. Raise for gradual alpha changes that follow spill smoothly; lower for hard alpha cuts. |
Performance and Properties
Performance and Properties — runtime status.

| Property | Description |
|---|---|
Message |
Status message about mask loading and runtime warnings. |
Inherits from: AbstractOperator, AbstractAudioMetering.
See also: Spill Suppression in Script Engine Objects.
Tutorials
The Spill Suppression operator features explicitly in:
- Difference matte — a chroma-key project that combines the Difference Matte keyer with Spill Suppression, Light Wrap, and composite layers. A good reference for how the dedicated Spill Suppression operator slots into the compositing chain.
Many of the HSV-keyer tutorials in the catalogue also rely on spill cleanup, but most use the keyer's built-in spill suppression rather than this stand-alone operator — so this tutorial is the most direct reference for the operator as a separate stage.
Tutorials are downloaded on demand from RealSprint via Tutorials → Download tutorials… in Composer Desktop; the full catalogue with thumbnails and minimum-version requirements lives on the Tutorials page.
Related components
Spill Suppression sits in the middle of the chroma-key compositing chain — after the keyer, before light-wrap. The components below are its natural neighbours.
The keyer in front of it — Spill Suppression is normally paired with one of the keyers:
- HSV Keyer — the default chroma keyer. It already includes a spill-suppression stage; add the stand-alone Spill Suppression operator after it when the built-in stage isn't enough, or when you want to apply suppression to channels the keyer left alone.
- IBK 3D Keyer — the image-based clean-plate keyer. Also has a built-in spill-suppression stage, but benefits from the same "second pass" treatment on tricky shots.
- Difference Matte — clean-plate-based keyer that does not include built-in spill suppression, so this operator is the natural follow-up when the original shot has any colour cast bouncing off the backdrop.
The compositing step after it — to finish the composite once spill is cleaned up:
- Light Wrap — pairs naturally with Spill Suppression. The order in the chain is keyer → Spill Suppression → Light Wrap → composite over background; that final wrap stage is what makes the subject feel placed in the new scene rather than pasted on top of it.