

UV Remap
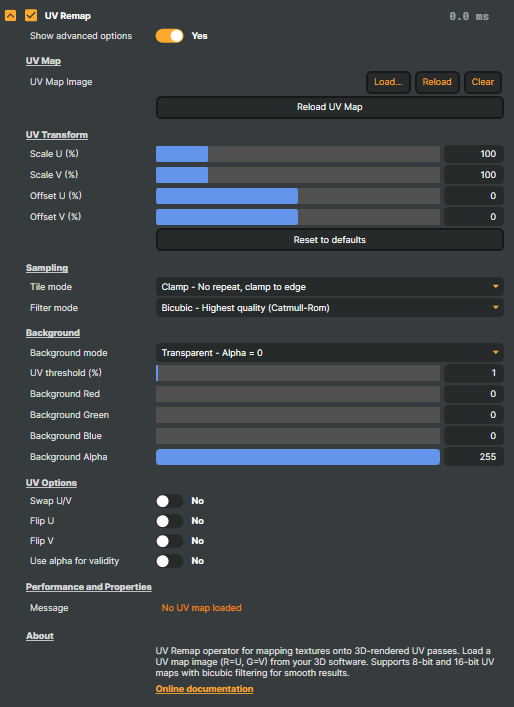
The UV Remap operator distorts a layer using a second image — a UV map — that tells the operator, for every output pixel, which pixel of the source layer to sample. It is the same idea texture artists use in 3D software, lifted out into a real-time live-video pipeline. Anywhere you can render a UV pass from your DCC tool, you can use it to drive a remap inside Composer at full broadcast frame rate.
Typical uses include:
- Projecting live video onto a 3D-rendered surface (a virtual TV in a set, a curved billboard, the side of a CG vehicle) by exporting a UV pass from Blender, Maya, Houdini, Cinema 4D, etc.
- Wrapping live footage around virtual props or set pieces in a green-screen / extended-reality production.
- Applying lens-warp, screen-distortion, or barrel/pincushion correction effects via a hand-painted or rendered UV map.
- Building stylised mirror, kaleidoscope, ripple, or morph effects where every pixel is rerouted from somewhere else in the source.
How a UV map works
A UV map is just an image, but the colours don't represent colour — they represent coordinates:
- The red channel encodes the horizontal position (U) on the source layer to sample, from
0.0(left edge) to1.0(right edge). - The green channel encodes the vertical position (V), from
0.0(top) to1.0(bottom).
When the operator processes each output pixel, it reads the matching pixel out of the UV map, decodes the red and green values into a (U, V) pair, then samples the source layer at that location. A flat, identity UV map (a smooth red-to-right, green-down gradient) re-renders the source untouched. Anything else twists, projects, repeats, or stretches the layer based on what the colours describe.
UV maps can be authored two ways:
- Rendered from 3D software — drop a UV pass on top of your geometry in Blender, Maya, Houdini, etc. and render it out. The pass already understands the surface, so the live video projects onto it correctly without any per-shot tweaking.
- Painted or generated procedurally — build distortion or effect maps by hand in any 2D tool, or generate them from a script when the effect doesn't need to follow real geometry.
Tip — use 16-bit PNGs
The operator supports both 8-bit and 16-bit UV maps. 16-bit PNG is strongly recommended for anything beyond simple distortions: 8-bit only has 256 levels per channel, which produces visible banding/stepping on slow gradients (think a curved object filling the frame at HD or 4K). 16-bit gives 65 536 levels and removes the stepping entirely.
Quick start
- Render your UV pass from your 3D tool, save it as a 16-bit PNG, and place it somewhere accessible from Composer.
- Add the UV Remap operator to the layer holding your video / image source.
- Set UV Map Image to the PNG you just rendered.
- The source layer is now projected through the UV map. Adjust Scale U / V and Offset U / V to nudge what part of the source ends up where on the rendered surface — useful for sliding video around inside a virtual screen without re-rendering the UV pass.
Tuning the result
- Tile mode — how the source behaves when the UV map references coordinates outside the layer. Clamp holds the edge pixel; Repeat tiles the layer endlessly; Mirror flips alternate tiles so seams disappear, which is handy when wrapping continuous surfaces.
- Filter mode — how Composer samples between source pixels. Bicubic (the default) gives the smoothest, highest-quality result on HD / 4K renders. Bilinear is the standard smooth fallback. Nearest keeps pixels crisp, which suits pixel-art looks and any case where you'd rather see hard pixels than soft interpolation.
- Background mode — what to show in pixels where the UV map has no valid coordinates (the off-surface region around your 3D object). Transparent is the right pick for compositing onto another scene. Original shows the unprocessed source. Color fills with a chosen solid colour for previews or stylised looks.
When to reach for it
UV Remap is the right operator when the distortion is content-aware — when the way pixels move depends on real geometry or a hand-authored map rather than a simple parametric formula. For straightforward zooms, rotations, or perspective tweaks the layer transform is usually enough. As soon as you need to project live video onto a virtual surface, wrap it around a curved object, or apply a custom warp that no built-in operator knows about, this is the tool.
UV Remap - Settings

| Property | Description |
|---|---|
Show advanced options |
UV Map
UV Map — load the UV coordinate image rendered from your 3D software.

| Property | Description |
|---|---|
UV Map Image |
Path to the UV map image file (red channel = horizontal U, green = vertical V). Render this from your 3D software as a UV pass. 16-bit PNG gives the smoothest results; 8-bit works for simpler distortions but may show stepping in slow gradients. |
Reload UV Map |
Reload the UV map from disk — useful after re-rendering or editing the UV pass externally. |
UV Transform
UV Transform — scale and offset the source layer before it is sampled by the UV map.
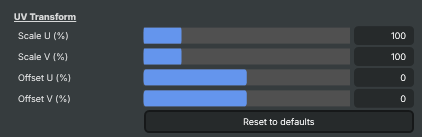
| Property | Description |
|---|---|
Scale U (%) |
Horizontal scale of the source layer, percent. [min=10, max=500, default=100]. 100 = no scaling. 200 doubles tiling along U so the layer repeats twice horizontally across the mapped surface; 50 stretches it to half (zoom in). |
Scale V (%) |
Vertical scale of the source layer, percent. [min=10, max=500, default=100]. 100 = no scaling. Higher values tile or shrink vertically; lower values zoom into the layer. |
Offset U (%) |
Horizontal shift of the source layer, percent. [min=-100, max=100, default=0]. Shifts the layer left/right before sampling — useful for sliding video around within the projected surface without re-rendering. |
Offset V (%) |
Vertical shift of the source layer, percent. [min=-100, max=100, default=0]. |
Reset to defaults |
Reset scale and offset back to defaults (100%, no offset). |
Sampling
Sampling — how the source layer is sampled when looked up via the UV map.

| Property | Description |
|---|---|
Tile mode |
How the layer behaves when UV coordinates go outside its bounds. [default=Clamp]. Clamp holds the edge pixel. Repeat tiles the layer endlessly. Mirror flips alternate tiles so seams are invisible — handy for wrapping video onto continuous surfaces. |
Filter mode |
Quality of sampling between source pixels. [default=Bicubic]. Nearest keeps pixels sharp (good for pixel-art looks). Bilinear is the standard smooth option. Bicubic gives the smoothest, highest-quality result for HD/4K UV maps. |
Background
Background — what to show where the UV map has no valid coordinates (e.g. outside the rendered surface).
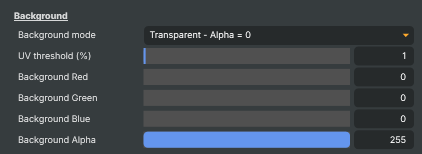
| Property | Description |
|---|---|
Background mode |
(advanced) What to display where the UV map is invalid (off-surface pixels). [default=Transparent]. Transparent fills with full transparency for compositing. Original shows the input layer untouched. Color uses the configured background colour below. |
UV threshold (%) |
(advanced) Minimum brightness in the UV map to count as a valid coordinate, percent. [min=0, max=100, default=1]. Keeps very dark UV pixels from accidentally pulling stretched edges of the source. Raise if you see colour bleed at object silhouettes; lower if valid edges are dropping out. |
Background Red |
(advanced) Red component of the background fill colour. [min=0, max=255, default=0]. Used when BackgroundMode is set to Color. |
Background Green |
(advanced) Green component of the background fill colour. [min=0, max=255, default=0]. |
Background Blue |
(advanced) Blue component of the background fill colour. [min=0, max=255, default=0]. |
Background Alpha |
(advanced) Alpha (opacity) of the background fill colour. [min=0, max=255, default=255]. 255 = fully opaque, 0 = fully transparent. Lower for a partially transparent fill. |
UV Options
UV Options — fix common UV-orientation differences between 3D packages.
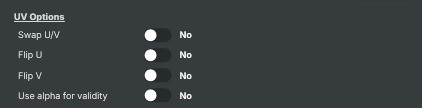
| Property | Description |
|---|---|
Swap U/V |
(advanced) Swap the U and V channels of the UV map. [default=No]. Use this when the UV pass came from a tool that uses a swapped axis convention and the result looks transposed. |
Flip U |
(advanced) Flip the U (horizontal) coordinate. [default=No]. Mirrors the source layer left-right within the projection. |
Flip V |
(advanced) Flip the V (vertical) coordinate. [default=No]. Mirrors the source layer top-bottom. Often needed when importing UV passes from renderers that use a flipped V convention compared to image files. |
Use alpha for validity |
(advanced) Use the UV map's alpha channel to mark valid areas. [default=No]. On = transparent UV-map pixels are treated as off-surface (background fill applies). Off = validity is judged purely by the brightness of the red and green channels. |
Performance and Properties
Performance and Properties — status messages from the operator.

| Property | Description |
|---|---|
Message |
Most recent status message from the operator (read-only, debug). |
Inherits from: AbstractOperator, AbstractAudioMetering.
See also: UV Remap in Script Engine Objects.