

Object Detection
Object Detection is a powerful AI feature that analyzes images and video feeds to identify and locate objects in real time. It works by detecting specific objects, such as people, vehicles, or other defined items, and highlighting them with bounding boxes and labels.
This feature can be used for a variety of purposes, such as:
- Monitoring and Security: Detect objects of interest in surveillance footage.
- Automation: Automate processes, such as counting items or triggering actions when certain objects are detected.
- Real-Time Insights: Gain immediate data and insights from your live stream to make informed decisions.
💡 Tip
Explore Composer's custom Blackjack Model, designed to detect and identify playing cards on-screen in real time. Contact RealSprint for access.
With its versatility, Object Detection can transform your live video streams into actionable tools for various industries and use cases.
System requirements
The object detection operator requires additional CUDA Toolkit + cuDNN prerequisites — see the cuDNN setup section in Installing on Windows or the optional-packages section in Installing on Linux.
Models and Compatibility
Composer allows you to bring your own YOLO models for Object Detection, offering flexibility and customization for your specific use case. By using pre-trained models or training your own, you can tailor the detection process to match your application's needs.
For more on how to train your own model, please refer to the Ultralytics YOLO documentation.
- Composer supports YOLO object detection models: YOLOv8, v9, v10, v11, v12, v26.
Models must be exported to ONNX with the matching opset version number:
opset
17→ YOLOv8-YOLOv12
opset18→ YOLOv26Export from CLI:
yolo export model=path/to/[your_model].pt format=onnx opset=[opset_version]Export from Python:
from ultralytics import YOLO
model = YOLO("path/to/[your_model].pt")
model.export(format="onnx", opset=[opset_version])
For details on exporting YOLO models to ONNX, refer to the YOLO documentation
ℹ️ Licensing for User-Supplied Models
- Commercial use of user-supplied YOLO models trained with Ultralytics tooling requires an Ultralytics Enterprise License.
- Composer does not provide or manage Ultralytics licenses.
For details, see Ultralytics Licensing.
Getting Started — Load a Model
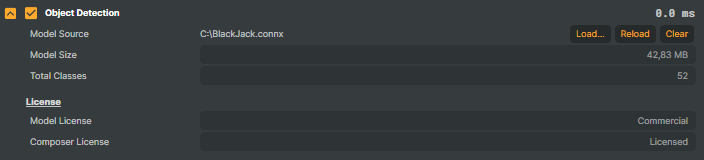
To use Object Detection in Composer, the first step is to load your YOLO-trained ONNX (or a CONNX model, such as Composer's Blackjack model) into Composer:
Click the Load button to open a file dialog. Browse to the location of your ONNX model file and select it.
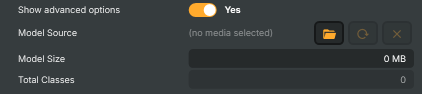
Once loaded, the model's information will be displayed. Example:
- Model Source: Current loaded model
- Model Size: Size in MB.
- Total Classes: Number of classes the model is trained to detect.
- Model License: Indicates whether the model uses YOLO licensing or is Composer-trained.
- Composer License: Confirms your license status for the model.
Select Execution Provider
Composer uses your NVIDIA GPU to accelerate object detection. With CUDA, you get reliable performance right out of the box. TensorRT goes a step further by optimizing your ONNX model for extra speed and efficiency, which is especially valuable in real-time streams. TensorRT is NVIDIA's high-performance engine that optimizes your neural network model for fast and efficient execution on your GPU.
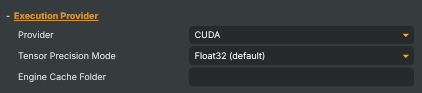
- Provider — choose which execution provider Composer will use for object detection:
- CUDA – Default. Acceleration using your NVIDIA GPU.
- TensorRT – Optimizes your model for higher speed and efficiency.
- Tensor Precision Mode (TensorRT only) — control the balance between speed and accuracy:
- Float32 – Default. Provides the highest detection accuracy, ideal when precision is most important.
- Float16 – Faster processing with minimal loss of accuracy, perfect for real-time performance.
- Engine Cache Folder — Windows/Linux (TensorRT only) — specify an absolute folder path with read and write permissions on your current operating system (Windows or Linux) where Composer will save the optimized TensorRT engine file. Make sure the folder exists on the machine that will run the project and that the folder path uses the correct syntax for your operating system.
- Windows:
c:\path\to\folder - Linux:
/home/<username>/path/to/folder
- Windows:
💡 Running TensorRT for the first time
When running a model with TensorRT for the first time, Composer will generate the engine cache. This may take anywhere from a few seconds to several minutes, depending on your hardware, the complexity of the model, and the selected precision mode. Storing the engine ensures faster model loading in future sessions, as Composer can reuse the precompiled engine instead of rebuilding it each time.
💡 The engine cache file is hardware-specific
The engine cache file is hardware-specific and optimized for your GPU, operating system (Windows or Linux), and chosen precision mode. Do not share the same engine file between different systems unless the hardware and OS are identical. The engine cache must be managed by the user, as Composer does not delete these files automatically.
Model Input Resize Mode
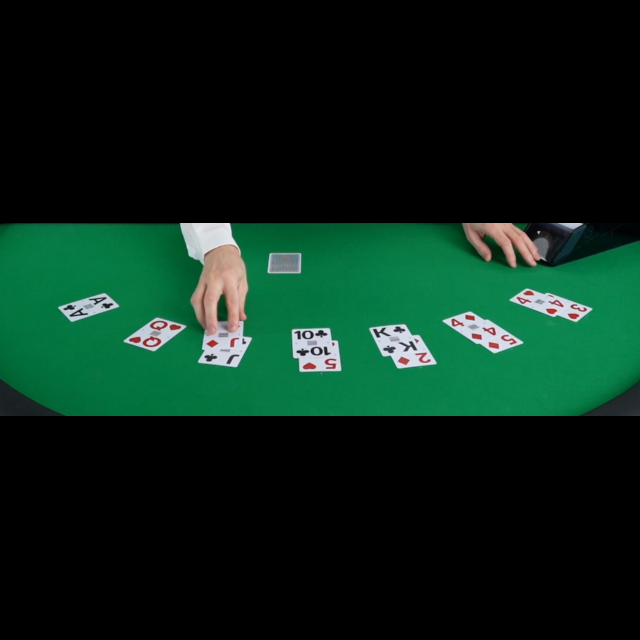
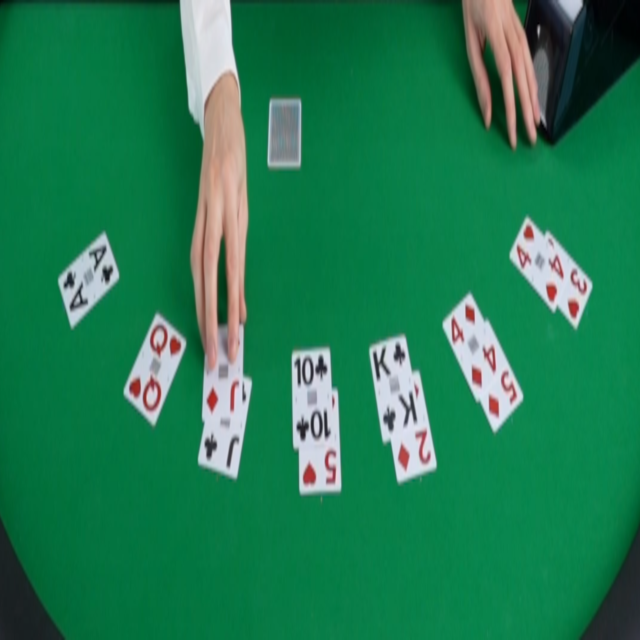
The Model Input Resize Mode option determines how Composer will resize each video frame before feeding it into the model for object detection processing. You can choose between two resize modes: Proportional and Stretched. Select the best mode based on the dataset image resizing the model was trained on to achieve optimal performance.
Proportional Mode (default) — Composer resizes each frame proportionally to fit within the model's input dimensions. The aspect ratio of the original frame is preserved, and padding may be added to maintain the model's required dimensions. Example:
Stretched Mode — directly resizes the frame to match the model's input dimensions, regardless of the aspect ratio. This can result in distortion if the original aspect ratio differs significantly from the model's input dimensions. While this can cause distortion if the aspect ratio differs significantly, it may also help retain image details depending on the dataset the model was trained on. Example:
💡 Note
Always select the resize mode that matches the dataset your model was trained on. Choosing the correct mode ensures frame resizing aligns with training conditions, directly impacting the model's ability to detect objects and the accuracy of its results.
Detection Area
The Detection Area option allows you to define a specific area on the screen where object detection will take place. This can be useful if you only want to detect objects within a particular region of interest rather than processing the entire image.
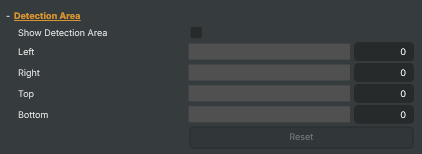
You have five options to configure the Detection Area:
- Show Detection Area: This option displays a box on the screen, marking the area of interest for visual confirmation. It helps you see exactly where object detection will be focused, allowing for easy adjustments.
- Left: Resize and move the detection area from the left side of the screen.
- Right: Resize and move the detection area from the right side of the screen.
- Top: Resize and move the detection area from the top of the screen.
- Bottom: Resize and move the detection area from the bottom of the screen.
Click on the Reset button to reset if needed.
This feature is particularly useful if you want to focus object detection on a specific part of the video feed, reducing unnecessary processing and improving performance.
Note
If you are using Composer's Blackjack model, the aspect ratio of the detection area is locked to match the expected input size.
Start and Stop Object Detection
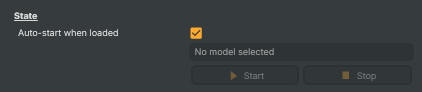
To activate Object Detection, click Start to activate and Stop to deactivate.
If you wish the Operator to start Object Detection automatically, simply check the Autostart checkbox and save your project. Next time you start composer, Object Detection will start automatically.

Classes
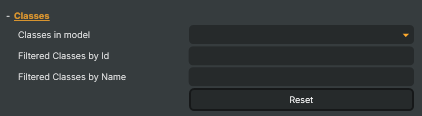
The Classes section allows you to filter the classes the model detects so you can focus on specific objects of interest. If the model has been trained to detect multiple object classes but you are only interested in a few, these options can help you narrow down the detection results.
There are three options available in the Classes section:
- Classes In Model — a dropdown that displays all the classes and their associated IDs the model is capable of detecting. This allows you to see exactly what the model was trained to recognize.
- Filter Classes By Id — enter the class IDs of the objects you want to detect. These IDs should be entered as a comma-separated list. Only the classes corresponding to the specified IDs will be included in the detection results; all other objects will be excluded.
- Filter By Class Name — similar to "Filter Classes By Id", this option allows you to filter detections by class names. Enter the names of the classes you're interested in as a comma-separated list. You can also use wildcards (
*) before and after class names for more flexible filtering. For example, if you want to detect all cards with the name "hearts" from a deck, you could enter*heartsto filter all classes whose names end with "hearts" or*ace*to filter all objects containing "ace".
These filtering options help you fine-tune the detection process by focusing on the classes that are most relevant to your use case, reducing the amount of irrelevant data and improving the detection efficiency.
Threshold
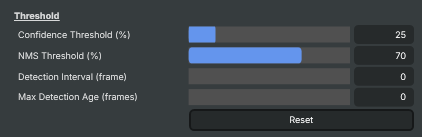
The Threshold section allows you to adjust various threshold values that control the behavior and accuracy of the object detection. These settings help fine-tune how the model performs and how often detections are made.
- Confidence Threshold — sets the minimum confidence level required for the model to consider an object as detected. The confidence threshold is specified as a percentage, ranging from 10% to 100%. A higher value means only objects with higher confidence will be considered valid detections. For example, a setting of 70% means only objects with a detection confidence score of 70% or higher will be recognized.
- NMS Threshold (Non-Maximum Suppression) — controls the level of overlap allowed between multiple detections of the same object. Non-maximum suppression (NMS) helps eliminate redundant bounding boxes by keeping only the one with the highest confidence score. The NMS threshold determines how much overlap is permissible before a second bounding box is suppressed. Lower values will result in fewer detections being retained.
- Detection Interval — controls how frequently object detection occurs. A value of 0 means detection is performed on every frame. If you set the detection interval to 5, detection will only occur on every 5th frame. This is useful for reducing computational load if you don't need to perform detection on every frame of the video.
- Max Detection Age — determines how many frames a previous detection will be displayed in case of frame loss. For example, if the model loses track of a detected object, the detection will persist for the number of frames specified in this setting. This helps maintain detection continuity in case of brief occlusions.
These threshold settings allow you to adjust detection sensitivity, performance, and how long detected objects are displayed, providing greater control over the detection process.
Script Callback Function
The Script Callback Function is an optional setting that allows you to define the name of a custom function to be triggered when objects are detected. This feature is designed for advanced users who want to automate actions with Composer's powerful Script Engine.
By specifying a function name, Composer will call the defined function whenever an object detection event occurs. This enables you to:
- Trigger custom actions when specific objects are detected.
- Update scenes, layers, or other elements within the application.
- Integrate with external systems or APIs based on object detection results.
For example, you could write a script to change a scene whenever a certain object is detected and update on-screen texts, counters, or log detection events for further analysis.
This feature provides flexibility for automating workflows and enhancing the functionality of Composer according to your specific needs. Read more about Script Engine here.
Visualization
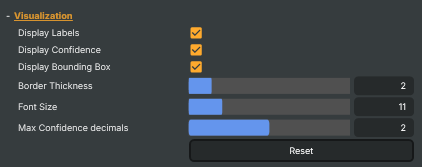
The Visualization section provides options for customizing the visual display of detected objects on the screen. These settings allow you to modify how detection results are shown, making it easier to interpret and analyze the objects detected by the model.
The following options are available:
- Display Labels — enables the display of labels for detected objects. When enabled, the label (such as "person", "car", etc.) will be shown next to the object's bounding box for easy identification.
- Display Confidence — displays the confidence value of each detected object. The confidence value indicates how certain the model is about the detection, expressed as a percentage (e.g., 85%). Enabling this option will show the confidence score next to each detected object's label.
- Display Bounding Box — draws a bounding box around each detected object. The box will highlight the area where the object was detected in the frame, making it visually clear where the detection occurred.
- Border Thickness — controls the thickness of the bounding box borders. By adjusting this value, you can make the bounding boxes more visible or less intrusive, depending on your preference.
- Font Size — defines the font size used when displaying labels and confidence values. You can adjust the font size to ensure the text is easily readable or fits better within the visual space of the frame.
- Max Confidence decimals — specifies how many decimal places (0–4) are shown for confidence scores in the on-screen display. Values are rounded to the nearest decimal based on the setting. This only affects visualization, not the underlying detection results.
These options provide full control over the visual presentation of detection results, allowing you to tailor the display to your needs.
Detection Stats
The Detection Stats show what the model is currently detecting.
- Total Detections — displays the total number of objects found in the current frame.
- Highest Confidence — displays the object with the highest Confidence score in the current frame.
- Detected Classes (ID) — a comma-separated string with IDs of all detected objects.
- All Detected Classes (JSON) — a JSON string with all objects, IDs, labels, bounding boxes, confidence scores, etc, that can be used for further processing with Composer's Script Engine.
- Processed Frames — total frames processed by the object detection model.
- Detection thread time (ms) — displays the time in milliseconds taken by the detection thread to perform inference on the current frame.
- Result paint time (ms) — displays the time in milliseconds required to render (draw) the detection results on screen. The value depends on which visualization options (labels, bounding boxes, confidence) are enabled.
Data Collection
The Data Collection feature allows you to save video frames that contain detected objects for later use. This helps you analyze your object detection results more closely or build and improve your object detection datasets. You can collect frames either manually or automatically based on your preferences.
Example use cases:
- Manually capture specific frames you want to review or annotate later.
- Automatically save frames when detected objects have confidence levels below a set threshold — helpful for spotting challenging cases where the model needs improvement.
- Build custom datasets by collecting real-world examples to retrain or fine-tune your models.
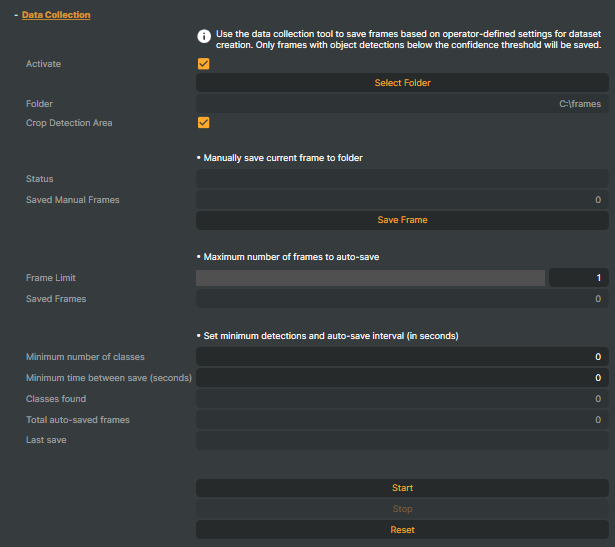
Select folder
- Activate — checkbox enables or disables the Data Collection feature.
- Select Folder — choose the folder where all collected frames will be saved.
- Crop Detection Area — crops each saved frame to the defined Detection Area.

Manual Save
- Status — shows a message indicating whether the current frame was successfully saved or not, helping you monitor the Data Collection process in real time.
- Saved Manual Frames — displays the total number of frames you have saved manually so far. This helps you keep track of your manual data collection progress.
- Save Frame — click this button to manually save the current video frame immediately. Use this to capture important frames on demand for later analysis or annotation.

Automatic Save
- Frame Limit — set the maximum number of frames the operator will save automatically. You can choose any value between 0 and 100,000. Setting this limit helps control storage use by restricting how many frames are collected automatically.
- Saved Frames — shows the total number of frames that have been saved automatically so far. This helps you keep track of the automatic data collection progress.

Save Conditions
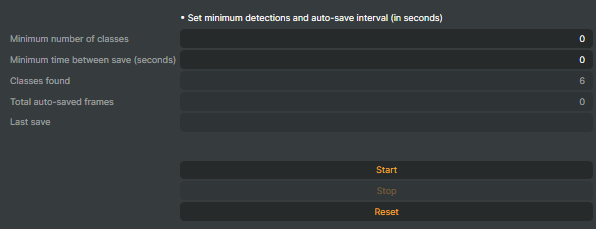
- Minimum Number of Classes — set the minimum number of detected objects required for a frame to be saved automatically. Choose any value from 0 to 1000. This ensures only frames with enough relevant detections are collected, helping you filter out less useful data.
- Minimum Time Between Saves (seconds) — specify the minimum number of seconds that must pass after the last saved frame before a new frame can be saved. This helps prevent saving too many frames in quick succession, managing storage and processing resources efficiently.
- Classes Found — displays the number of different object classes detected in the frame that was just saved. This gives you insight into what the model identified at the moment of capture.
- Total Auto-Saved Frames — shows the total count of all frames saved automatically so far. This helps you track your automatic data collection progress over time.
- Last Save — displays the exact time when the last frame was saved. This helps you monitor recent activity and understand the frequency of automatic saves.
Object Detection - Settings
| Property | Description |
|---|---|
Show advanced options |
Whether to reveal advanced configuration in the editor. [default=false]. Toggle on to show options like the execution provider, detection area, classes and data collection. |
Model Source |
Path to the AI model file (.onnx or encrypted .connx) used for object detection. Pick a detection-type model trained on the objects you care about. Loading a new model reinitialises the operator and refreshes the available class list. Composer-encrypted (.connx) commercial models may be license-limited. |
Model Size |
Size of the loaded model file, formatted as a string (read-only). |
Total Classes |
Number of distinct object classes the loaded model can detect (read-only). Reflects what the model was trained on — for example, a generic everyday-objects model reports around 80 classes, while a specialised model may report only a handful. |
License
License — licensing details of the loaded model.

| Property | Description |
|---|---|
Model License |
License declared by the model itself (read-only). |
Composer License |
Composer-side license status for commercial Composer-issued models (read-only). Reads "Licensed" if your Composer license covers this model, "Unlicensed" if it doesn't — unlicensed Composer models stop running after a short trial window. |
Execution Provider
Execution Provider — which AI runtime processes the model.
| Property | Description |
|---|---|
Provider |
Which runtime the model runs on — CUDA (default) or TensorRT. CUDA works out of the box on any compatible GPU. TensorRT is faster once the engine cache is built but takes time to generate that cache the first time. Pick TensorRT for long-running production setups; stick with CUDA for quick experimentation. |
Tensor Precision Mode |
Numeric precision used by the TensorRT engine — FP32 (default) or FP16. FP32 gives the most accurate results; FP16 is faster and uses less memory at a small accuracy cost. Only relevant when ExecutionProvider is TensorRT. |
Engine Cache Folder |
Folder where the TensorRT engine cache is stored. Must be a folder with read and write permission. Building the engine cache the first time takes minutes; subsequent runs reuse the cached file. Only relevant when ExecutionProvider is TensorRT. |
Model Input Resize Mode
Model Input Resize Mode — how the frame is fitted to the model's input size.

| Property | Description |
|---|---|
Resize Mode |
How the frame is fitted to the model's input size — Proportional or Stretched. Proportional preserves the aspect ratio (recommended in most cases). Stretched distorts the image to fill the model's input — only useful for models trained on a stretched dataset. |
Detection Area
Detection Area — limit detection to a sub-region of the frame to save processing and avoid false positives.
| Property | Description |
|---|---|
Show Detection Area |
Whether to draw the detection area outline on screen. [default=false]. Useful while configuring the area; turn off in production output. |
Left |
Detection-area inset from the left edge, in pixels. [min=0, max=4096, default=0]. Together with the other Crop sliders, defines a sub-region of the frame to scan. Use to cut out areas that produce false positives (signage, screens in the background) or to focus on the area that actually matters. |
Right |
Detection-area inset from the right edge, in pixels. [min=0, max=4096, default=0]. |
Top |
Detection-area inset from the top edge, in pixels. [min=0, max=4096, default=0]. |
Bottom |
Detection-area inset from the bottom edge, in pixels. [min=0, max=4096, default=0]. |
ResetCropAreaCommand |
Reset all detection-area insets so the full frame is scanned. |
State
State — operator running state and start/stop controls.
| Property | Description |
|---|---|
Auto-start when loaded |
Whether to begin detection automatically once the model finishes loading. [default=true]. Saves a manual click when the project is loaded fresh; turn off if you want to start detection only on demand. |
DetectionState |
Current state of the operator (read-only). Reports whether the model is loading, ready, running, stopped, or in an error state. |
StartCommand |
Begin detecting objects in incoming frames. Available once a valid detection model is loaded. |
StopCommand |
Stop detecting objects in incoming frames. |
Classes
Classes — labels the model can detect, plus filters narrowing what the operator reports.
| Property | Description |
|---|---|
Classes in model |
Read-only list of every class the loaded model can detect. Useful for picking which class IDs or names to put in the filter fields. |
Filtered Classes by Id |
Comma-separated list of class IDs to keep — everything else is ignored. Use this to focus only on the objects you care about, for example "0,2" to keep only people and cars from a generic model. Leave empty to report all detected classes. |
Filtered Classes by Name |
Comma-separated list of class names to keep — everything else is ignored. Easier to read than IDs when you know the labels (for example "person,car"). Wildcards * match anywhere in the name (*phone*, tv*). Leave empty to report all detected classes. |
ResetClassFilterCommand |
Clear both class filters so every detected class is reported again. |
Threshold
Threshold — accuracy/sensitivity controls and how often detection runs.
| Property | Description |
|---|---|
Confidence Threshold (%) |
Minimum confidence (in percent) a detection must score to be reported. [min=10, max=100, default=25]. Raise to suppress weak detections — only highly confident bounding boxes get through. Lower to surface marginal detections, at the cost of more false positives. |
NMS Threshold (%) |
How aggressively overlapping bounding boxes are merged into one. [min=0, max=100, default=70]. Lower values merge overlapping boxes more aggressively, reducing duplicates around the same object. Higher values keep more boxes — useful when objects of interest genuinely overlap (a row of cars, a crowd). |
Detection Interval (frame) |
Run detection only every Nth frame. [min=0, max=1000, default=0 (every frame)]. Set to 0 for the most responsive results — every frame is detected. Higher values reduce overall load by only running the model occasionally and reusing the previous boxes in between, useful when scenes change slowly and you want to keep capacity free for other operators. |
Max Detection Age (frames) |
How many frames the last good detection stays valid if a later frame fails to detect. [min=0, max=60, default=3]. Higher values smooth over occasional misses by holding the last bounding boxes in place; lower values react faster to genuine changes but show empty results during brief glitches. |
ResetThresholdCommand |
Reset all settings to their defaults (confidence, NMS, detection interval, max detection age). |
Script callback function (optional)
Script callback function — invoke a Script Engine function whenever new detections arrive.

| Property | Description |
|---|---|
Function name |
(advanced) Name of a Script Engine function to call each time detection produces a new result. Receives the JSON payload from DetectedClassesJson. Leave empty to disable. Useful for triggering scene switches, alerts, or downstream effects when something appears. |
Visualization
Visualization — what the operator overlays on the output image.
| Property | Description |
|---|---|
Display Labels |
Whether to draw class names on each detected object. [default=true]. Turn off for a cleaner output where you only want to see the bounding boxes, or use the JSON output downstream without on-screen labels. |
Display Confidence |
Whether to draw the confidence score (in percent) on each detected object. [default=true]. |
Display Bounding Box |
Whether to draw a rectangle around each detected object. [default=true]. Turn off if you want to use the JSON output downstream without any on-screen overlay. |
Border Thickness |
Thickness of the bounding box outline, in pixels. [min=1, max=8, default=2]. |
Font Size |
Size of the label and confidence text drawn on each detection, in pixels. [min=6, max=30, default=11]. |
Max Confidence decimals |
Number of decimal places shown for the confidence percentage. [min=0, max=4, default=2]. |
ResetVisualizationCommand |
Reset all visualization settings to their defaults (labels, confidence, bounding boxes, thickness, font, decimals). |
Detection Stats
Detection Stats — what the model found on the most recent frame.

| Property | Description |
|---|---|
Total Detections |
Number of objects detected in the most recent processed frame (read-only). |
Highest Confidence |
Label and confidence of the strongest detection in the most recent frame (read-only). Formatted as "Name [class: id, confidence: 95.32%]". Empty when nothing is detected. |
Detected Classes (Id) |
Comma-separated list of class IDs detected in the most recent frame (read-only). Just the unique IDs — convenient for quick scripting checks like "is class 0 in this list". |
All Detected Classes (Json) |
All detections in the most recent frame as a JSON array (read-only). Each element contains id, name, confidence, bounding box (x, y, width, height), frame number and timestamp. Convenient payload for scripts and external systems — feed this directly into a callback function and parse fields on the receiving side. |
Processed Frames |
Total number of frames the operator has processed since it started (read-only). |
Detection thread time (ms) |
Time the AI model took to process the last frame, formatted as a millisecond string (read-only, debug). |
Result paint time (ms) |
Time taken to draw the bounding boxes onto the last frame, formatted as a millisecond string (read-only, debug). |
Data Collection
Data Collection — capture frames where objects fall below confidence to grow your training set.
| Property | Description |
|---|---|
Activate |
Whether the data collection workflow is active. [default=false]. When on, the operator can save frames where detection falls below the confidence threshold — useful for collecting more training data on the cases the current model gets wrong. |
Select Folder |
Open a folder picker to choose where collected frames are written. |
Folder |
Folder where collected frames will be saved (read-only). Set via the folder-picker command. |
Crop Detection Area |
Whether collected frames are cropped to just the detection area before saving. [default=true]. On to save smaller, focused images that match what the model actually sees. Off to save the full frame for context. |
Status |
Status message from the last manual save attempt (read-only). |
Saved Manual Frames |
Total number of frames saved by the manual Save command this session (read-only). |
Save Frame |
Save the current frame as a JPEG to the configured folder, if any object detection falls below the confidence threshold. |
Frame Limit |
Maximum number of frames the auto-collect run will save before stopping. [min=1, max=10000, default=1]. Acts as a safety stop so a long unattended run can't fill the disk. |
Saved Frames |
Total number of frames the auto-collect run has saved so far (read-only). |
Minimum number of classes |
Minimum number of detections in a frame before auto-collect will save it. [min=0, max=1000, default=0]. Useful to avoid saving frames that don't contain any objects of interest. |
Minimum time between save (seconds) |
Minimum delay between consecutive auto-saves, in seconds. [min=0, max=600, default=0]. Stops the operator from saving near-identical frames in rapid succession. |
Classes found |
Number of distinct object classes detected in the last saved frame (read-only). |
Total auto-saved frames |
Cumulative auto-save counter across the run (read-only). |
Last save |
Timestamp of the most recent auto-save (read-only). |
StartAutoCollectFramesCommand |
Begin the auto-collect run with the configured frame limit, minimum class count, and save interval. |
StopAutoCollectFramesCommand |
Stop the auto-collect run early. |
ResetAutoCollectFramesCommand |
Clear the auto-collect counters and timestamps to start a fresh run. |
Inherits from: AbstractOperator, AbstractAudioMetering.
See also: Object Detection in Script Engine Objects.