

Noise Reduction
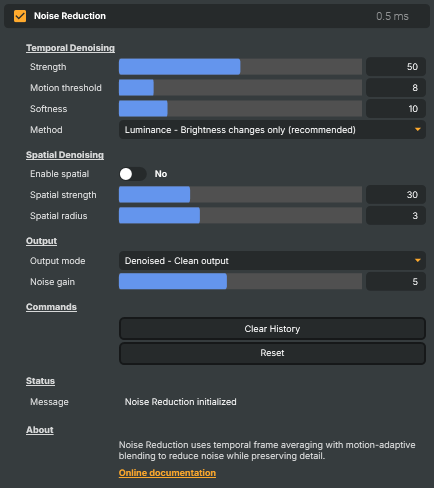
The Noise Reduction operator cleans up grainy, speckled, or otherwise noisy footage in real time, while keeping fine detail and moving subjects sharp. It's designed for the kinds of sources that almost always look noisier than you'd like on a big screen — low-light camera feeds, compressed contribution streams, sensor grain from action cams and phones, or older SD material that needs a bit of help before going to air.
Because the operator runs on the GPU and processes every frame as it passes through the layer chain, you can drop it in upstream of colour correction, scaling, or keying without adding noticeable latency. Tune it once for a given source and the rest of the production stays clean.
What is video noise?
Most "noise" in a video feed is random pixel-level variation introduced somewhere between the lens and your screen. The most common sources are:
- Sensor noise — the camera's image sensor amplifies whatever light it captures, and in dim conditions it also amplifies its own electronic noise floor. The result is a fine, dancing grain that's most visible in shadows and flat colours.
- Compression noise — codecs like H.264 throw away information to keep the bitrate down. When the bitrate is too low for the content, the discarded detail comes back as blocky artefacts, mosquito noise around edges, and time-varying speckles.
- Transmission noise — analogue chains and some legacy SDI conversions can introduce hum bars, chroma noise, and dropouts.
The eye is especially good at picking out noise on flat areas (skin, sky, walls) and on static shots, where there's no motion to distract from the shimmer. A noisy feed also costs you bitrate downstream: every encoder you put after it has to spend bits encoding the random grain instead of the real picture.
How the operator cleans it up
Noise Reduction combines two complementary passes, each of which can be tuned or disabled independently.
- Temporal denoising averages the current frame against recent frames. Because real noise is random from frame to frame, averaging cancels it out — while genuine picture content (which doesn't change from frame to frame) survives intact. A built-in motion check means moving objects aren't blended with their previous positions, so they don't leave ghost trails behind them.
- Spatial denoising is an optional second pass that smooths within a single frame, preserving edges. It's most useful on still or near-still shots where there isn't much motion for the temporal pass to work with, or when stubborn noise survives the temporal step.
The two passes are independent — you can run temporal alone (the most common choice), spatial alone, or both together for the heaviest cleanup.
What you control
The property panel groups the settings by purpose:
- Temporal Denoising —
Strength(how aggressively to average across frames),Motion threshold(how big a pixel change has to be before it's considered motion rather than noise),Softness(how smoothly the operator transitions between "smooth this" and "leave this alone"), andMethod(how pixel differences are measured — luminance is the safe default). - Spatial Denoising —
Enable spatialto turn it on, thenSpatial strengthandSpatial radiusto control how much smoothing and how big a neighbourhood it looks at. - Output —
Output modechooses between the clean image, aNoise Onlydiagnostic view that shows just the noise being removed, and aSide by Sideview that puts the original and the cleaned image next to each other.Noise gainbrightens the diagnostic view so subtle noise is easier to see when tuning. - Commands —
Clear Historydiscards the temporal pass's recent-frames memory, which is the right thing to do after a hard cut between two unrelated shots.Resetputs every property back to its default.
The output modes are particularly useful during setup: switch to Noise Only while you adjust Strength and Motion threshold until the diagnostic view shows mostly grey (no noise being removed) on stationary content and barely anything on moving content. That's the sweet spot where you're removing the noise without smearing the picture.
You can also bind the output mode to a keyboard shortcut — F1 for Denoised, F2 for Noise Only, F3 for Side by Side, F5 to clear history — for quick A/B comparisons while the show is running.
Example use cases
- Cleaning up low-light camera feeds from cameras shooting in dim venues, night events, or under coloured stage lighting.
- Smoothing compressed contribution feeds coming in over RTMP or SRT from remote presenters before they go on air.
- Reducing sensor grain on action cameras and phones so the result looks closer to a broadcast camera.
- Improving the encoder efficiency downstream — a clean signal compresses far better than a noisy one, so the same bitrate buys a sharper final picture.
- Restoring older SD material that's being repurposed for a modern HD or UHD production.
Practical tips
- Start with temporal only. It's the cheaper of the two passes and handles the most common kind of noise. Add spatial only if temporal alone isn't enough.
- Use the diagnostic views when tuning. Switch to
Noise Onlywhile you adjust the temporal settings — what you want to see is mostly flat grey on stationary regions (nothing being removed when there's nothing to remove) and very little change on moving regions (motion left alone). - Clear history after a hard cut. Without clearing, a sliver of the outgoing shot can briefly bleed into the incoming one through the temporal averaging. The
Clear Historycommand — or the F5 shortcut — handles it instantly. - Don't over-denoise. Pushed too far, noise reduction starts to look "plastic" or "watercolour" as fine texture (skin pores, fabric weave, foliage) disappears along with the noise. Aim to make the grain less visible, not to remove it completely.
- Watch for ghosting on slow motion. If you see faint trails behind slow-moving objects, lower
Strengthor raiseMotion thresholduntil they disappear.
Noise Reduction - Settings
Temporal Denoising
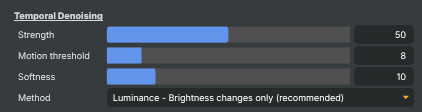
Temporal Denoising — averages across frames to remove time-varying noise.
| Property | Description |
|---|---|
Strength |
How aggressively the temporal denoiser smooths across frames. [min=0, max=100, default=50]. 0 disables the temporal pass. Higher values blend more of the previous frame in, removing more noise — but at high values, slow-moving objects can leave faint trails ("ghosting"). 30–60 is a good range for most material. |
Motion threshold |
How big a pixel change has to be before it counts as motion rather than noise. [min=1, max=50, default=8]. Pixels below the threshold are smoothed; pixels above it are left alone so motion stays sharp. Lower values denoise more aggressively but risk smearing fine motion. Higher values protect motion at the cost of letting more noise through. |
Softness |
Width of the soft transition between "this is noise" and "this is motion". [min=0, max=50, default=10]. 0 gives a hard switch — pixels are either fully smoothed or fully unaffected, which can cause visible banding around moving edges. Higher values blend the two behaviours smoothly across a range of pixel-difference values, hiding the switch. |
Method |
How the operator measures the change between adjacent frames. [default=Luminance]. Luminance looks only at brightness changes — robust to chroma noise and the best default for most footage. Max Channel uses the largest of the R/G/B differences. RGB Magnitude uses the Euclidean distance across all three channels — strictest, flags more pixels as motion. |
Spatial Denoising
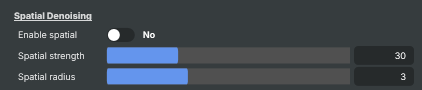
Spatial Denoising — additional within-frame smoothing for stubborn noise.
| Property | Description |
|---|---|
Enable spatial |
When true, an edge-preserving spatial filter runs after the temporal pass. [default=false]. Helps clean up noise that survives temporal denoising — typically on still or near-still footage where there's little frame-to-frame variation to average. Costs extra processing time, so leave off if temporal alone is sufficient. |
Spatial strength |
How aggressively the spatial filter smooths across similarly coloured neighbouring pixels. [min=1, max=100, default=30]. Lower values preserve more fine detail; higher values produce a softer, more painted look. Only takes effect when EnableSpatial is true. |
Spatial radius |
Pixel radius the spatial filter looks at around each pixel. [min=1, max=7, default=3]. Larger radii give smoother results at higher processing cost. Only used when EnableSpatial is true. |
Output
Output — what the operator outputs (denoised or diagnostic views).

| Property | Description |
|---|---|
Output mode |
What the operator produces on the output. [default=Denoised]. Denoised is the normal mode — the cleaned-up image. Noise Only shows just the noise that was removed (a uniformly grey image when nothing is being filtered) — useful for tuning thresholds. Side by Side puts the original on the left and the cleaned image on the right for direct comparison. |
Noise gain |
Brightness boost applied to the Noise Only view. [min=1, max=10, default=5]. Higher values make subtle noise easier to see when tuning. Only affects the Noise Only output mode — has no effect on the actual denoised image. |
Commands
Commands — manual actions for resetting state.

| Property | Description |
|---|---|
Clear History |
Clear the temporal filter's frame history. Useful after a hard cut between scenes — without clearing, content from the previous shot can briefly bleed into the new one through the temporal averaging. |
Reset |
Reset all settings to their defaults (50 strength, 8 motion threshold, 10 softness, Luminance method, spatial off, Denoised output). |
Status
Status — most recent state message.

| Property | Description |
|---|---|
Message |
Most recent status message from the operator (read-only). Reports things like "history cleared" or "output mode changed". Useful as a quick confirmation that an action took effect. |
Inherits from: AbstractOperator, AbstractAudioMetering.
See also: Noise Reduction in Script Engine Objects.