

Matte Paint Keyer
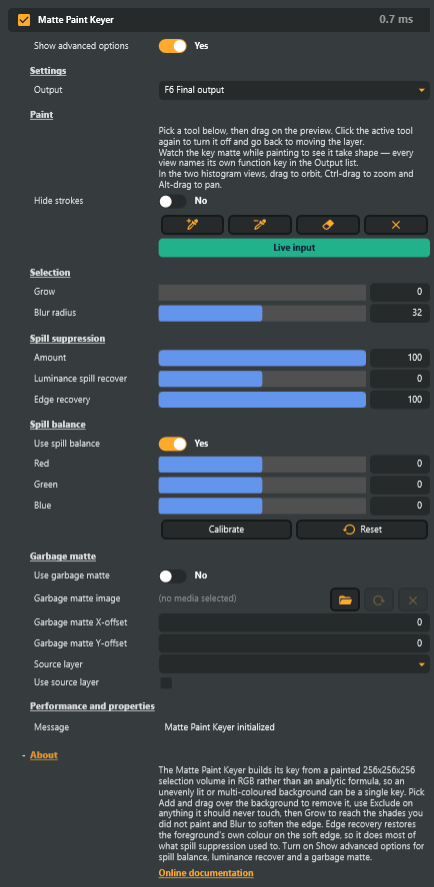
Conventional chroma keyers describe the background with a formula: pick a screen colour, then set a tolerance and a softness around it. That works when the screen really is one colour. It struggles the moment reality intervenes — a cyclorama lit unevenly from one end to the other, a fold or a scuff, a hot spot under a practical, two different greens because a flat was repainted, or a set that needs both a green screen and a blue one keyed in the same shot.
The Matte Paint Keyer takes the opposite approach. Instead of describing the background, you paint it. The operator holds a 256×256×256 selection volume covering the whole of RGB space, and you mark the colours that are background by dragging over them in the preview. Anything you paint is keyed out; anything you do not is kept. An unevenly lit or multi-coloured background is no harder than a clean one, because nothing about the selection assumes the background is a single colour — or even a single region of colour space.
Painting the key
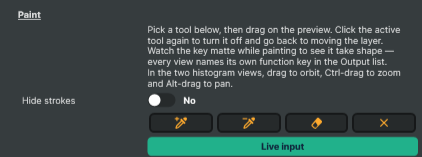
Pick a tool, then drag on the preview. Clicking the active tool again turns it off and gives you back normal layer manipulation.
- Add — mark colours as background. Drag over the screen; the matte updates as you go.
- Exclude — protect colours the key must never touch. Use it on skin, hair, or a prop that shares a shade with the backdrop. Exclude wins over Add, so you can paint broadly and then carve back what matters.
- Erase — undo part of the selection without protecting it.
Watch the key matte view while you paint rather than the final composite — it shows exactly what the
selection is doing. Every entry in the Output list names its own function key, so switching views is a
single keystroke: F1 unprocessed input, F2 key matte, F3 final output, F4 the 3D histogram, F5 the
histogram with the key drawn over it.
Reaching the shades you did not paint
You will never drag over every colour in the background, and you do not need to.
- Grow expands the selection outward through colour space, picking up neighbouring shades you missed. This is what turns a few strokes into a solid key.
- Blur softens the boundary of the volume, which is what gives the matte a soft edge instead of a hard, aliased cut.
The two histogram views are the fastest way to understand what these are doing. F4 scatters the incoming
image into the RGB cube — one small cube per occupied colour bin, each drawn in the colour it stands for — so
you can see where the screen's cloud actually sits and how close the foreground comes to it. F5 overlays the
key: the grown selection as a solid red volume, the blurred falloff as a glow around it. If the red volume does
not enclose the screen's cloud, Grow further; if its glow is reaching into colours you want to keep, that is
the fringe you are about to see on the matte. Drag to orbit, Ctrl-drag to zoom, Alt-drag to pan.
Spill
Green bouncing off a screen lands on the subject, and no matte fixes that — the pixel is kept, it is just the wrong colour.
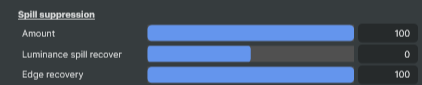
Edge recovery brings detail back in the half-transparent areas along the edge of the matte — hair, motion blur, smoke, the edge of glass — which handles most of what dedicated spill suppression used to be needed for. How much it helps depends on the shot: on some material it recovers strands and texture that suppression alone flattens, on other material it makes the edge worse. Compare a few settings against the shot rather than leaving it at one value. Beyond it, Amount sets the strength of spill suppression, and Luminance spill recover puts back brightness that suppression removed.
Advanced options
Turning on Show advanced options reveals three further groups:
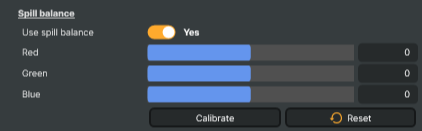
- Spill balance — per-channel red/green/blue trim, for a set where the standard suppression pulls the colour slightly the wrong way.
- Garbage matte — an image or an earlier layer that restores opacity, removes unwanted areas or protects a subject's colour. Use blue to remove a stand, red to keep an object opaque, or yellow to keep both its opacity and colour. Green protects colour even along partially transparent edges. See Settings below for the source and alignment controls, and the garbage-matte setup guide for file and live-layer examples.
- Histogram display controls — bin resolution, marker shape and size, colour space, density weighting, and the view camera.
Matte Paint Keyer - Settings
Properties marked (
Components) or (AudioMixer) broadcast a livePropertyChangedevent to clients subscribed to that WebSocket channel.

| Property | Description |
|---|---|
Show advanced options |
Reveals the fine-tuning controls: spill balance, luminance spill recover and the garbage matte. Leave off for a straightforward key; turn on for a difficult one. |
Settings
Settings — what the operator outputs.

| Property | Description |
|---|---|
Output (Components) |
MattePaintKeyerOutput — which view the operator renders. Each name carries its own function key, so the list is the hotkey reference and there is no second place to keep in step. Garbage matte shows the active image or layer with its offsets and source transparency; it shows black when the matte is disabled or no source is available. |
Paint
Paint — build the selection by sampling colours straight off the preview.
| Property | Description |
|---|---|
PaintHelp |
Gesture reference for painting into the selection. |
Hide strokes (Components) |
Hides the red dots that trace where you have painted. The dots only appear at all when this operator is selected and the global "Show handles" toggle is on; this hides them independently, for when they sit over the very edge you are trying to judge. |
Add |
Switch to additive painting — Shift-drag adds colours to the selection. |
Exclude |
Switch to subtractive painting — Shift-drag marks colours as foreground. |
Erase |
Switch to erasing — Shift-drag unmarks colours with a disc. |
Clear |
Discard the whole selection and return the operator to a pass-through. |
FreezeState (Components) |
Whether the incoming frame is passing through or being held still, as a two-state indicator. |
Selection
Selection — how the painted colours become a matte.

| Property | Description |
|---|---|
Grow (Components) |
Expands the selection through RGB space by this many steps in each direction, as a 3D maximum filter. [min=0, max=64, default=8]. This is the part of the selection — everything it reaches is keyed completely. At 256 steps per axis nothing is filled in implicitly, so a screen that ramps across shadow and highlight needs a fair amount of grow before the matte closes up. |
Blur radius (Components) |
Radius of the soft falloff added the grown selection, in RGB steps. [min=0, max=32, default=4]. A width in colour space, not pixels — it widens the transition between keyed and kept colours, which is what gives hair and motion blur a gradient rather than a hard cut. It cannot eat into the grown region, so raising it never makes the background less transparent. Total reach is roughly Grow + Blur radius. |
Spill suppression
Spill suppression — neutralises residual screen colour on foreground edges.
| Property | Description |
|---|---|
Amount (Components) |
Strength of spill suppression. [min=0, max=100, default=100]. 0 disables it. Works by limiting the screen channel to the strongest of the other two, so a pixel carrying more green than either red or blue has the excess removed. The screen channel is taken from the average of the painted colours, so there is nothing to configure — but it also means genuinely green foreground objects will lose saturation. |
Luminance spill recover (Components) |
Restores brightness that spill suppression removed, by adding neutral light back. [min=-200, max=200, default=0]. 0 disables it. |
Edge recovery (Components) |
Brings detail back in half-transparent areas — hair, motion blur, smoke, the edge of glass — instead of leaving them tinted by the screen behind them. [min=0, max=100, default=100]. 0 disables it. Whether it improves a shot depends on the material, so try a few settings and compare: on some footage it recovers detail that suppression alone loses, on other footage it makes the edge worse. It changes nothing where the matte is solid; the spill suppression below is what covers those pixels. |
Spill balance
Spill balance — where the light suppression removed is put back.
| Property | Description |
|---|---|
Use spill balance (Components) |
(advanced) Redistributes the light spill suppression removed into the other two channels. [default=true]. |
Red (Components) |
(advanced) Share of the removed spill added to red. [min=-255, max=255, default=0]. Locked to 0 while red is the screen channel — putting the screen's own channel back would undo the suppression. |
Green (Components) |
(advanced) Share of the removed spill added to green. [min=-255, max=255, default=0]. Locked to 0 while green is the screen channel. |
Blue (Components) |
(advanced) Share of the removed spill added to blue. [min=-255, max=255, default=0]. Locked to 0 while blue is the screen channel. |
Calibrate |
Recompute the three balance amounts from the current screen colour and Amount. Only needed after changing Amount — a change of screen colour recalibrates on its own. |
Reset |
Set the three balance amounts back to zero, leaving suppression un-compensated. |
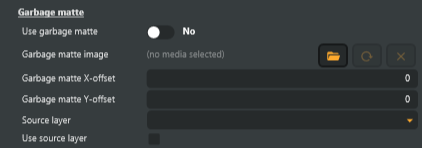
Garbage matte
Garbage matte — an image or earlier layer that adjusts opacity, spill suppression and edge recovery.
| Property | Description |
|---|---|
Use garbage matte (Components) |
(advanced) Enables the image or live layer selected as the garbage matte. [default=false]. Red adds opacity, blue removes opacity, and green reduces both spill suppression and edge recovery. Yellow combines opacity restoration with colour protection, including at partially transparent edges. Partial channel values apply proportionally. Turning this off bypasses either source without clearing the settings. |
Garbage matte image (Components) |
(advanced) Image file used when Use source layer is off, or when the selected layer has no rendered image. Use garbage matte must be enabled. Clearing the path removes the file matte without clearing the layer selection. RGB controls opacity and colour protection; the image's alpha controls its transparency in the Garbage matte view. |
Garbage matte X-offset (Components) |
(advanced) Horizontal offset of the file or live-layer matte, in pixels. Positive values move it right; negative values move it left. [default=0]. Areas outside the shifted matte leave the key unchanged. |
Garbage matte Y-offset (Components) |
(advanced) Vertical offset of the file or live-layer matte, in pixels. Positive values move it down; negative values move it up. [default=0]. The same offset applies to the key and the Garbage matte view. |
Source layer (Components) |
(advanced) Earlier layer in the scene's render order whose rendered output supplies a live garbage matte (experimental). Choose the layer before enabling Use source layer. Use garbage matte must also be enabled. |
Use source layer (Components) |
(advanced) Enable the experimental live-layer garbage matte in place of the image file. [default=false]. Choose the source layer first. Use garbage matte must also be enabled. Turning this off returns to the configured image file. A selected layer without a rendered image also falls back to that file. If the layer is removed or moved after this layer, the source selection is cleared and this switch turns off. |
Reset |
Return the histogram camera to its default three-quarter view. |
Performance and properties
Performance and properties — runtime status.

| Property | Description |
|---|---|
Message (Components) |
Status message about painting and solving. |
Inherits from: AbstractCameraFilteredOperator, AbstractOperator, AbstractAudioMetering, NamedModel.
See also: Matte Paint Keyer in Script Engine Objects.
Getting a soft edge
A matte only looks natural if it has an in-between. The pixels along a strand of hair or the edge of a sleeve are part foreground and part background, and they need to come out part transparent to match. The painted selection on its own cannot give you that: painting is all-or-nothing — a colour is either marked as background or it is not — so a key built from strokes alone is fully transparent or fully solid, with the step between them falling wherever your strokes happened to stop. That step is what a hard, jagged edge is.
Two controls decide whether the matte has any in-between at all:
- Grow expands the selection into a solid core. Everything it reaches is keyed completely. It buys coverage, never softness.
- Blur is the only source of partial transparency. It fades the selection out over a distance in colour space beyond the core, and that fade is what becomes a soft edge on screen.
So a wide Grow with a narrow Blur is the reliable way to get a cut-out look: a large solid region with almost no ramp around it. A new Matte Paint Keyer starts the other way round — no solid core, a wide ramp — so the edge begins soft and you tighten it deliberately rather than discovering it was hard all along. Raise Grow only as far as the screen actually needs, and leave the ramp room to work.
The F5 histogram view is the fastest way to see whether you still have one. It draws the key over the image's own
colour cloud: the solid part as a filled volume, the falloff as a glow around it. If the glow has gone, so has the
soft edge.
Go easy on Exclude
Exclude is applied after the fade, and it is absolute. Wherever an excluded colour lands, the matte is forced fully solid, and the ramp that was there is cut off flat instead of tapering. Add and Exclude are each hard-edged on their own, and where the two meet there is no gradient between them whatsoever — the matte can go from fully transparent to fully solid across a single shade. Paint enough of both and you have described the background very precisely and thrown away every transition pixel doing it.
Exclude also reaches further than the colour you dragged over. Each excluded colour clears a region the same size as Grow, so raising Grow widens the exclusions along with the selection. A couple of Exclude strokes on shades close to the screen colour can punch straight through the ramp you were relying on.
In practice:
- Paint Add broadly and let Grow and Blur do the reaching. Covering every shade by hand is the slower route to a worse matte.
- Use Exclude for colours genuinely far from the screen — a prop, a costume, skin. Avoid it on shades sitting just off the screen colour, because that is exactly where the semi-transparent edge pixels live.
- If edges have turned harsh, widen Blur first, then lower Grow, then remove Exclude strokes near the screen
colour. Watch the key matte (
F2) rather than the composite while you do it — harshness is visible there long before it shows up over a background. - Reach for Edge recovery and the garbage matte for what is left. Edge recovery brings detail back in the half-transparent areas along the edge — try it at a few settings and keep the one that looks best on this shot, because it is a clear win on some material and a step backwards on others. A garbage matte separates a real object that shares the screen's colour, which no amount of painting can do.
Garbage matte guide
See the garbage-matte guide for RGB channel meanings, combined colours and partial-strength masks.
Related components
The Matte Paint Keyer produces the matte, so it sits in the middle of the chroma-key chain. The components below are the ones on either side of it.
Alternative keyers — reach for one of these instead when the shot does not need what painting buys:
- HSV Keyer — the everyday choice, and quicker to set up when the screen really is one colour: pick the key colour, set a tolerance, done. The Matte Paint Keyer earns its extra work only on a screen that a single colour and tolerance cannot describe.
- IBK 3D Keyer — clean-plate-based image keyer. Holds fine hair, sheer fabric and contact shadows better than a painted selection can, provided you can shoot a clean plate that matches the live shot and keep it current. Not suitable for unattended 24/7 deployments.
- Difference Matte — also clean-plate-based, and needs no coloured screen at all. The one to use for a locked-off camera against an ordinary backdrop, where there is no screen colour to paint.
Compositing companions — add these after the Matte Paint Keyer to finish the composite:
- Spill Suppression — a dedicated stand-alone spill suppressor. The Matte Paint Keyer already has its own suppression stage plus Edge recovery, so this is a second pass for a shot that defeats both rather than a routine addition.
- Light Wrap — wraps a thin halo of the new background's colour around the keyed foreground so the subject reads as part of the scene it has been placed into. It works on the soft edge of the matte, so it pays off in proportion to how much ramp you kept.