

Chroma keying
Chroma keying replaces a uniformly-coloured background with transparency, so a foreground subject can be composited over a different background. Composer ships four keyer operators, each tuned for a different keying situation, plus two that finish the composite once the matte is clean:
HSV Keyer— colour-based keying in HSV space; simple and fast, suitable for clean, well-lit greenscreens.IBK 3D Keyer— 3D image-based keyer with built-in spill suppression; the recommended starting point for production-quality keys.Difference Matte— keys based on the difference between a live frame and a reference clean plate; useful when the background isn't a uniform colour.Matte Paint Keyer— you paint the background colours instead of describing them with a key colour and a tolerance; handles an unevenly lit or scuffed screen, and green and blue keyed in the same shot.Spill Suppression— removes residual greenscreen / bluescreen tint from the keyed foreground.Light Wrap— wraps a thin halo of the new background's colour around the keyed foreground so the subject reads as part of the scene it has been placed into.
Workflow
- Pick the right keyer for the source —
IBK 3D Keyerfor a typical greenscreen / bluescreen,Difference Matteif you have a static background but no chroma to key on,Matte Paint Keyerif the screen is not a single colour. - Pick the key colour — most keyers offer an eyedropper that samples the source frame.
- Refine the matte — pull the threshold up to remove stray green pixels; check edges for hard cutoffs vs. soft blending.
- Suppress spill — add a
Spill Suppressionoperator after the keyer if the foreground subject still has a green tint on hair or skin edges. - Stack the keyed layer in your scene with the desired blend mode (usually Normal — keyed alpha already handles transparency).
For lighting and shoot-side tips beyond the operator-level controls, RealSprint can provide consultancy through Professional Services; see the Troubleshooting & Support manual.
Garbage matte
The garbage matte lets you adjust opacity and protect colour in chosen parts of the frame. Its red, green and blue channels carry three kinds of information: additive alpha, subtractive alpha, and spill-suppression reduction. HSV Keyer and Matte Paint Keyer can use an image file or an earlier layer's rendered output as the matte.
Channel functions
Red channel. The red channel forces the keyer to include otherwise excluded (not solid) areas. This is called additive alpha.
The red pixel values in the garbage matte image are added to the alpha-channel value. A fully saturated red pixel with no blue makes the result fully opaque.
Green channel. Reduces colour-spill suppression without changing opacity. Full green prevents suppression; half green halves its strength; no green leaves it unchanged. In Matte Paint Keyer, green also reduces Edge recovery, so colour protection applies at partially transparent edges as well as in opaque areas.
Blue channel. The blue channel forces the keyer to exclude otherwise included (solid or half-transparent) areas. This is called subtractive alpha.
The blue pixel values in the garbage matte image are subtracted from the alpha-channel value. A fully saturated blue pixel with no red makes the result fully transparent. Red and blue are combined before the result is limited to the opacity range, so equal red and blue values cancel each other.
Combined mattes
The three kinds of areas can overlap in the garbage matte image. Combining additive and subtractive alpha makes little sense, but the other combinations are useful:
- Combining additive alpha (red) + spill-suppression reduction (green) renders a yellow garbage-matte pixel.
- Combining subtractive alpha (blue) + spill-suppression reduction (green) renders a cyan garbage-matte pixel.
Worked example
The image below is the source scene. We want to key the green backdrop, but not the green "0" inside the roulette wheel — and we also want to remove the tripod on the left:
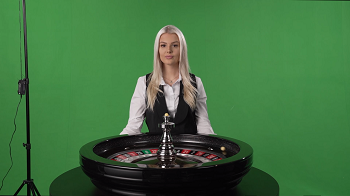
Without a garbage matte limiting spill suppression (using yellow in the matte), the spill suppression affects the green colour of the "0" inside the roulette wheel:

The garbage matte we'd build for this scene paints blue where the tripod sits (everything in that region is keyed out), red over the roulette wheel area (so it isn't keyed), and yellow specifically over the "0" (no key, no spill suppression):
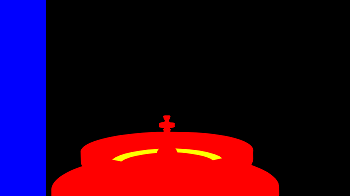
Applying the matte: the yellow area is not keyed and not spill-suppressed (the green "0" stays green), the blue area is added to the keying ("removing" the tripod), and the red area is not keyed but spill suppression still applies (so green reflections inside the wheel are removed):

Matte gradients and softness
The red, green, and blue channels don't have to be fully saturated. You can use both gradients and softness in your mattes:
- A 50 %-saturated red value adds about 50 percentage points of opacity, up to fully opaque.
- A 50 %-saturated blue value removes about 50 percentage points of opacity, down to fully transparent.
- A 50 %-saturated green value decreases the amount of spill suppression by 50 %.
Using a garbage matte in Matte Paint Keyer
Turn on Show advanced options to reveal the Garbage matte settings. Use garbage matte starts off; choosing a source alone does not apply it. Turning the switch off bypasses the matte while keeping the source and offsets for later use.
Use an image file
- Choose the image in Garbage matte image.
- Leave Use source layer off and enable Use garbage matte.
- Select F5 Garbage matte in Output to inspect its position, then return to F6 Final output to see the keyed result.
Choosing another image replaces the file matte. Clearing the image path removes it; this does not clear a separately selected live layer.
Use a live layer
Live-layer mattes are experimental. The source must come before the keyed layer in the scene's render order. For example, an earlier layer containing coloured shapes can provide a matte that changes with those shapes.
- Choose the earlier layer in Source layer.
- Enable Use source layer, then Use garbage matte. Choose the layer first: enabling layer mode without a valid source makes it switch off again when the matte is applied.
- Use F5 Garbage matte to inspect the live source and F6 Final output to check the result.
The live layer takes precedence over the image file. Turning Use source layer off returns to the configured file; a selected layer with no rendered image also falls back to the file if one is loaded. Removing the source layer or moving it after the keyed layer clears Source layer and turns Use source layer off. Select an earlier layer and enable the switch again to resume using a live matte.
Align the matte
Both source types use the same pixel offsets:
| Setting | Positive value | Negative value | Default |
|---|---|---|---|
| Garbage matte X-offset | Moves the matte right | Moves it left | 0 pixels |
| Garbage matte Y-offset | Moves the matte down | Moves it up | 0 pixels |
For example, X-offset 32 and Y-offset -24 move the matte 32 pixels right and 24 pixels up. The offsets move the matte without resizing it and apply to both the key and the Garbage matte view. A smaller or shifted matte leaves uncovered pixels unchanged; its edge colours are not extended across the rest of the frame.
Read the preview
The Garbage matte view preserves the source's alpha. Transparent parts of an image or live layer, and areas outside its bounds, reveal the layers underneath. With no active source, or with Use garbage matte off, the view is black.
The RGB channels control the matte's effect on opacity and colour; the source's alpha controls its appearance in this preview. To leave the key unchanged in a region, paint that region black in RGB rather than relying on source transparency.
Operators that accept a garbage matte
HSV KeyerIBK 3D KeyerMatte Paint Keyer— uses the same red, green and blue channels as HSV Keyer, with green also protecting colour from edge recovery. See the setup steps above for image files, live layers and offsets.
Spill Suppression doesn't take a garbage matte as such, but its Mask image can read the green channel of one — so the same file you painted for the keyer can hold back the stand-alone suppressor too.
Screen-colour compensation (IBK 3D Keyer)
The IBK 3D Keyer has a feature that compensates for a non-pure green- or blue-screen backdrop. Non-pure means the screen colour is not 100 % green or 100 % blue — and that's almost always the reality: manufacturing tolerances, lighting, and screen wear all push the actual measured colour off-pure. The consequence is that the spill-suppression algorithms produce a slightly colourised result, leading to unnatural-looking edges.
Below is an example of a green screen that looks very green to the eye but isn't actually pure green:

The RGB values of the image above are (0, 241, 74). A pure green screen would measure (0, 241, 0) — the screen here is a bit blue. In Composer, you can use the Color Picker tool (in the Preview window) to inspect the actual colour of your backdrop.
Without compensation
Using the spill-suppression algorithm without Screen Color Compensation produces a result like this:

The spill-suppressed result is not neutral / grey. The RGB values are (1, 38, 75) — a bluish colour, which produces challenges when trying to create a perfect chroma-key result. The edges of the image and the hair will become slightly blue.
The optimal RGB values would be (0, 0, 0). In real life that's rarely achievable, but the result can be substantially improved using Screen Color Compensation.
With compensation
The same image after activating Screen Color Compensation:

The spill-suppressed result is much closer to neutral. It's not perfect, but it's a significant improvement: the RGB values are now (1, 7, 14), close to neutral grey. Activating Screen Color Compensation produces a more natural image where the edges blend more cleanly with downstream backgrounds.
Compensation Boost
To increase the amount of screen-colour correction, use the Compensation Boost setting. Increasing the boost increases the compensation. Be careful not to overuse the Boost setting — it may cause edges to become too dark.
Performance note
Activating Screen Color Compensation imposes a slightly higher load on the GPU. Recommendation: only enable it if your backdrop has a non-pure green or blue colour. On a genuinely clean screen the feature does no useful work and you save the cycles.
HSV Keyer and the Luminance configuration
The HSV Keyer offers an optional Luminance configuration that serves as an additional keyer setting, operating independently of the HSV (hue / saturation / value) settings. It allows precise adjustments for dark (low luminance / shadow) and bright (high luminance / highlight) areas.
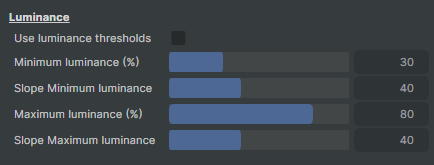
The Luminance configuration is particularly useful in scenarios where dark foreground objects may become transparent due to their hue. Even though these objects are quite dark, they can still be included by the HSV Keyer due to the influence of backdrop reflections on their hue.
By using the Luminance configuration, you can restrict the HSV Keyer from including dark or bright objects regardless of their hue. This limitation extends to very bright objects too.
Important
The Luminance configuration is applied prior to the Alpha Ped and Gain adjustments in the keyer's pipeline.
Worked example with a synthetic test image
Imagine a green test image with a consistent hue throughout. In the upper portion, luminance increases toward the right. In the lower portion, luminance decreases toward the right:
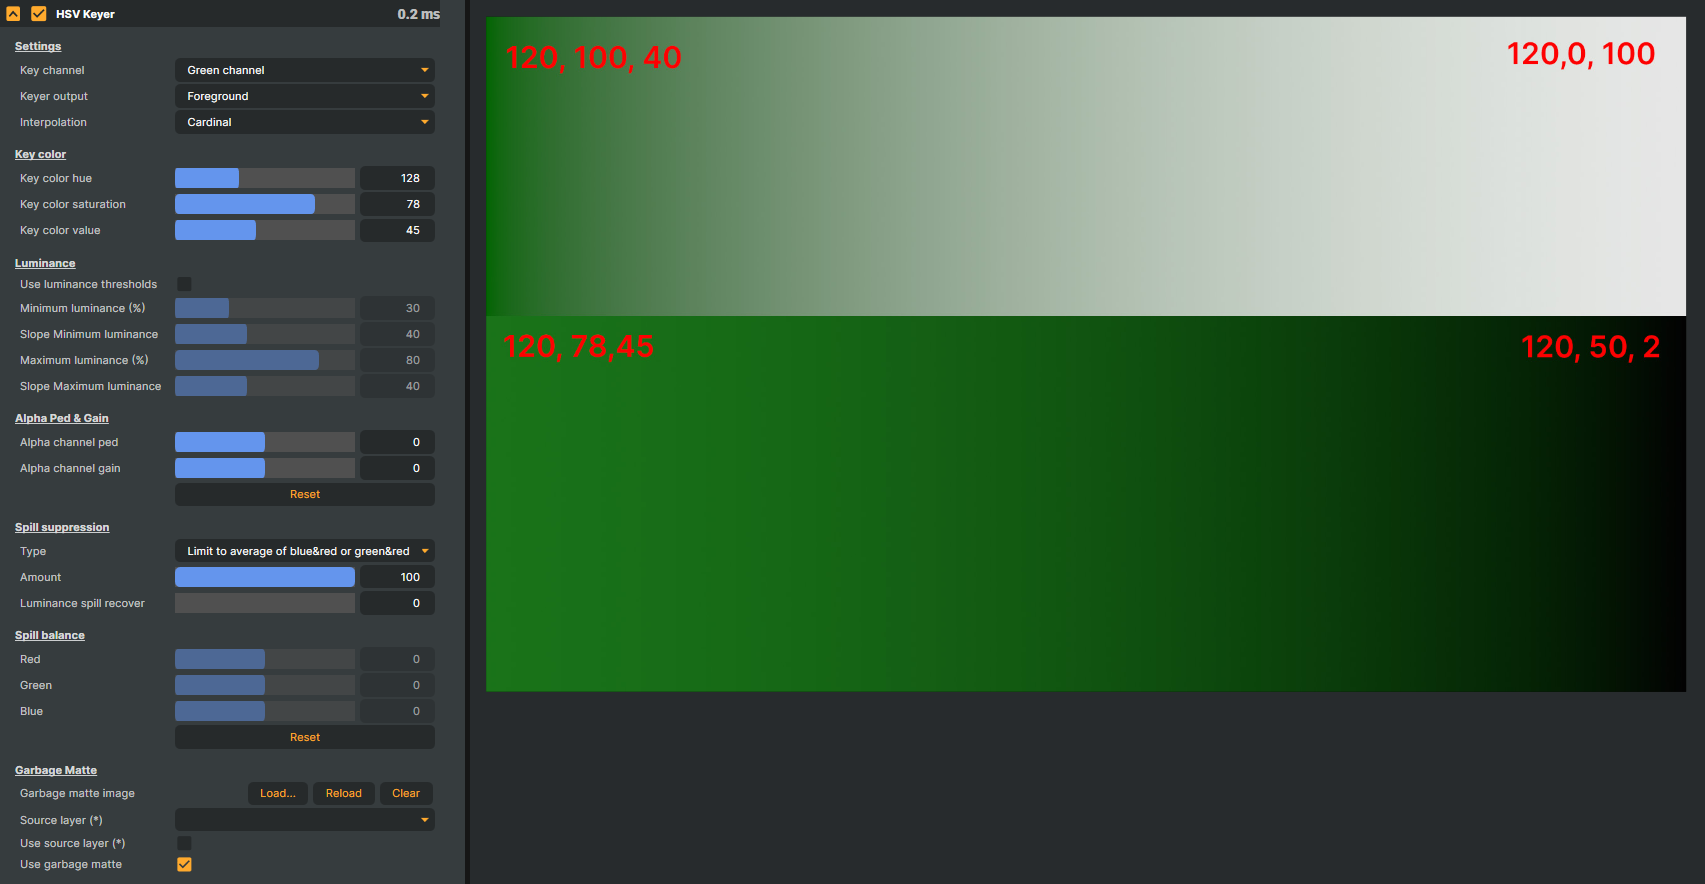
Using the HSV Keyer without the Luminance configuration produces a fully transparent key that encompasses all colours with at least the configured saturation and value:
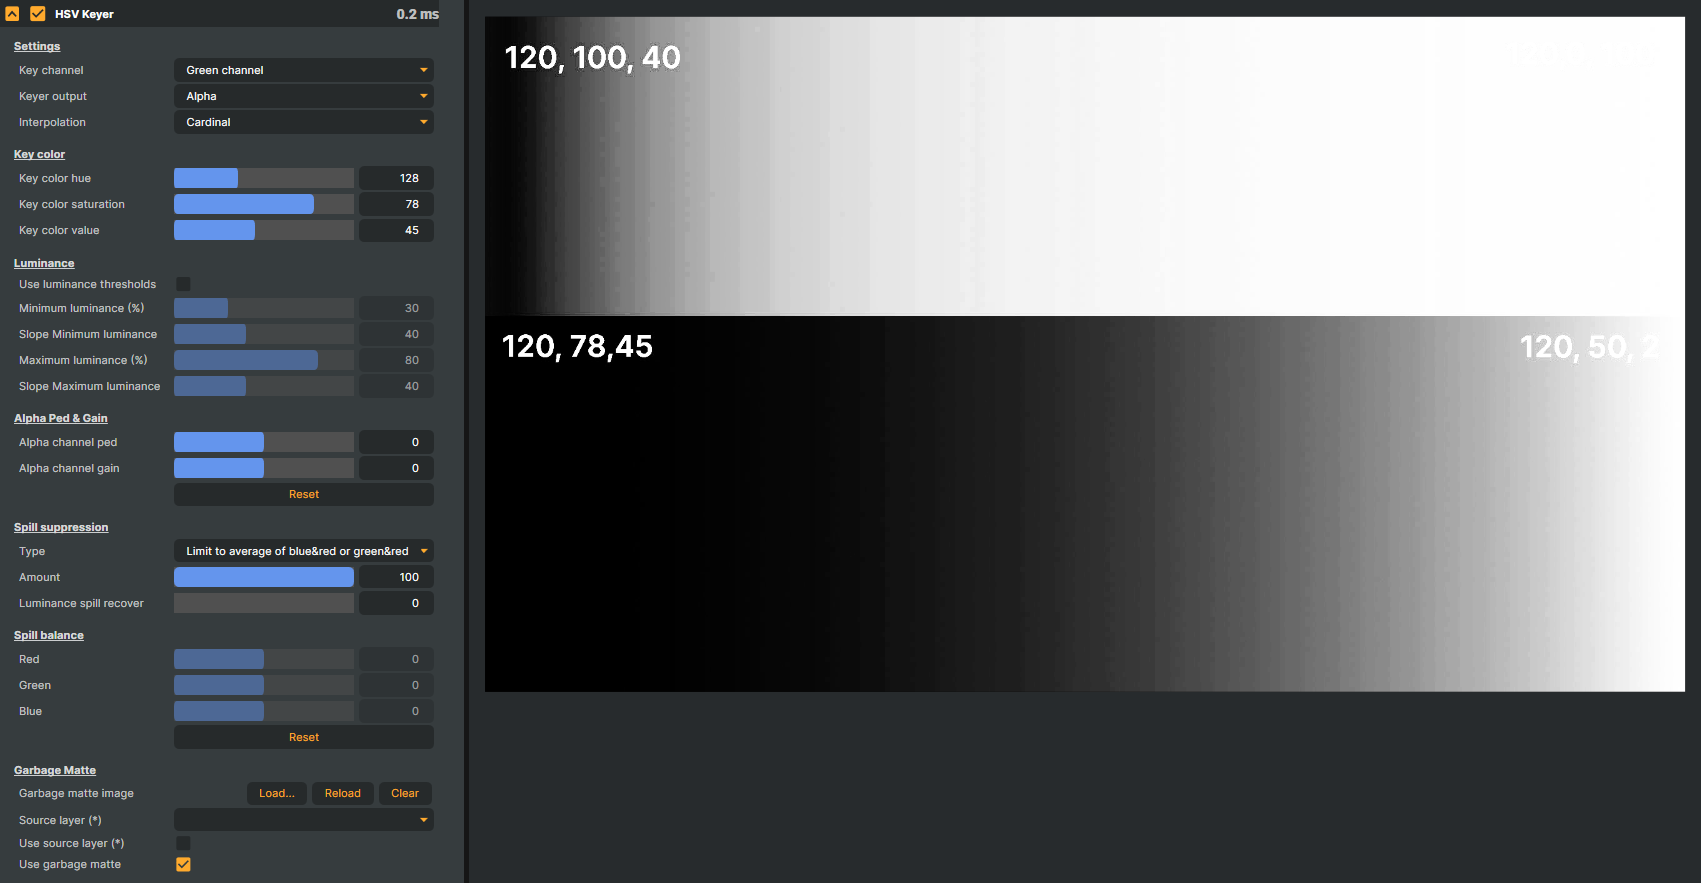
You can see in the second image above that very dark and very bright colours become semi-transparent due to their hue. This effect is consistent for both dark and bright colours based on hue alone.
With the Luminance configuration enabled, you can fine-tune the keyer to exclude these dark or very bright colours. These adjustments are referred to as Thresholds, and the extent of the reduction is controlled by Slopes:
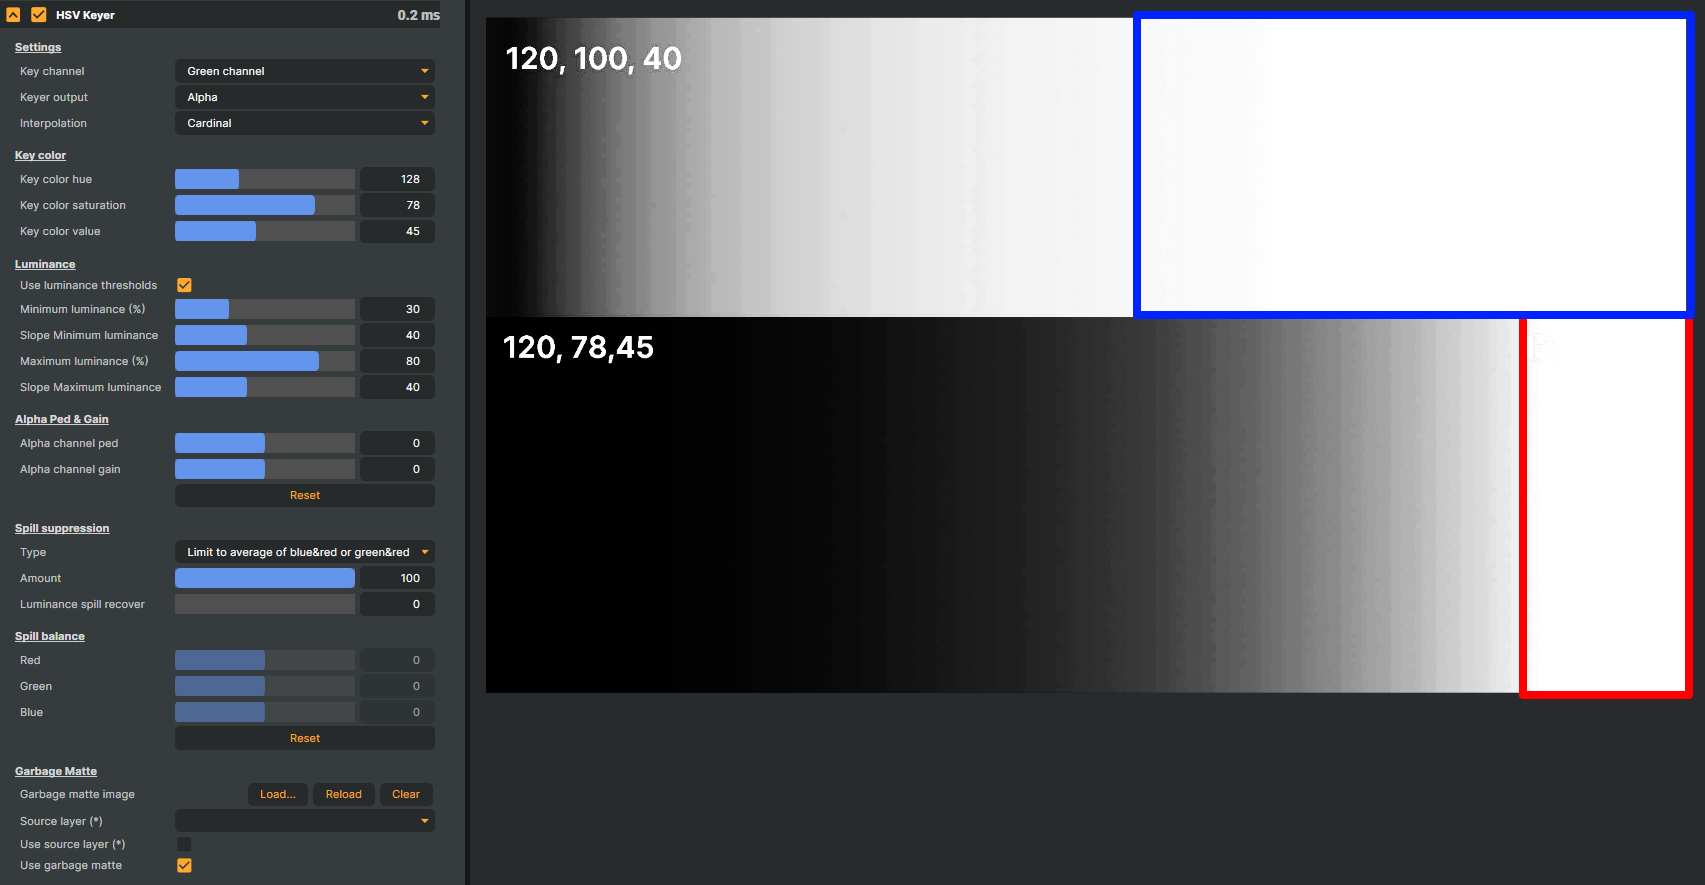
In the example above, the red (dark) and blue (bright) areas in the image represent colours that will be excluded from the key. The configuration of the dark threshold is controlled by the Minimum luminance (%) setting; the bright threshold by the Maximum luminance (%) setting; and the Slope settings define the softness of each cutoff.
Compared to Alpha Ped / Gain
While adjusting Alpha Ped and Gain can achieve similar results to the Luminance feature to some extent, those adjustments will impact all areas of the image — not just the dark and bright parts. This can lead to a less smooth and soft alpha channel across the entire image.
The Luminance configuration applies before Ped / Gain and targets only the dark and bright luminance bands, so the rest of the image keeps its smooth alpha.
Real-world example
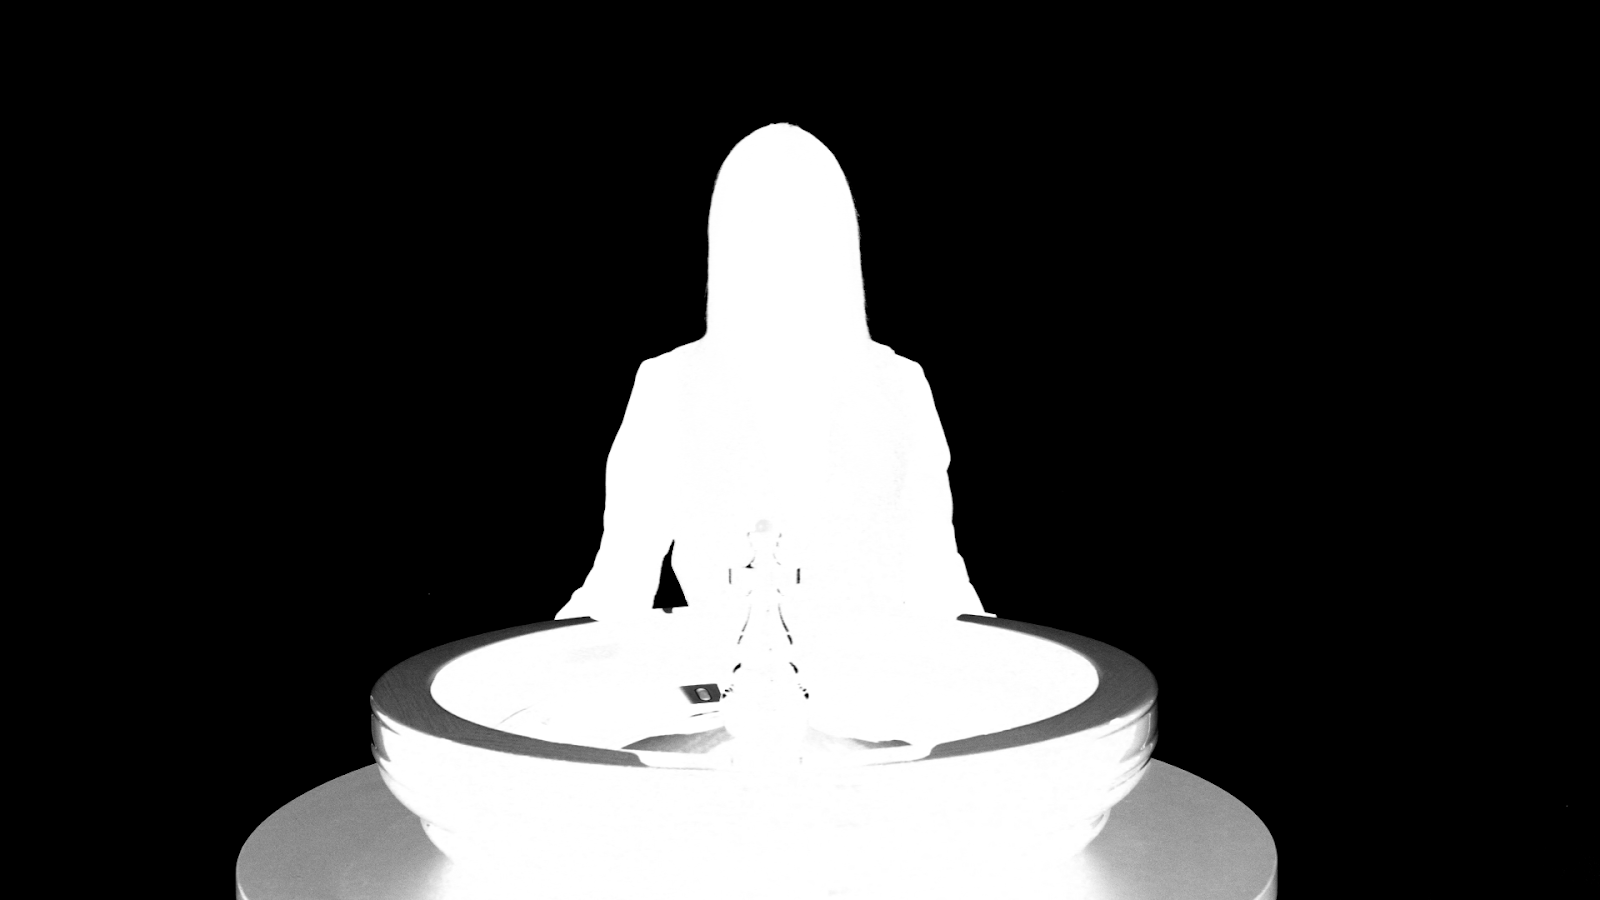
Below is a real-world example where dark areas in the foreground (a roulette table, a wheel) have green reflections coming from the green-screen backdrop:

Using the regular HSV Keyer without the Luminance configuration produces this key — the table and roulette wheel are semi-transparent because of the reflections:
Using the Luminance configuration, the key can be adjusted without using Ped and Gain. The result:
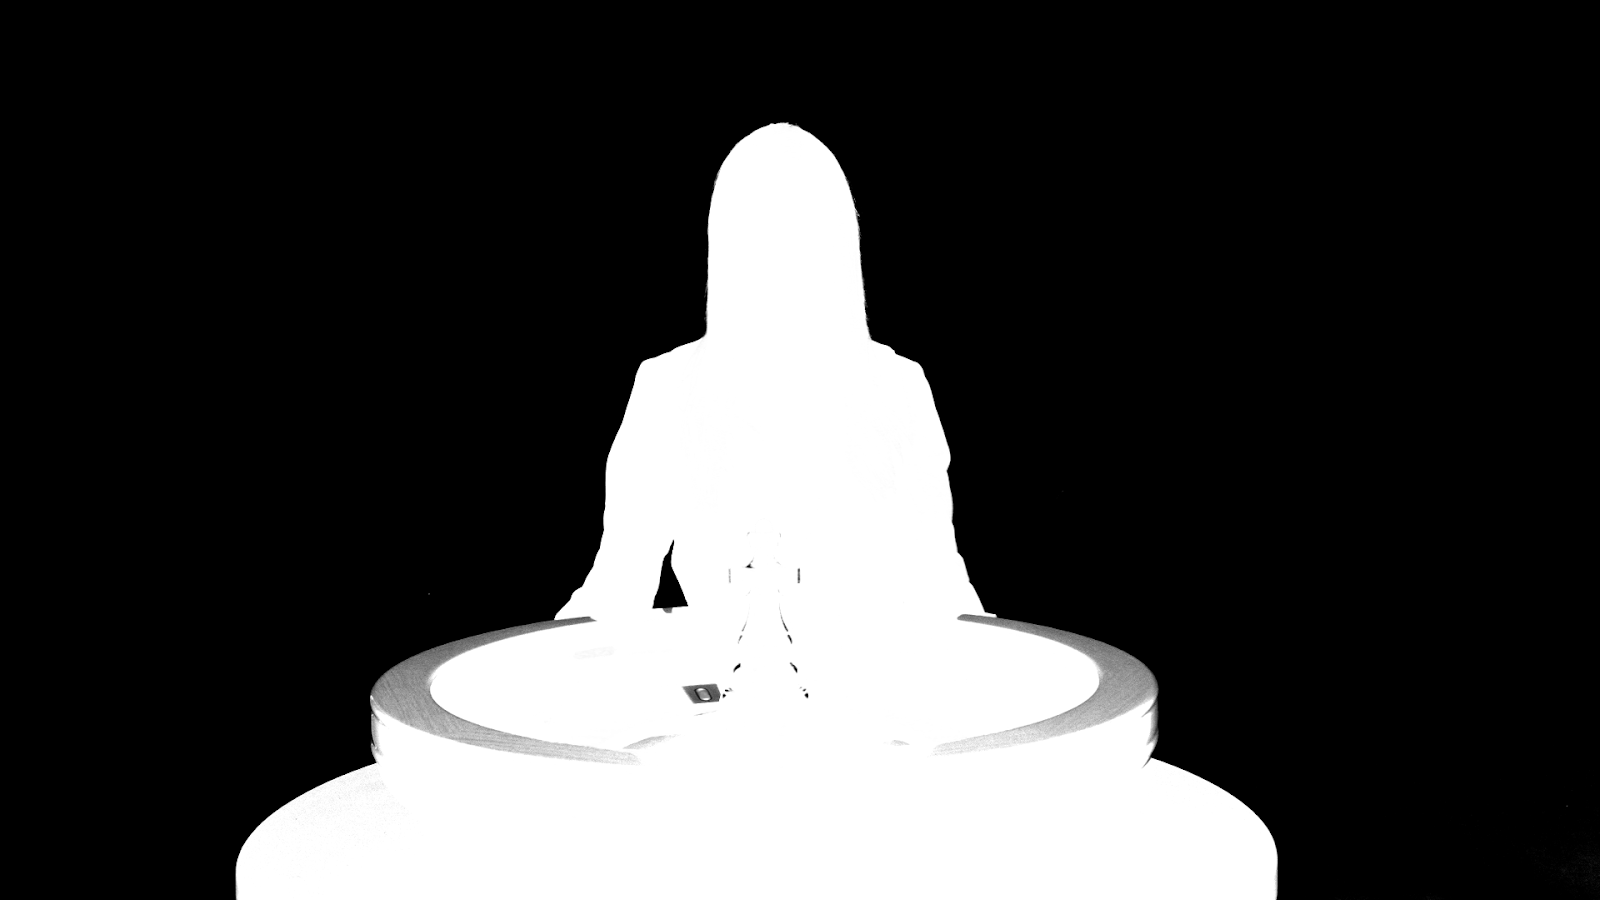
To perfect this key, a garbage matte is still needed. But as shown in the image above, the "false transparency" of the dark table and wheel can be reduced substantially by using the Luminance configuration alone.