

Target overview
The Target overview window is a single, sortable list of every target in the project, gathered from every scene. It answers the one question the scene-by-scene Targets panel cannot: is everything on air?
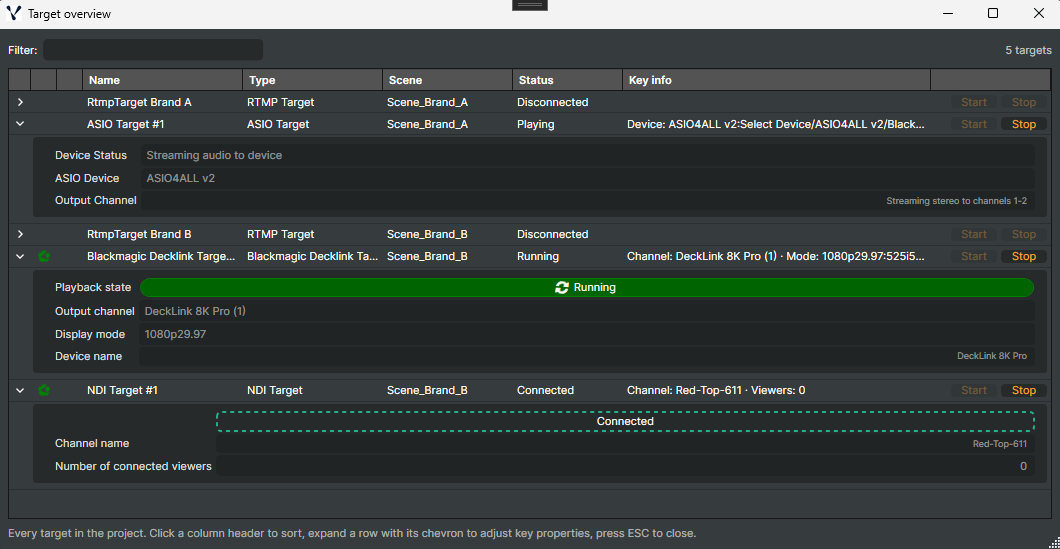
Each row carries the target's running indicator, warning state, name, component type, owning scene, its own status (connection, playback, recording state — whatever that target type reports) and a one-line summary of its key configuration, plus start/stop buttons where the target type offers them. Expand a row and its key properties appear as real editors, so you can correct an address or a channel name without leaving the window.
It is the natural companion to the Targets panel when you run a show with outputs spread across several scenes: instead of clicking through each scene in turn to confirm that the RTMP stream is connected, the recorder is writing and the SDI card is playing out, you see all of it in one grid.
The window is a live view, not a snapshot — targets and scenes added or removed while it is open appear and disappear as they happen.
Opening the window
Choose Windows ▸ Target overview… from the application menu.
The window opens as a floating tool window that stays available while you work elsewhere in Composer; press ESC (or close it as usual) to dismiss it, and reopen it from the same menu entry. It closes automatically on File ▸ New and when you enter performance mode, and can be reopened after you exit.
Targets in the internal live-preview scene are not listed — only the scenes you created yourself.
What each row shows
| Column | What it shows |
|---|---|
| Chevron | Expands this row's key properties as editors. See Adjusting key properties in place. |
| Running state | The same badge the target carries in the Targets panel: a spinning green circle while running, an orange triangle on a warning, a red icon on an error, nothing for a target that has not been started. |
| Warning | An orange warning icon, shown only while a warning is active on that target. Hover it for the message; click it to clear the warning. |
Name |
The name the target was given in its scene. Ctrl + click opens it in the main window; right-click for more actions. |
Type |
The component type, for example RTMP Target, SRT Target or NDI Target. |
Scene |
The scene the target belongs to. |
Status |
The target's own status — connection status for a streaming target, playback state for a hardware output, recording state for a file recorder. Target types that report no status of their own fall back to their running state (None, Running, Warning or Error). |
Key info |
A one-line summary of the configuration that matters most for that target type — its address, channel, file name, device and so on. Where the column is too narrow, hover the cell for the full multi-line form. |
| Actions | Start / Stop buttons for the target types that offer them. |
Sorting and filtering
Click any column header to sort by it, and click again to reverse the order. The running-state and warning columns sort too, which is the quickest way to bring everything that is not healthy to the top of the list.
The Filter field above the grid narrows the list as you type. It matches the target name, component type, scene name, status and key info, so srt, the name of a scene, or part of a server address all work as search terms. The caption on the right of the filter row counts what you are looking at — 12 targets with no filter, 7 of 12 targets while one is active. Clear the field to show every target again.
Starting and stopping targets
Where a target type has a manual start or stop action, the row offers it as a button — Start and Stop for most targets, though a type may name its action differently (the HTTP Target, for example, offers a single Execute button that fires its request). Target types with no manual action at all leave the cell empty.
A button is disabled when the action is not available: Start while the target is already starting or running, Stop when there is nothing to stop. The buttons follow the target's real state, so a target that connects, drops and reconnects on its own keeps them in step without you clicking anything.
Adjusting key properties in place
Click the chevron at the start of a row to open that target's key properties below it. These are the same editors the property panel shows in the main window, bound to the same values — a change here takes effect immediately, exactly as if you had made it in the Targets panel.
Expanding is independent of selection, so more than one row can be open at a time and nothing moves when you press a button in another row.
Two things to expect:
- A target type that declares no key properties says so: "This target has no key properties to adjust." Use its full property panel in the main window instead.
- Some properties can only be changed while the target is stopped — the
NDI Target's channel name and the SRT targets' server address, for example, are locked while the target is live. Stop the target to edit them, then start it again.
Jumping to a target
The overview is deliberately narrow: it shows the configuration that matters on air, not every property a target has. When you need the full panel, go there from the row itself:
| Action | How |
|---|---|
| Open target | Ctrl + click the target's name, or right-click the name and choose Open target. Composer brings the Targets tab forward, makes the target's scene current, selects the target and expands it. |
| Extract to window… | Right-click the name and choose Extract to window…. The target opens in its own floating window while staying in place in its scene — useful on a multi-monitor setup. If a window for that target is already open, it is brought back to the front instead of a second one being stacked on top. |
Because the overview lists targets from every scene, opening a target usually changes the active scene — that is expected, and it is the only way to select a target in a scene that is not currently showing.
What Status and Key info show per target type
Every target type nominates its own status property and its own key configuration, which is why the two columns read differently from row to row:
| Target | Status shows |
Key info shows |
|---|---|---|
| RTMP Target | Connection status | Server address |
| RTMP Target (Multi scaler) | Connection status | The first two destination addresses |
| SRT Target / SRT Target 16 channel audio | Connection status | Server address and the current SRT endpoint |
| MoQ Target | Connection status | Connection URL and channel ID |
| NDI Target | Connection status | Channel name and the number of connected viewers |
| AES67 Target | Connection status | Multicast address and port |
| Blackmagic Decklink Target v4 | Playback state | Output channel, display mode and device name |
| ASIO Target | Device status | Device and output channels |
| File Recorder Target | Recording state | Configured file name and the file currently being written |
| Snapshot Target | Capture state | Last snapshot file name and the snapshot interval |
| FFmpeg Target | Playback state | FFmpeg options |
| Google Storage Target | Status | Storage URL and file name |
| HTTP Target | Status | Endpoint |
| URL Sequencer Target | Status of the first URL | The first URL |
| UDP Message Target | Running state | Address and port |
| Vindral CDN Metadata Target | Status | Endpoint |
A target type that nominates nothing still gets a row — its Status falls back to the running state and its Key info stays empty. For the full property reference for any of these, see the Targets manual.