

Stereo Imager
Introduction
Stereo Imager controls how wide the stereo image sounds — from dead-centre mono, through the original recording, out to a broad, enveloping spread. It's the tool you reach for when a mix feels narrow and boxed-in, when a stereo source is too wide and hollow, or when the low end needs to stay tight and centred while everything above it opens up.
Before you reach for it — what it needs: the Stereo Imager reshapes stereo width that is already there. It cannot create stereo from mono. A solo voice, a mono recording, or a "stereo" file whose two channels happen to be identical has no width to work with, so the operator will (correctly) do nothing — you'll hear no change at any setting. It comes alive on full mixes and material with genuinely different left and right channels: panned instruments, stereo synths, room ambience. If you're not sure your source qualifies, see How it works and the "What the Stereo Imager can — and can't — widen" section below.
Reach for it when:
- A mix or stem feels flat and mono, and you want it to breathe and fill the space between the speakers.
- A stereo source is too wide — hollow in the middle, or unstable when heard on a single speaker.
- The bass wanders off-centre and needs anchoring, without narrowing the rest of the mix.
- You're preparing audio for broadcast or club playback and need to check — and protect — mono compatibility.
How it works
A stereo signal is really two things layered together: the part that is the same in both speakers (the centre — lead vocals, bass, the solid middle of a mix) and the part that is different between them (the sides — the width, ambience, and spread). The Stereo Imager gently separates those two and lets you turn the "different" part up or down. Turn it down and the image pulls toward the centre until, at the extreme, everything collapses to mono; turn it up and the sides grow, pushing the image out toward and past the speakers.
Because it only ever acts on that difference, a sound sitting dead-centre — a lead vocal, the bass — barely moves, while panned instruments and ambience spread out or pull in around it. This is the key to using it well, and also the reason it can appear to "do nothing": if the two channels carry the same sound (a mono or centred source), there is no difference to act on, and no setting will change what you hear.
Widening comes at a cost, though: the more you emphasise the difference between the channels, the more they can work against each other when a listener hears them combined into a single speaker — and a mix that sounds huge in stereo can turn thin or hollow in mono. That is why the imager keeps a live read-out of how in-phase the output is, so you can widen confidently and stop before the mix stops surviving mono. And because low frequencies are the most fragile — a wandering, out-of-phase bass is the first thing to fall apart on a phone or a club system — the low end can be held solid and centred while the rest of the image stays as wide as you like.
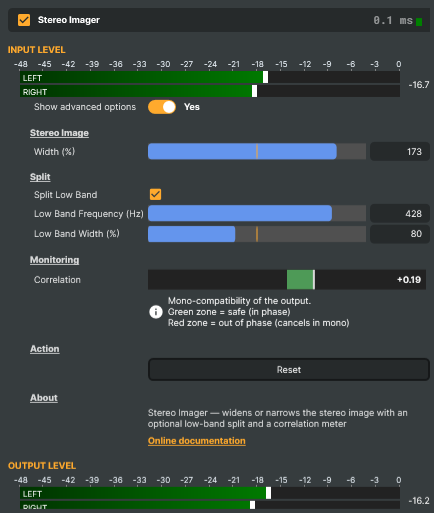
Stereo Imager - Settings

| Property | Description |
|---|---|
Show advanced options |
Show or hide the operator's advanced settings in the editor UI. [default=false]. |
Stereo Image
Stereo Image — the width control that narrows or widens the stereo picture.

| Property | Description |
|---|---|
Width (%) |
How wide the stereo image is, as a percentage. [min=0, max=200, default=100]. 100 % leaves the image unchanged; below 100 % it narrows toward mono (0 % is fully mono); above 100 % it spreads wider. Widening works on the "side" (the difference between left and right), so material that is already mono stays mono however far you push this. |
Split
Split — split the low band off with its own width.

| Property | Description |
|---|---|
Split Low Band |
(advanced) When on, everything below Low Band Frequency is split into its own low band with its own Low Band Width, while the frequencies above it keep the chosen Width. [default=false]. Lower Low Band Width toward mono to hold the bass tight and mono-compatible while the mids and highs stay wide — widening the full spectrum can smear the bass and cause phase problems on club or mono systems. Only the low band gets its own control because the low end is the part that breaks mono compatibility; the mids and highs rarely do. |
Low Band Frequency (Hz) |
(advanced) The frequency that divides the low band from the rest, in Hz. [min=40, max=500, default=120]. Only used when Split Low Band is on. Everything below this gets the Low Band Width; everything above it keeps the main Width. Around 100–150 Hz suits most music; raise it if the low mids still wander, lower it to isolate only the deepest bass. |
Low Band Width (%) |
(advanced) The width of the low band (below Low Band Frequency), as a percentage. [min=0, max=200, default=100]. Only used when Split Low Band is on. 100 % (the default) leaves the low end unchanged; lower it toward 0 % to sum the bass to mono and hold it tight and centred; above 100 % spreads it wider. This shapes the low band independently of the main Width. |
Monitoring
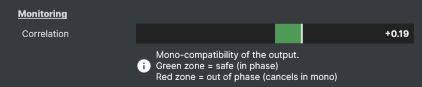
Monitoring — a read-only correlation meter for checking mono compatibility.
| Property | Description |
|---|---|
Correlation |
Correlation — a meter showing how in-phase the left and right channels of the output are (read-only). +1 is mono / perfectly in phase, 0 is fully decorrelated (the widest a signal can be without phase problems), and negative values mean the channels partly cancel if summed to mono. Watch it while widening: as the bar moves left past 0 the mix may lose level or content on mono playback. It also indicates when the input is mono (nothing to widen) or when there is no signal. |
Action

| Property | Description |
|---|---|
Reset |
Reset all settings to their defaults. |
Inherits from: AbstractAudioOperator, AbstractOperator, AbstractAudioMetering, NamedModel.
See also: Stereo Imager in Script Engine Objects.
What the Stereo Imager can — and can't — widen
This is the first thing to understand, because it is the most common source of "is this thing working?".
The Stereo Imager reshapes stereo width that is already in the signal. It works purely on the difference between the left and right channels, so how much you hear depends entirely on how different the source's two channels already are — not on which track you loaded or whether the file is labelled "stereo".
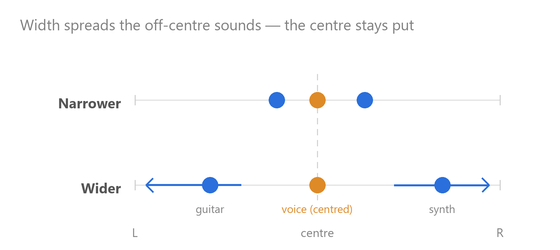
- Centred sounds — anything equally present in both channels: a lead vocal, bass, or kick sitting dead centre, or any mono recording. They have little or no left/right difference, so Width barely moves them, and a perfectly centred sound (identical left and right) does not move at all.
- Off-centre and wide sounds — panned guitars, stereo synths, room ambience, reverb, and anything that leans even slightly to one side — genuinely differ between the channels, so these are what move as you change Width.
The important thing is that this is a gradient by position, not "voices are safe and instruments are not." The further off-centre a sound already sits, the more Width shifts it: widening pushes it further out toward its side, narrowing pulls it back toward the centre, and at 0% everything collapses to dead centre. So a lead vocal panned dead centre stays rock-solid — but a vocal that leans a little to one side will drift further out as you widen (usually subtly, in proportion to how far off-centre it already is). Only a truly centred sound is completely untouched. In a normal mix that behaviour is usually what you want: the solidly-centred vocal and bass hold their place while the panned parts and ambience around them spread out or tighten.
The catch that trips everyone up: a "stereo" file is just a file with two channels — those two channels can still be identical. A single-microphone voice or speech recording is the classic example: it is mono, so left and right are identical, the side is zero, and the imager has nothing to act on. You will hear no difference at any Width. That is not a fault — there is simply no stereo image to reshape. (A voice that genuinely differs between the channels — a stereo room recording, or one panned off-centre — does have side content, and will be affected, as described above.)
How to check in five seconds: set Width to 100% (a true passthrough) and read the Correlation value:
- +1.00 → the source is mono / centred. There is nothing to widen — try a different source.
- lower (0.8, 0.5, 0, …) → there is real stereo content, and Width will do something audible.
And to hear the effect clearly the first time: use a music mix with obviously panned instruments, put on headphones, and sweep Width from 0% (everything collapses to centred mono) to 200% (wide and spacious). A plain mono voice or speech recording is the one kind of material where you should expect to hear nothing.
Setting the width
Width is the main control, and most of the time it is the only one you will touch.
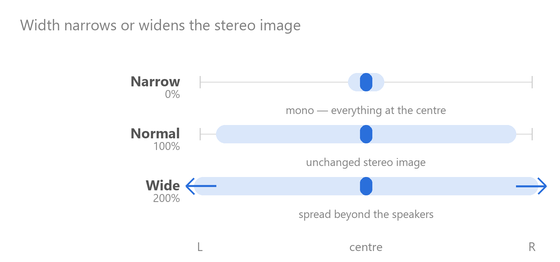
- 100% is the centre detent — the signal passes through untouched (a true bypass), so you can compare against the original at any time.
- Below 100% narrows the image. As you approach 0% the sides fade away and the signal collapses to pure mono — useful for reining in an over-wide source, or for hearing what your mix sounds like on a single speaker.
- Above 100% widens the image, spreading the sides out toward and past the speakers for a bigger, more enveloping sound.
A little widening goes a long way. Pushing much past 150% starts to hollow out the centre and puts mono compatibility at risk, so widen while watching the Correlation read-out (below) rather than by ear alone.
Reading the correlation meter
The Correlation meter is the single most useful thing to watch while widening, and it is what protects you from the one real hazard of a stereo imager. It does not change the sound — it tells you, at a glance, whether the wider image you are building will still hold together if a listener hears it in mono. This is the same kind of phase/correlation read-out used throughout broadcast and mastering, and it exists here for exactly that reason.
It measures how alike the left and right channels are, on a scale from +1 to −1:
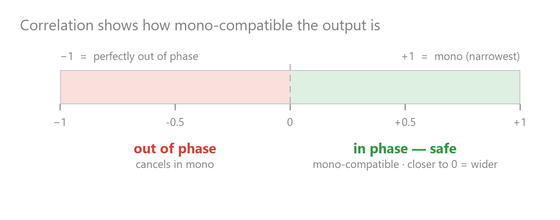
- Green — in phase, mono-safe (0 and up). Left and right agree, so the mix holds together when summed to mono. Near +1 the image is narrow/mono; closer to 0 it is at its widest while still safe — that near-zero edge of the green is the sweet spot a tastefully widened mix aims for.
- Red — out of phase (below 0). Left and right work against each other. Summed to mono the widened content cancels: the mix thins out and drops in level, and the deeper into the red, the more of it disappears — near the far edge that content is almost silent in mono.
The rule is simple: stay out of the red. The entire green (positive) side is mono-safe. As you raise Width the bar travels left toward 0 and the image gets wider; the moment it crosses 0 into the red you have gone too far, so ease Width back until it is green again. For the widest safe image, bring the bar close to 0 without letting it cross. The peak marker parks at the worst point the bar reaches, so a brief dip into the red will not slip past you while you are looking elsewhere.
Two things about the meter that commonly surprise people:
- It always shows a reading, even at 100% Width. It reflects the signal's correlation, not how far you have moved the slider. At 100% it is simply reporting your source's own, unchanged correlation — the same way a level meter reads even when you have not touched a fader. As you widen, the bar drifts left from wherever the source started.
- A mono or narrow source barely moves it. With little or no side content, there is nothing to push out of phase, so the bar stays safely in the green however far you widen — the meter is correctly telling you there is nothing to worry about (and little to gain). It only swings toward the red on material that already has genuine stereo width. When the input is fully mono the meter says "Mono input — nothing to widen"; with no audio it reads "No signal".
Why mono compatibility matters
Widening is meant for stereo playback — so why care about mono at all? Because you almost never control where your audio finally lands, and a surprising share of everyday playback collapses it to a single channel:
- Phones, tablets, and many laptops — often a single speaker.
- Bluetooth and smart speakers — a great many are mono.
- Club and venue PA systems — frequently summed to mono, and the subwoofer feed is mono practically without exception.
- TV built-in speakers, phone and conference audio, and some broadcast and social-media playback — mono, or summed to mono somewhere along the way.
A mix that sounds spectacular in stereo but falls apart in mono will sound broken to a large slice of a live audience. That is the whole job of the meter: widen as far as it sounds great in stereo, but keep it out of the red so it still works for everyone hearing it in mono. In practice that means dialling in Width and confirming the meter sits on the safe (positive) side before you go live, then glancing at it now and then as the content changes. If your delivery is guaranteed stereo — a fixed installation, or headphone-only content — a little red is survivable; but for broadcast and streaming, assume some of your audience is listening in mono.
Splitting off the bass
Low frequencies are where width does the most damage. A wide, phasey low end is the first thing to fall apart on a phone speaker, a club rig, or vinyl — places where the bass is often summed to mono anyway. Split Low Band solves this by dividing the signal at a chosen frequency and giving the low end its own separate width. These controls live under Show advanced options — turn that on to reveal the Split section:
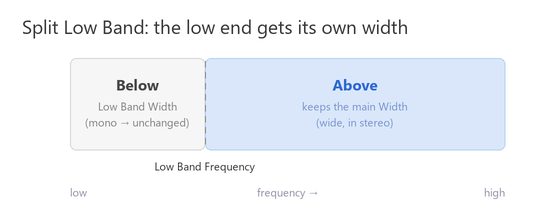
- Below the Low Band Frequency the low end gets its own Low Band Width. At 100% (the default) it is left unchanged; drop it toward 0% to sum the bass to mono, so the low end stays tight, solid, and centred.
- Above it the signal keeps whatever main Width you have dialled in, so the mids and highs stay as wide as you like.
Set Low Band Frequency to the point that should divide the low end from the rest — around 100–150 Hz suits most music. Raise it if the low mids still wander; lower it to affect only the deepest sub-bass. The split uses a phase-matched crossover, so the two bands recombine cleanly with no dip or coloration at the crossover point.
Only the low end gets its own control, because it is the part that breaks mono compatibility — a wide, out-of-phase bass is what collapses on phones and club subwoofers. Widening the mids and highs rarely causes the same trouble, so they stay under the single main Width and don't need a band of their own.
Tips and best practices
- Start at 100% and A/B often. The centre detent is a true bypass — flip between it and your setting to be sure you are improving the mix, not just making it sound louder.
- Widen with your eyes as well as your ears. A wider image is impressive in the moment; the Correlation meter tells you whether it will survive mono playback. Keep the bar out of the red — that is your mono-safety line. When ears and meter disagree, trust the meter.
- Protect the low end. On anything with real bass, turn on Split Low Band and set Low Band Width to 0% to keep the bass mono. It removes the single biggest risk of widening and lets you push the rest of the image further.
- Widen stems, not the master, when you can. Widening a backing texture, pad, or reverb return usually sounds better than widening a whole mix, which spreads the vocal and bass along with everything else.
- Check mono before you finish. Drop Width to 0% for a moment (or sum to mono downstream) to hear exactly what a mono listener gets — nothing important should vanish.
Troubleshooting
- "Widening does nothing / I think it's broken." By far the most common cause: the source is mono or centred — there is no left/right difference to expand (see What the Stereo Imager can — and can't — widen). Confirm it by setting Width to 100% and reading Correlation: +1.00 means the source is mono, so no setting will change anything. Voice and speech recordings are almost always mono in this sense. Load a music mix with panned instruments and listen on headphones to hear it work. Also make sure you are not monitoring in mono — a mono monitor sums the two channels and cancels the width entirely, so even a genuinely wide source will sound unchanged.
- "The mix sounds hollow, or the vocal lost its body." You have widened too far and pulled energy out of the centre. Lower Width, and check the Correlation meter — if it is near or below zero, that is the cause.
- "It sounds great here but thin or weak on my phone." That is a mono-compatibility problem. Reduce Width, turn on Split Low Band (with Low Band Width at 0% for mono bass), and keep an eye on the Correlation read-out staying in the green.
- "The bass feels loose or off-centre after widening." Turn on Split Low Band, set Low Band Frequency around 120 Hz, and keep Low Band Width at 0%, raising the frequency until the low end locks firmly to the centre.
Related components
- Compressor V2 — for controlling level and dynamics. The Stereo Imager shapes where the sound sits across the image; the compressor shapes how loud it is.
- EBU R128 — to measure loudness after imaging and the rest of your audio chain.
- De-Esser — for taming harsh sibilance on a voice, another common polishing step in the same audio chain.
Glossary
Plain-language meanings for the terms used on this page and in the controls:
- Stereo image — the sense of left-to-right space in a recording: where instruments seem to sit between the two speakers, and how wide the whole picture feels.
- Width — how far the stereo image spreads. Narrow pulls everything toward the centre; wide pushes it out toward and past the speakers.
- Mid / Side — a way of viewing stereo as two parts: the mid is what is common to both channels (the centre), the side is the difference between them (the width). The Stereo Imager works by scaling the side.
- Mono — a single combined channel, with no left-right difference. "Summing to mono" adds the two channels together, as happens on a phone speaker, many club systems, and some broadcast paths.
- Mono compatibility — how well a stereo mix holds up when it is summed to mono. A widened mix can lose level or content in mono if its channels are out of phase.
- Correlation — a measure of how alike the left and right channels are, from +1 (identical, mono) through 0 (independent, wide) to −1 (opposite, out of phase).
- Phase — the timing relationship between the two channels. When they are "out of phase", one pushes while the other pulls, and they partly cancel when combined.
- Crossover — a filter that splits audio into a low band and a high band at a chosen frequency, so each can be treated separately — here, giving the lows their own width while the highs keep the main width.
- Low Band Frequency — the point that divides the low band from the rest of the spectrum.