

Background Match
A keyed subject almost never belongs to the picture it has been dropped into. The key itself can be flawless and the shot still reads as two images stacked: the foreground was lit in a different room, graded on a different day, and photographed through a different lens. Two things give it away more than anything else — its levels do not agree with the plate's, and its edges are too clean, because in a real photograph the light behind a subject bends around it.
Background Match fixes both, against a layer already in your scene.
Match Background
The operator measures a black point, a mid point and a white point per colour channel, on the background layer and on the foreground, then remaps the foreground out of its own levels and into levels blended toward the background's — lift, gamma and gain. Measuring per channel is what carries the colour.
- Amount — strength of the whole correction.
0turns it off, and skips both measurement passes. Defaults to 100.
The three below weight the ends and the middle of the match independently. They live behind Show advanced options, because the defaults are chosen so that Amount on its own does the right thing — reach for these to bias the match toward one end of the range, or to dial the mid-tone cast up and down.
- Black Level — how much of the background's black point to take. Lifting and tinting the shadows is what puts a subject into haze, and it is safe at full strength.
- Mid Level — how much of the background's mid-tone colour to take. Usually the one that does the work. Its full travel is worth half a cast match rather than a whole one, because a full match reads too strong on real plates, so 100 - the default - means half the measured cast.
- White Level — how much of the background's white point to take. This is the end that crushes shadows or blows out highlights. Defaults to 100 alongside the others; back it off first if highlights suffer.
Why Mid Level carries the colour
A black point and a white point only describe where a picture ends. That is enough when the ends themselves are tinted: haze lifts a plate's blacks to a blue-grey, so matching endpoints picks the haze up for free, and a misty-forest composite needs nothing more.
A lit interior is not like that. It has real shadows and blown speculars, so its ends sit near 0 and 1 — and so do those of a presenter in a white shirt and a dark waistcoat. Between two such pictures an endpoint match is close to doing nothing, however hard it is driven, because the two already agree exactly where it is looking. Measured on three casino plates, matching black and white points at full strength moved the subject by under 5 %.
What separates a warm room from a cool one is where the bulk of its histogram sits per channel. On those
same plates the medians read B 0.42 G 0.41 R 0.38 for the cool daylight room and B 0.14 G 0.18 R 0.28 for
the burgundy one — a clear, correctly-signed cast in each. Gamma is the control that reaches it, and the
reason it is the right one is that it leaves the endpoints exactly where they are: black stays black and white
stays white while everything between them is repainted.
Tint, not exposure
Mid Level takes the background's colour but not its brightness. A gamma shared by all three channels is an exposure change with no colour in it, so the three exponents are divided by their geometric mean and only the spread between them is applied. Without that, matching a white-shirted presenter to the absolute mid-tone of a dark room would simply crush them.
(Geometric, not arithmetic, because gammas compose by multiplication — applying one and then another is the same as applying their product. Subtracting an average instead can drive a channel's exponent below zero, where it inverts and blows that channel out.)
The background's levels are re-measured on a timer — see Refreshing the background below. The foreground's are measured every frame, because the subject moves, and smoothed over about half a second: a percentile recomputed from scratch each frame would jitter with the noise floor and the correction would visibly breathe.
Light Wrap
Light Wrap lays the blurred background over the foreground in a strip just inside the matte's edge, standing in for the light that would have spilled around a real subject.
- Amount — strength of the spill.
0turns it off. Defaults to 20.
The blend is Screen, which never darkens. That is the correct behaviour for something representing light, and it is the reason there is no blend-mode choice to make here.
The mask comes from upstream
Amount is the only wrap control here, because the mask's shape is not this operator's to decide.
The mask needs the foreground's alpha blurred, and — unlike the background side, which is sampled on a timer — that cannot be cached between frames, because the subject moves. When one keyed presenter feeds twenty branded scenes, twenty scenes would blur the same alpha, every frame, to produce twenty masks that ought to be identical anyway.
So a Light Wrap Mask operator in the keyer scene does it once. Put one after the keyer, set its Size there, and every scene consuming that presenter inherits the same edges. This operator finds it by following its own layer's input — into the scene feeding this layer, and on into any scene feeding that — and reports what it found:
Edge mask from upstream (86 px) No mask — add a Light Wrap Mask operator upstream
Without a publisher there is no light wrap. There is no local fallback: a mask computed here would be a second opinion on geometry that belongs to one place, and twenty scenes each forming their own would be the problem the publisher exists to solve. The status line and a line in the log say so whenever that state changes, because a wrap that has quietly stopped otherwise looks exactly like one that was never set up.
What is reasonable to vary per scene is how strongly the mask is applied — a darker branding may want less spill than a bright one from the same source. That is Amount, and it is why it stayed here.
Refreshing the background
Most backgrounds are still images or locked-off plates. While the background does not change, neither can the two things this operator derives from it — the six measured levels, and the blurred light probe the wrap draws from — so recomputing them fifty times a second buys nothing. Refresh every sets how often that work is redone: 10 seconds, 30 seconds, 1 minute, 2 minutes, or Never. At ten seconds it runs on roughly one frame in three hundred.
Sampling on a timer rather than capturing once is what makes this safe, and that matters more than the saving. There is no moment at which the operator can know the background is ready:
- an input may not have decoded its first frame yet
- a layer may be part-way through a fade
- a live feed may still be serving black or a test pattern
- a clip may open on black
- layers come up in some order when a project loads
Any single privileged capture instant is therefore a guess, and a bad guess would be frozen in place for the
rest of the session. A timer has no privileged instant: a poor sample is simply replaced by the next one. It
also picks up a still image being swapped on the source layer, which nothing else here can detect —
LayerId does not change when the picture behind it does.
Shorter is therefore safer, and the cost is already negligible at the short end, so the interval is really a question of how long a bad first sample may linger. Ten seconds is the default for that reason.
Never
Never takes one sample and keeps it. It is for the case where you know the branding is a still image: an operator starting the application by hand, looking at the picture, and pressing Refresh when it wants re-reading. The timer is there to cover the moment when nobody is watching — when somebody is, it is just work being repeated.
It stops the timer and nothing else. A sample is still taken when there is none yet, when the source layer changes, and when the resolution changes, so a scene still comes up matched without anyone touching it. Refresh covers the one case the operator cannot see for itself: the picture on the source layer being swapped underneath it.
The one thing to know is that the automatic first sample can land early — before an input has decoded, or while a layer is still fading up. On a timer that corrects itself within the interval; on Never it waits for Refresh. The counter under the button reads how old the current sample is.
A sample is also taken immediately, without waiting for the timer, whenever something it depends on changes: the source layer, the wrap Size (the probe is a blur at one particular radius), the layer's resolution, or you shortening the interval. Refresh forces one on demand.
The message under the button counts up — "Background refreshed 7 seconds ago" — so you can see that sampling is actually running, and how stale the current sample is.
If your background is genuinely moving video, it will lag by up to one interval. Set the interval short and be aware of the limit; this operator is built on the assumption that brandings are still or very low-motion.
Which layer is used
The source is always the layer directly above this one in the layer list — which is the layer immediately behind it in the composite. The same layer under either description. Its name is shown in Source layer.
There is no picker, deliberately. A keyed subject wants the plate it is standing in front of, and that is the layer above. Offering a choice meant another control, a combo box to keep refreshed, and a stored reference to a layer that could be deleted or copied into a different scene. Naming the layer answers the only question the picker was really being used to answer.
Two limits are worth knowing:
- The background is one layer, not the composite of everything behind. If your background is built from several layers, match against the one that dominates the frame, or consolidate them first.
- The background layer's picture is taken before the compositor positions, scales and rotates it. So the match is exact when both layers are full-frame and untransformed — the ordinary case. A background at a different resolution is scaled to fit automatically, but a background that is moved or scaled in the composite will not line up with the foreground, and the light wrap will draw the wrong colours at the edges. Match against an untransformed plate.
If the chosen layer is hidden, or at zero opacity, the operator passes the picture through untouched and says so in its status line rather than matching against a frame that is no longer on screen.
Put it last in the chain
Place Background Match after the keyer and after spill suppression.
It measures the foreground's levels over the matted region only — pixels whose coverage is above half — so it needs a matte that is already final. An operator placed after it that changes coverage would invalidate the measurement this one made, and the light wrap would put its spill along an edge that has since moved.
Output
Output lets you look at any single stage of the operator instead of the finished picture — every intermediate buffer it actually uses, not a reconstruction. It sits with the background controls, because most of what it shows is the background at some stage of processing.
- Final — matched and wrapped.
- Matched only — the levels match with no light wrap, so you can judge the colour on its own.
- Wrap contribution — the edge spill alone, opaque on black. It is deliberately opaque: carrying the foreground's own alpha would let the background show through the transparent surround, and the background is the very thing the spill is sampled from, so you would be judging the view against a copy of its own source.
- Wrap mask — the region the spill is confined to, as a matte. Deliberately independent of wrap Amount, so you can judge how far Size reaches in even with the effect turned right down.
- Light probe — the blurred background the wrap samples its light from. Worth knowing: this is the view that reveals a stale sample. If you have just changed the picture behind and the timer has not come round yet, the final composite will look plausible while the probe still shows the old background — press Refresh, or watch the counter.
- Background — the background layer exactly as this operator reads it, after any scaling. Use it to confirm you are matching against the layer you meant, and that it lines up with the foreground.
Each of these renders even when its own Amount is at zero, so a flat or empty view means "this stage is contributing nothing", not "the operator is broken".
A note on precision
Every image surface in Composer is 8-bit, and a levels stretch is precisely the operation that shows banding in 8 bits. The lift and the gain are therefore applied in a single pass so that no intermediate result is ever written out and read back. On an extreme correction — a very dark foreground lifted a long way into a bright hazy plate — some banding in the shadows is still possible, and that is a limit of the pipeline's bit depth rather than of the match.
Background Match - Settings
Properties marked (
Components) or (AudioMixer) broadcast a livePropertyChangedevent to clients subscribed to that WebSocket channel.

| Property | Description |
|---|---|
Show advanced options |
Reveals the per-channel strengths of the levels match - Black Level, Mid Level and White Level. Leave it off for ordinary use: Amount alone is enough, and the three defaults are chosen so that the match does the right thing without them. Turn it on to bias the match toward one end of the range or to dial the mid-tone cast up and down. [default = No] |
Background
Background
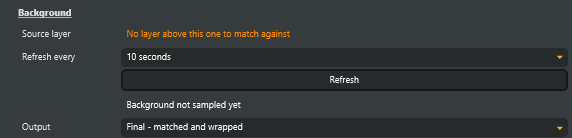
| Property | Description |
|---|---|
Source layer |
Which layer the operator is matching against. Read-only: the source is always the layer DIRECTLY ABOVE this one in the layer list, which is the layer immediately behind it in the composite - the same layer under either description. |
Refresh every (Components) |
How often the background is re-measured and its light probe re-blurred. |
Refresh |
Re-measure the background and rebuild its light probe now, without waiting for the next scheduled refresh. Useful when you have just changed the picture behind and want to see the match update against it straight away. |
RefreshMessage |
How long ago the background was last sampled. Counts up to the refresh interval and then resets, so it doubles as a sign that sampling is actually running. |
Output (Components) |
Which stage of the operator to hand back instead of the finished picture. Every intermediate buffer the operator actually uses can be shown on its own - for setting the effect up, for diagnosing it, and so that a test can assert on one stage rather than on a composite in which anything could be responsible for a difference. |
Light Wrap
Light Wrap

| Property | Description |
|---|---|
Amount (Components) |
Strength of the light wrap. 0 turns it off and costs nothing. |
WrapMaskMessage |
Whether a light wrap is being applied, and where its mask comes from. |
Match Background
Match Background
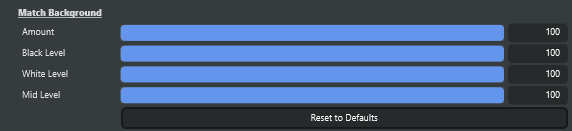
| Property | Description |
|---|---|
Amount (Components) |
Strength of the whole levels match. 0 turns it off and skips both measurement passes. Defaults to off because it is a large colour change and should not happen unannounced the moment the operator is added to a layer. [default = 0] |
Black Level (Components) |
(advanced) How much of the background's black point to take. This is the atmospheric half of the match - lifting and tinting the shadows is what puts a subject into haze - and it is safe at full strength. [default = 100] |
White Level (Components) |
(advanced) How much of the background's white point to take. This is the end that crushes or blows out the highlights, so it usually wants far less than the black point. [default = 33] |
Mid Level (Components) |
(advanced) How much of the background's mid-tone colour to take. This is usually the control that does the work. |
Reset to Defaults |
Return every setting to its default. |
Inherits from: AbstractOperator, AbstractAudioMetering, NamedModel.
See also: Background Match in Script Engine Objects.