

Render Tuning
Render Tuning automatically pauses every input that no active scene is currently using, so Composer spends CPU and GPU time only on the sources that actually reach an output. Inputs it has paused are shown dimmed in the Inputs list, so you can see at a glance which ones are idle.
The toggle lives in the Project Options panel in Composer Desktop — see Performance and project options for the surface-level UI walkthrough. This page covers when to use it, the rules it follows, the per-input override, and the on-disk representation in the .prj file.
When to use it
Render Tuning pays off in any project where not every connected source is on air at the same time. A typical multi-camera show has every camera, replay feed, graphics source and media file connected, but only the ones in the current shot appear in the output. Without Render Tuning, Composer processes all of them on every frame whether they are seen or not. With it, the cameras and other sources that are not in the current shot stop costing anything until they are cut back in.
The more sources a project has, and the fewer of them are in use at any one moment, the bigger the saving. It is often the single biggest free performance gain in a project with a long input list, and it pairs naturally with the Batch Processor for projects that preload many sources.
For the full effect, turn Show video preview off on a production host. While it is on, the scene in the preview counts as active, so its inputs keep running even if no target uses it.
It gains nothing when every input is always in use — for example a single scene that shows all its cameras at once in a multiview — because nothing is ever idle.
Which scenes are kept running
Render Tuning looks at every scene and decides whether it is active. A scene is active when at least one of these is true:
- It has a target that is not stopped. A scene with a running target is always rendered, because its output is going somewhere. A target that is still connecting (for example an RTMP or SRT target mid-handshake) counts too. When every target on a scene is stopped, the scene is no longer kept running — there is nothing consuming its output.
- It is the scene shown in the Composer Desktop preview, with Show video preview on (the yellow eye icon next to the active scene name). While the application is locked with Lock Application…, the previewed scene keeps counting even though the preview is off, so the project keeps playing normally behind the lock screen.
Composer Runtime has no preview, so in Runtime only targets keep a scene running. A scene with no running target renders nothing, and its inputs are paused.
These scenes are never active, whatever their targets:
- a scene with Disable render ticked,
- an empty scene, with nothing in it to render,
- the internal Live Preview scene — which is why Render Tuning and Live Preview cannot be used together (see the callout below).
Which inputs are kept running
Inside an active scene, an input keeps running when:
- it is on a layer that is visible with opacity above 0, or on a layer whose audio is audible,
- it is a source of a
Switcherthat is itself in use — every source the switcher can cut to stays warm, so a cut lands immediately, or - it is on a nested scene whose layer is visible or audible. Nested scenes are followed to any depth.
Every other input is paused. An active scene does not keep all of its layers running: a layer that is hidden, at opacity 0 and not audible does not keep its input alive, even in a scene with a running target.
Render Tuning follows only layers and switchers. An input that is used some other way and is not also on a visible or audible layer is paused. For example, a microphone chosen as the Sidechain source of a Sidechain Ducking operator stops delivering sound when paused, so the ducking never triggers. Put such an input on an audible layer, or set it to Manual Configuration (below).
What a paused input stops doing
A paused input stops producing both picture and sound. Its per-frame processing is skipped, it sends no audio to the scene or the mixer, and its audio meters drop to silence.
Render Tuning recalculates once per video frame. An input that stops being used is paused on the next frame, and one that becomes used again is back on the next frame — cutting a camera in does not wait for a warm-up. Sources that take time to reconnect when they start (some network sources) are the exception worth planning for: use Manual Configuration to keep them running while they are off air.
Checking what it is doing
Paused inputs are dimmed in the Inputs list:
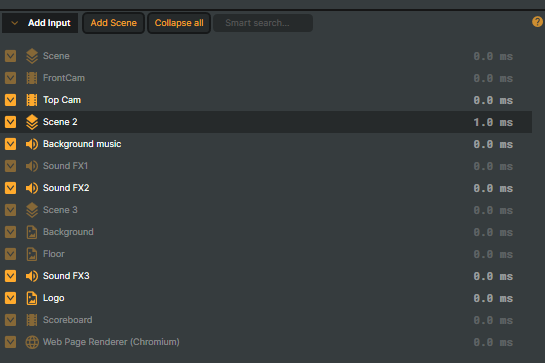
With Render Tuning on, the Hide not rendered checkbox above the list hides them, leaving only the inputs that are running — see Hide not rendered.
The performance report states whether Render Tuning is active, how many inputs it is currently not rendering and how many are set to manual control.
An input that looks frozen or silent while Render Tuning is on is almost always paused because no active scene uses it. Check that its layer is visible, above 0 opacity or audible, and that the scene it is in has a running target or is the previewed scene. Turning Show video preview off also releases the previewed scene, so its inputs pause unless a running target still uses them.
Per-input override
Each input has a Do not render input controller (under Render Options when Show advanced options is enabled) that decides whether Render Tuning is allowed to manage that input:
- Let Composer decide (the default) — the input is governed by the per-frame pass above. This is what almost every input should be set to.
- Manual Configuration — the input opts out of the pass entirely. Render Tuning never touches its
DoNotRenderInputflag; the toggle next to the controller wins. Use this for a slow-to-warm network source you want to keep alive even when off-air, or to take a heavy input down by hand regardless of scene activity.
When you turn Render Tuning off at the project level, every Let Composer decide input is immediately re-enabled (DoNotRenderInput = false); Manual Configuration inputs keep whatever value they had.
Setting name in the project file
Render Tuning is a project-level setting and lives inside the .prj file as the XML element <UseOptimizedRenderer> — the on-disk name predates the user-facing Render Tuning label, but they refer to the same flag. A project with Render Tuning enabled saves as:
<Project>
  ...
  <UseOptimizedRenderer>True</UseOptimizedRenderer>
  ...
</Project>
The same name is used by the HTTP API /api/project/setproperty endpoint and the Composer Runtime project-property surface, so a script or remote-control client toggles the flag with /api/project/setproperty?property=UseOptimizedRenderer&value=True (or False). Diff-checking a project file across edits, or grepping a fleet of .prj files to audit which projects have Render Tuning on, is a matter of looking for <UseOptimizedRenderer>True</UseOptimizedRenderer>.
The setting is not in settings.xml — settings.xml only carries the UI panel's collapsed / expanded state (IsExpandedPanelRenderTuning), not the feature toggle itself. Render Tuning travels with the project, so the same .prj loaded by Composer Desktop on one host and by Composer Runtime on another both honour the same value.
Live Preview compatibility
Render Tuning and Live Preview cannot run together. Turning Render Tuning on stops a running Live Preview, and the Live Preview Start button stays disabled until Render Tuning is turned off again. Pick one for any given session. (Render Tuning never counts the Live Preview's internal scene as active, so the inputs Live Preview shows would be paused.)